Panasonic PTDS8500U PTDS8500U User Guide - Page 19
JCONTROL PANEL JTerminals on side, Preparation
 |
UPC - 885170010994
View all Panasonic PTDS8500U manuals
Add to My Manuals
Save this manual to your list of manuals |
Page 19 highlights
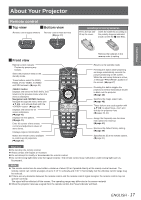
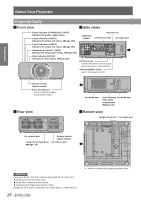
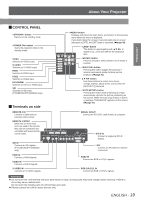
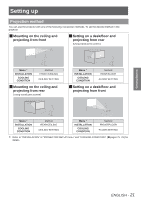
About Your Projector Preparation JJCONTROL PANEL button Returns to the standby mode. button Starts the projection while in the standby mode. VIDEO Switches to VIDEO input. S-VIDEO Switches to S-VIDEO input. RGB1 Switches to RGB1 input. RGB2 Switches to RGB2 input. DVI-D/HDMI Switches to DVI-D or HDMI input. SDI Switches to SDI input. (PT-DZ8700U/PT-DS8500U only) JJTerminals on side button Displays and clears the main menu, and returns to the previous menu when the menu is displayed. If you hold it down for at least 3 seconds while the on-screen indication is [OFF], the [OFF] state is canceled. (Æpage 49) button This button is used together with to adjust focus, zoom and shift by the projection lens. button Press to activate a menu selection or to initiate a function. button Pressing this button toggles the projector's internal mechanical shutter to black out the projector. (Æpage 46) button Use these buttons to select menu items, change settings, adjust levels, and to enter the [SECURITY] password. button Pressing this button while projecting an image automatically corrects the picture positioning on the screen. While the auto setup feature is active, a message "PROGRESS" appears on the screen. (Æpage 47) REMOTE 2 IN Connect a cable from an external control circuit. REMOTE 1 IN/OUT When two or more main units are used in the system, they can be connected and controlled with wired remote control cable. SDI IN Connect an SDI signals. (PT-DZ8700U/PT-DS8500U only) HDMI IN Connect a HDMI signals. VIDEO IN Connect a VIDEO signals. S-VIDEO IN Connect an S-VIDEO signals. SERIAL IN/OUT Connect an RS-232C cable from/to a computer. DVI-D IN Connect a single link DVI-D signals. LAN Connect a LAN cable for network connection. RGB2 IN Connect an RGB or YPBPR signals. RGB (YPBPR)1 IN Connect an RGB or YPBPR signals. Attention zzDo not touch the LAN terminal with your bare hands or body, as body parts may have charged static electricity. Failure to do so may cause malfunctions. Do not touch the metallic parts of LAN terminal and cable. zzPlease connect the LAN to indoor devices only. ENGLISH - 19
-
 1
1 -
2
-
3
-
4
-
5
-
6
-
7
-
8
-
9
-
10
-
11
-
12
-
13
-
 14
14 -
 15
15 -
 16
16 -
 17
17 -
 18
18 -
 19
19 -
 20
20 -
 21
21 -
 22
22 -
 23
23 -
 24
24 -
25
-
26
-
27
-
28
-
29
-
30
-
31
-
32
-
33
-
34
-
35
-
36
-
37
-
38
-
39
-
40
-
41
-
42
-
43
-
44
-
45
-
46
-
47
-
48
-
49
-
50
-
51
-
52
-
53
-
54
-
55
-
56
-
57
-
58
-
59
-
60
-
61
-
62
-
63
-
64
-
65
-
66
-
67
-
68
-
69
-
70
-
71
-
72
-
73
-
74
-
75
-
76
-
77
-
78
-
79
-
80
-
81
-
82
-
83
-
84
-
85
-
86
-
87
-
88
-
89
-
90
-
91
-
92
-
93
-
94
-
95
-
96
-
97
-
98
-
99
-
100
-
101
-
102
-
103
-
104
-
105
-
106
-
107
-
108
-
109
-
110
-
111
-
112
-
113
-
114
-
115
-
116
-
117
-
118
-
119
-
120
-
121
-
122
-
123
-
124
-
125
-
126
-
127
-
128
-
129
 |
 |
