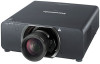
Panasonic PTDS8500U PTDS8500U User Guide - Page 54
COLOR TEMPERATURE, To further adjust toward the, desired white balance, Changing the name of [USER 1]
 |
UPC - 885170010994
View all Panasonic PTDS8500U manuals
Add to My Manuals
Save this manual to your list of manuals |
Page 54 highlights
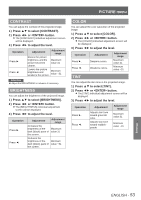
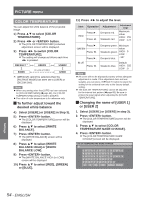
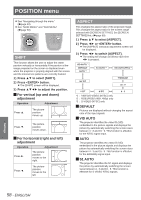
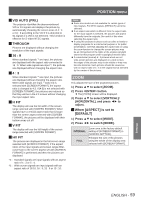
PICTURE menu COLOR TEMPERATURE You can adjust the white balance of the projected image. 1111 Press ▲▼ to select [COLOR TEMPERATURE]. 2222 Press ◄► or button. zzThe [COLOR TEMPERATURE] individual adjustment screen will be displayed. 3333 Press ◄► to switch [COLOR TEMPERATURE]. zzThe setting will change as follows each time ◄► is pressed. DEFAULT Û USER1 USER2 9300K (in units of 100K) 3200K ½½½ [DEFAULT] cannot be selected when the [PICTRUE MODE] has been set to [USER] or [DICOM SIM.]. Note zzWhen any setting other than [OFF] has been selected for [COLOR MATCHING] (Æpage 68), the [COLOR TEMPERATURE] setting is fixed to [USER1]. zzThe value of color temperature is for reference only. JJTo further adjust toward the desired white balance 4444 Select [USER1] or [USER2] in Step 3). 5555 Press button. zzThe [COLOR TEMPERATURE] screen will be displayed. 6666 Press ▲▼ to select [WHITE BALANCE]. 7777 Press button. zzThe [WHITE BALANCE] screen will be displayed. 8888 Press ▲▼ to select [WHITE BALANCE HIGH] or [WHITE BALANCE LOW]. 9999 Press button. zzThe [WHITE BALANCE HIGH (or LOW)] screen will be displayed. 11111Press ▲▼ to select [RED], [GREEN] or [BLUE]. 11111Press ◄► to adjust the level. Item RED Operation Adjustment Press ►. Deepens red. Press ◄. Weakens red. Adjustment range Maximum value HIGH : 255 LOW : 127 Press ►. GREEN Press ◄. Press ►. BLUE Press ◄. Deepens green. Minimum value Weakens green. HIGH : 0 LOW : Deepens blue. -127 Default Weakens blue. HIGH : 255 LOW : 0 Note zzAll colors will not be displayed properly unless adequate adjustment is made. If the adjustment does not look suitable, you can press button to return the setting for the selected item only to the factory default setting. zzThe [COLOR TEMPERATURE] cannot be adjusted for the internal test pattern (Æpage 88). Be sure to project the input signal when adjusting the [COLOR TEMPERATURE]. JJChanging the name of [USER 1] or [USER 2] 111 Select [USER1] or [USER2] in step 3). 222 Press button. zzThe [COLOR TEMPERATURE] screen will be displayed. 333 Press ▲▼ to select [COLOR TEMPERATURE NAME CHANGE]. 444 Press button. zzThe [COLOR TEMPERATURE NAME CHANGE] screen will be displayed. COLOR TEMPERATURE NAME CHANGE Settings 54 - ENGLISH
-
 1
1 -
2
-
3
-
4
-
5
-
6
-
7
-
8
-
9
-
10
-
11
-
12
-
13
-
14
-
15
-
16
-
17
-
18
-
19
-
20
-
21
-
22
-
23
-
24
-
25
-
26
-
27
-
28
-
29
-
30
-
31
-
32
-
33
-
34
-
35
-
36
-
37
-
38
-
39
-
40
-
41
-
42
-
43
-
44
-
45
-
46
-
47
-
48
-
 49
49 -
 50
50 -
 51
51 -
 52
52 -
 53
53 -
 54
54 -
 55
55 -
 56
56 -
 57
57 -
 58
58 -
 59
59 -
60
-
61
-
62
-
63
-
64
-
65
-
66
-
67
-
68
-
69
-
70
-
71
-
72
-
73
-
74
-
75
-
76
-
77
-
78
-
79
-
80
-
81
-
82
-
83
-
84
-
85
-
86
-
87
-
88
-
89
-
90
-
91
-
92
-
93
-
94
-
95
-
96
-
97
-
98
-
99
-
100
-
101
-
102
-
103
-
104
-
105
-
106
-
107
-
108
-
109
-
110
-
111
-
112
-
113
-
114
-
115
-
116
-
117
-
118
-
119
-
120
-
121
-
122
-
123
-
124
-
125
-
126
-
127
-
128
-
129
 |
 |
