Panasonic PTDS8500U PTDS8500U User Guide - Page 49
Settings, Menu Navigation, Navigating through the menu
 |
UPC - 885170010994
View all Panasonic PTDS8500U manuals
Add to My Manuals
Save this manual to your list of manuals |
Page 49 highlights
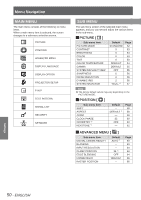
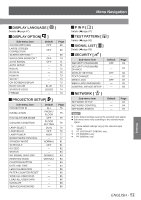
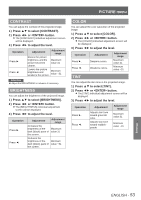
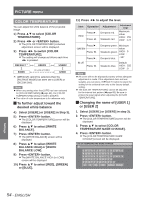
Menu Navigation Menus are extensively used for configuring, adjusting or reconfiguring the projector. Navigating through the menu JJOperating procedure 1111 Press button. [MAIN MENU] appears on the screen. MAIN MENU PICTURE POSITION ADVANCED MENU DISPLAY LANGUAGE DISPLAY OPTION PROJECTOR SETUP P IN P TEST PATTERN SIGNAL LIST SECURITY NETWORK MENU SELECT ENTER SUB MENU 2222 Press ▲▼ to select the desired item. The selected item is highlighted in orange. MAIN MENU PICTURE POSITION ADVANCED MENU DISPLAY LANGUAGE DISPLAY OPTION PROJECTOR SETUP P IN P TEST PATTERN SIGNAL LIST SECURITY NETWORK MENU SELECT ENTER SUB MENU 4444 Press ▲▼ button to highlight the desired adjustment item, then press ◄► to change or adjust the parameter value. For some items, an individual adjustment screen containing a bar scale will appear as shown in the diagram below when ◄► is pressed. CONTRAST 0 ADJUST Note zzPress button to return to the previous menu. zzSome menu items may not be valid for certain signal formats applied to the projector. The menu items that cannot be adjusted or used are shown in gray characters, and they cannot be selected. zzIf no button is pressed for approx. 5 seconds while the individual adjustment screen is displayed, the screen will return to the previous page. JJResetting to the factory default If an adjustment item is selected and button is pressed, the adjustment value will return to the factory default setting. Press 3333 Press button to establish your selection. The submenu for the selected option will now open. POSITION SHIFT ASPECT ZOOM CLOCK PHASE GEOMETRY DEFAULT 0 OFF MENU SELECT ENTER SUB MENU CONTRAST 0 ADJUST Note zzYou cannot reset all the settings at a time to the factory default settings. To reset all the settings to the factory defaults, refer to "INITIALIZE" of "PROJECTOR SETUP menu" (Æ 86 page). zzSome menu items are not available to reset by pressing button. Adjust each menu item manually. zzThe triangle mark under the bar indicates factory default setting and the square indicates the current setting. The triangle mark position varies by the selected input signals. Current setting Default setting Settings ENGLISH - 49
-
 1
1 -
2
-
3
-
4
-
5
-
6
-
7
-
8
-
9
-
10
-
11
-
12
-
13
-
14
-
15
-
16
-
17
-
18
-
19
-
20
-
21
-
22
-
23
-
24
-
25
-
26
-
27
-
28
-
29
-
30
-
31
-
32
-
33
-
34
-
35
-
36
-
37
-
38
-
39
-
40
-
41
-
42
-
43
-
 44
44 -
 45
45 -
 46
46 -
 47
47 -
 48
48 -
 49
49 -
 50
50 -
 51
51 -
 52
52 -
 53
53 -
 54
54 -
55
-
56
-
57
-
58
-
59
-
60
-
61
-
62
-
63
-
64
-
65
-
66
-
67
-
68
-
69
-
70
-
71
-
72
-
73
-
74
-
75
-
76
-
77
-
78
-
79
-
80
-
81
-
82
-
83
-
84
-
85
-
86
-
87
-
88
-
89
-
90
-
91
-
92
-
93
-
94
-
95
-
96
-
97
-
98
-
99
-
100
-
101
-
102
-
103
-
104
-
105
-
106
-
107
-
108
-
109
-
110
-
111
-
112
-
113
-
114
-
115
-
116
-
117
-
118
-
119
-
120
-
121
-
122
-
123
-
124
-
125
-
126
-
127
-
128
-
129
 |
 |
