Panasonic PTDS8500U PTDS8500U User Guide - Page 70
WAVEFORM MONITOR (PT-DZ8700 only), Adjust the waveform
 |
UPC - 885170010994
View all Panasonic PTDS8500U manuals
Add to My Manuals
Save this manual to your list of manuals |
Page 70 highlights
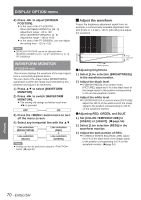
Signal level Settings DISPLAY OPTION menu 4444 Press ◄► to adjust [SCREEN POSITION]. zzIn the case of the PT-DZ8700U : When [SCREEN FORMAT] is [16 : 9] Adjustment range: -60 to +60 When [SCREEN FORMAT] is [4 : 3] Adjustment range: -160 to +160 zzIn the case of the PT-DS8500U, you can adjust the setting from -132 to +131. Note zz[SCREEN POSITION] cannot be adjusted when [SCREEN FORMAT] is [16 : 10] (PT-DZ8700U) or [4 : 3] (PT-DS8500U). WAVEFORM MONITOR (PT-DZ8700 only) This function displays the waveform of the input signal from a connected peripheral device. You can check if the image output (BRIGHTNESS) signal level is within the range recommended by this projector and adjust it as necessary. 1111 Press ▲▼ to select [WAVEFORM MONITOR]. 2222 Press ◄► to switch [WAVEFORM MONITOR]. zzThe setting will change as follows each time ◄► is pressed. OFF ON 3333 Press the button twice to turn off the menu screen. 4444 Select any horizontal line with the ▲▼. Line selection (BRIGHTNRSS) Line selection (RED) Line selection (BLUE) Line selection (GREEN) Note zzSetting can also be performed using the button. (Æpage 84) JJAdjust the waveform Project the brightness adjustment signal from, for example, a commercially available adjustment disc (0% [0 IRE or 7.5 IRE] - 100 % [100 IRE]) and adjust the waveform. 100% 50% 0% Image displayable area Monitor position QQAdjusting brightness 1111 Select [Line selection (BRIGHTNRSS)] in the waveform monitor. 2222 Adjust the black level. zzIn [BRIGHTNESS] of on-screen menu [PICTURE], adjust the 0 % of the black level of the image signal to the position corresponding to 0% on the waveform monitor. 3333 Adjust the white level. zzIn [CONTRAST] of on-screen menu [PICTURE], adjust the 100 % of the while level of the image signal to the position corresponding to 100 % on the waveform monitor. QQAdjusting RED, GREEN, and BLUE 1111 Set [COLOR TEMPERATURE] to [USER1] or [USER2]. (Æpage 54) 2222 Select [Line selection (RED)] in the waveform monitor. 3333 Adjust the dark portion of RED. zzIn [RED] of [WHITE BALANCE LOW], adjust the 0 % of the black level of the image signal to the position corresponding to 0 % on the waveform monitor. (Æpage 54) 70 - ENGLISH
-
 1
1 -
2
-
3
-
4
-
5
-
6
-
7
-
8
-
9
-
10
-
11
-
12
-
13
-
14
-
15
-
16
-
17
-
18
-
19
-
20
-
21
-
22
-
23
-
24
-
25
-
26
-
27
-
28
-
29
-
30
-
31
-
32
-
33
-
34
-
35
-
36
-
37
-
38
-
39
-
40
-
41
-
42
-
43
-
44
-
45
-
46
-
47
-
48
-
49
-
50
-
51
-
52
-
53
-
54
-
55
-
56
-
57
-
58
-
59
-
60
-
61
-
62
-
63
-
64
-
 65
65 -
 66
66 -
 67
67 -
 68
68 -
 69
69 -
 70
70 -
 71
71 -
 72
72 -
 73
73 -
 74
74 -
 75
75 -
76
-
77
-
78
-
79
-
80
-
81
-
82
-
83
-
84
-
85
-
86
-
87
-
88
-
89
-
90
-
91
-
92
-
93
-
94
-
95
-
96
-
97
-
98
-
99
-
100
-
101
-
102
-
103
-
104
-
105
-
106
-
107
-
108
-
109
-
110
-
111
-
112
-
113
-
114
-
115
-
116
-
117
-
118
-
119
-
120
-
121
-
122
-
123
-
124
-
125
-
126
-
127
-
128
-
129
 |
 |
