Pioneer DEH-P9800BT Owner's Manual - Page 14
Before You Start - remote
 |
UPC - 012562793962
View all Pioneer DEH-P9800BT manuals
Add to My Manuals
Save this manual to your list of manuals |
Page 14 highlights
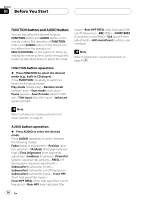
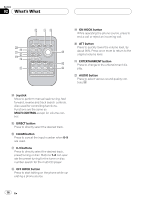
Section 01 Before You Start FUNCTION button and AUDIO button You can also select the desired mode by FUNCTION button and AUDIO button on the remote control. But operation of FUNCTION button and AUDIO button on the remote control differs from the operation of MULTI-CONTROL on the head unit. When operating the remote control, switch through the modes as described below to select the mode. slope)-Rear HPF FREQ. (rear high pass filter cut-off frequency)-BBE (BBE)-COMP/BMX (Compression and BMX)-SLA (source level adjustment)-AUI sound level (auditory user interface) Note Refer to Introduction of audio adjustments on page 80. FUNCTION button operation % Press FUNCTION to select the desired mode (e.g., built-in CD player). Press FUNCTION repeatedly to switch between the following modes: Play mode (repeat play)-Random mode (random play)-Scan mode (scan play)- Pause (pause)-Search mode (search method)-Title Input (disc title input)-Jacket art (jacket art read) Note Refer to Introduction of advanced built-in CD player operation on page 23. AUDIO button operation % Press AUDIO to select the desired mode. Press AUDIO repeatedly to switch between the following modes: Fader (balance adjustment)-Position (position selector)-TA Mode (time alignment setting)-Time Alignment (time alignment adjusting)-Loudness (loudness)-Powerful (graphic equalizer adjustment)-FREQ. (16band graphic equalizer adjustment)- Subwoofer1 (subwoofer on/off)- Subwoofer2 (subwoofer cut-off frequency)- Subwoofer3 (subwoofer slope)-Front HPF (front high pass filter slope)- Front HPF FREQ. (front high pass filter cut-off frequency)-Rear HPF (rear high pass filter 14 En
-
 1
1 -
2
-
3
-
4
-
5
-
6
-
7
-
8
-
 9
9 -
 10
10 -
 11
11 -
 12
12 -
 13
13 -
 14
14 -
 15
15 -
 16
16 -
 17
17 -
 18
18 -
 19
19 -
20
-
21
-
22
-
23
-
24
-
25
-
26
-
27
-
28
-
29
-
30
-
31
-
32
-
33
-
34
-
35
-
36
-
37
-
38
-
39
-
40
-
41
-
42
-
43
-
44
-
45
-
46
-
47
-
48
-
49
-
50
-
51
-
52
-
53
-
54
-
55
-
56
-
57
-
58
-
59
-
60
-
61
-
62
-
63
-
64
-
65
-
66
-
67
-
68
-
69
-
70
-
71
-
72
-
73
-
74
-
75
-
76
-
77
-
78
-
79
-
80
-
81
-
82
-
83
-
84
-
85
-
86
-
87
-
88
-
89
-
90
-
91
-
92
-
93
-
94
-
95
-
96
-
97
-
98
-
99
-
100
-
101
-
102
-
103
-
104
-
105
-
106
-
107
-
108
-
109
-
110
-
111
-
112
-
113
-
114
-
115
-
116
-
117
-
118
-
119
-
120
-
121
-
122
-
123
-
124
-
125
-
126
-
127
-
128
-
129
-
130
-
131
-
132
-
133
-
134
-
135
-
136
-
137
-
138
-
139
-
140
-
141
-
142
-
143
-
144
-
145
-
146
-
147
-
148
-
149
-
150
-
151
-
152
-
153
-
154
-
155
-
156
-
157
-
158
-
159
-
160
-
161
-
162
-
163
-
164
-
165
-
166
-
167
-
168
-
169
-
170
-
171
-
172
-
173
-
174
-
175
-
176
-
177
-
178
-
179
-
180
-
181
-
182
-
183
-
184
-
185
-
186
-
187
-
188
-
189
-
190
-
191
-
192
-
193
-
194
-
195
-
196
-
197
-
198
-
199
-
200
-
201
-
202
-
203
-
204
-
205
-
206
-
207
-
208
-
209
-
210
-
211
-
212
-
213
-
214
-
215
-
216
-
217
-
218
-
219
-
220
-
221
 |
 |