Pioneer DEH-P9800BT Owner's Manual - Page 81
Using the position selector, Using balance adjustment, Audio Adjustments - aux
 |
UPC - 012562793962
View all Pioneer DEH-P9800BT manuals
Add to My Manuals
Save this manual to your list of manuals |
Page 81 highlights
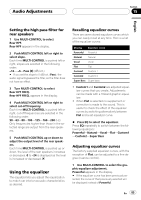
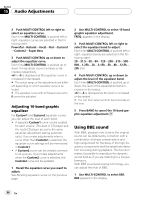
Audio Adjustments Section 15 English Fader (balance adjustment)-Position (position selector)-TA Mode (time alignment setting)-Time Alignment (time alignment adjusting)-Loudness (loudness)-Powerful (graphic equalizer adjustment)-FREQ. (16band graphic equalizer adjustment)- Subwoofer1 (subwoofer on/off)- Subwoofer2 (subwoofer cut-off frequency)- Subwoofer3 (subwoofer slope)-Front HPF (front high pass filter slope)- Front HPF FREQ. (front high pass filter cut-off frequency)-Rear HPF (rear high pass filter slope)-Rear HPF FREQ. (rear high pass filter cut-off frequency)-BBE (BBE)-COMP/BMX (Compression and BMX)-SLA (source level adjustment)-AUI sound level (auditory user interface) # When selecting OFF in TA Mode, you cannot switch to Time Alignment. # You can select Subwoofer2 and Subwoofer3 only when subwoofer output is turned on in Subwoofer1. # When tuner, television or AUX is selected as a source, you cannot select COMP/BMX. # When selecting the FM tuner as the source, you cannot switch to SLA. # To return to the display of each source, press BAND. Note If you do not operate the audio function within about 30 seconds, the display is automatically returned to the source display. Using the position selector One way to assure a more natural sound is to clearly position the stereo image, putting you right in the center of the sound field. The position selector function lets you automatically adjust the speakers' output levels and inserts a delay time to match the number and position of occupied seats. 1 Use MULTI-CONTROL to select Position. Position appears in the display. 2 Push MULTI-CONTROL left, right, up or down to select a listening position. Direction Display Position Left Front Left Front seat left Right Front Right Front seat right Up Front Front seats Down All All seats # To cancel the selected listening position, push MULTI-CONTROL in the same direction again. Using balance adjustment You can change the fader/balance setting so that it can provide you an ideal listening environment in all occupied seats. 1 Use MULTI-CONTROL to select Fader. Fader appears in the display. # If the balance setting has been previously adjusted, Balance will be displayed. 2 Push MULTI-CONTROL up or down to adjust front/rear speaker balance. Each time MULTI-CONTROL is pushed up or down, the front/rear speaker balance moves towards the front or rear. Front 25 to Rear 25 is displayed as the front/ rear speaker balance moves from front to rear. # Front/Rear 0 is the proper setting when only two speakers are used. 3 Push MULTI-CONTROL left or right to adjust left/right speaker balance. Each time MULTI-CONTROL is pushed left or right, the left/right speaker balance moves towards the left or right. En 81
-
 1
1 -
2
-
3
-
4
-
5
-
6
-
7
-
8
-
9
-
10
-
11
-
12
-
13
-
14
-
15
-
16
-
17
-
18
-
19
-
20
-
21
-
22
-
23
-
24
-
25
-
26
-
27
-
28
-
29
-
30
-
31
-
32
-
33
-
34
-
35
-
36
-
37
-
38
-
39
-
40
-
41
-
42
-
43
-
44
-
45
-
46
-
47
-
48
-
49
-
50
-
51
-
52
-
53
-
54
-
55
-
56
-
57
-
58
-
59
-
60
-
61
-
62
-
63
-
64
-
65
-
66
-
67
-
68
-
69
-
70
-
71
-
72
-
73
-
74
-
75
-
 76
76 -
 77
77 -
 78
78 -
 79
79 -
 80
80 -
 81
81 -
 82
82 -
 83
83 -
 84
84 -
 85
85 -
 86
86 -
87
-
88
-
89
-
90
-
91
-
92
-
93
-
94
-
95
-
96
-
97
-
98
-
99
-
100
-
101
-
102
-
103
-
104
-
105
-
106
-
107
-
108
-
109
-
110
-
111
-
112
-
113
-
114
-
115
-
116
-
117
-
118
-
119
-
120
-
121
-
122
-
123
-
124
-
125
-
126
-
127
-
128
-
129
-
130
-
131
-
132
-
133
-
134
-
135
-
136
-
137
-
138
-
139
-
140
-
141
-
142
-
143
-
144
-
145
-
146
-
147
-
148
-
149
-
150
-
151
-
152
-
153
-
154
-
155
-
156
-
157
-
158
-
159
-
160
-
161
-
162
-
163
-
164
-
165
-
166
-
167
-
168
-
169
-
170
-
171
-
172
-
173
-
174
-
175
-
176
-
177
-
178
-
179
-
180
-
181
-
182
-
183
-
184
-
185
-
186
-
187
-
188
-
189
-
190
-
191
-
192
-
193
-
194
-
195
-
196
-
197
-
198
-
199
-
200
-
201
-
202
-
203
-
204
-
205
-
206
-
207
-
208
-
209
-
210
-
211
-
212
-
213
-
214
-
215
-
216
-
217
-
218
-
219
-
220
-
221
 |
 |
