Pioneer PDP-434CMX Operating Instructions - Page 13
Remote control unit
 |
View all Pioneer PDP-434CMX manuals
Add to My Manuals
Save this manual to your list of manuals |
Page 13 highlights
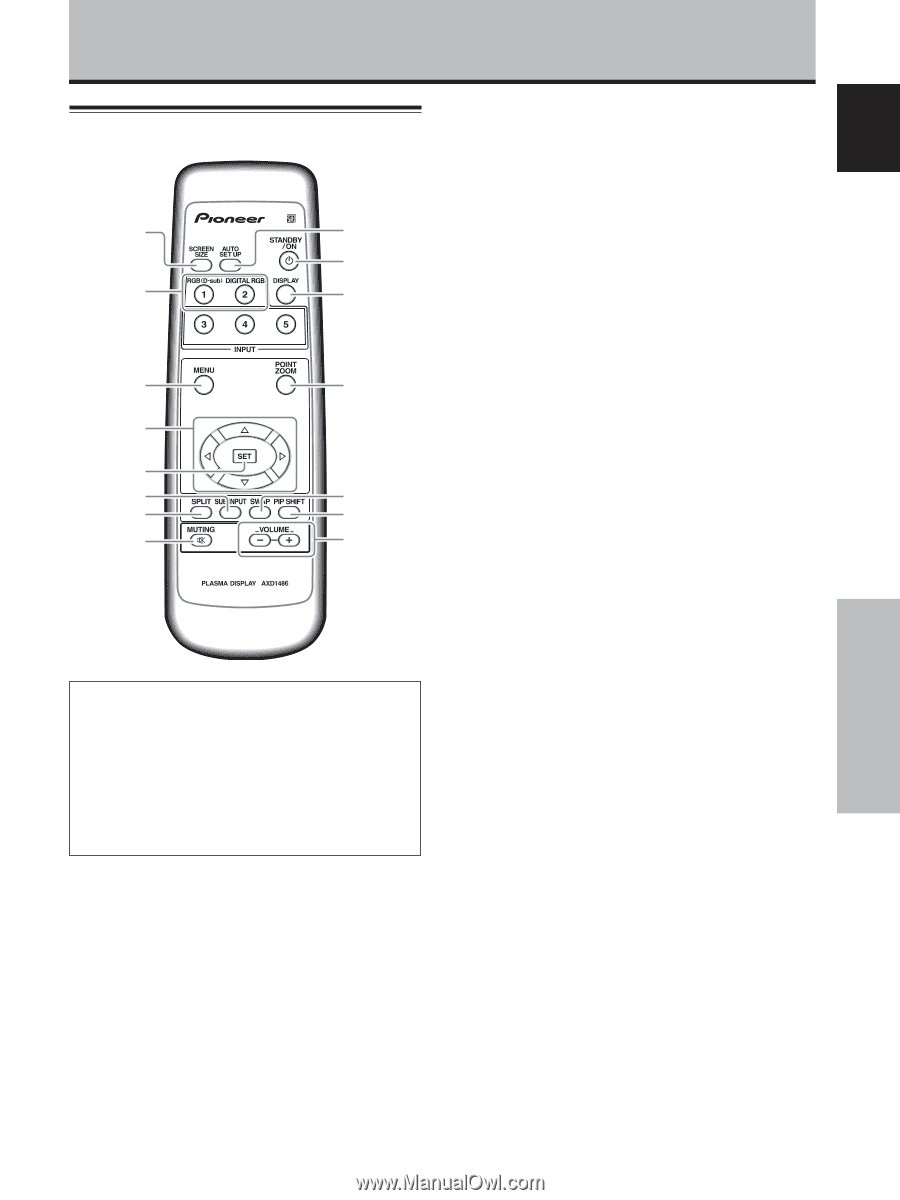
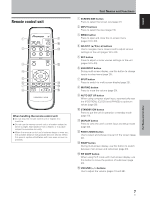
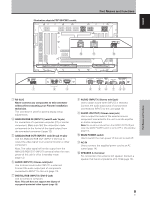
English Remote control unit 1 9 0 2 - 3 = 4 5 6 ~ 7 ! 8 @ When handling the remote control unit ¶ Do not drop the remote control unit or expose it to moisture. ¶ Do not use the remote control unit in a location subject to direct sunlight, heat radiation from a heater, or in a place subject to excessive humidity. ¶ When the remote control unit's batteries begin to wear out, the operable distance will gradually become shorter. When this occurs, replace all batteries with new ones as soon as possible. Part Names and Functions 1 SCREEN SIZE button Press to select the screen size (page 21). 2 INPUT buttons Press to select the input (page 19). 3 MENU button Press to open and close the on-screen menu (pages 16 to 33). 4 ADJUST (5/∞/3/2) buttons Use to navigate menu screens and to adjust various settings on the unit (pages 16 to 33). 5 SET button Press to adjust or enter various settings on the unit (pages 16 to 33). 6 SUB INPUT button During multi-screen display, use this button to change inputs to subscreens (page 23). 7 SPLIT button Press to switch to multi-screen display (page 23). 8 MUTING button Press to mute the volume (page 20). 9 AUTO SET UP button When using computer signal input, automatically sets the [POSITION], [CLOCK] and [PHASE] to optimum values (page 26). 0 STANDBY/ON button Press to put the unit in operation or standby mode (page 19). - DISPLAY button Press to view the unit's current input and setup mode (page 20). = POINT ZOOM button Use to select and enlarge one part of the screen (page 22). ~ SWAP button During multi-screen display, use this button to switch between main screen and subscreen (page 23). ! PIP SHIFT button When using PinP mode with multi-screen display, use this button to move the position of subscreen (page 23). @ VOLUME (+/-) buttons Use to adjust the volume (pages 19 and 20). Part Names and Functions 7 En
-
 1
1 -
2
-
3
-
4
-
5
-
6
-
7
-
 8
8 -
 9
9 -
 10
10 -
 11
11 -
 12
12 -
 13
13 -
 14
14 -
 15
15 -
 16
16 -
 17
17 -
 18
18 -
19
-
20
-
21
-
22
-
23
-
24
-
25
-
26
-
27
-
28
-
29
-
30
-
31
-
32
-
33
-
34
-
35
-
36
-
37
-
38
-
39
-
40
-
41
-
42
-
43
-
44
-
45
-
46
-
47
-
48
-
49
-
50
-
51
-
52
-
53
-
54
-
55
-
56
-
57
-
58
-
59
-
60
-
61
-
62
-
63
-
64
-
65
-
66
-
67
-
68
-
69
-
70
-
71
-
72
-
73
-
74
-
75
-
76
-
77
-
78
-
79
-
80
-
81
-
82
-
83
-
84
-
85
-
86
-
87
-
88
-
89
-
90
-
91
-
92
-
93
-
94
-
95
 |
 |