Pioneer VSX 1019AH-K Owner's Manual - Page 18
Connecting your equipment, Connecting the speakers - manual
 |
UPC - 012562954646
View all Pioneer VSX 1019AH-K manuals
Add to My Manuals
Save this manual to your list of manuals |
Page 18 highlights
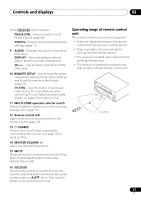
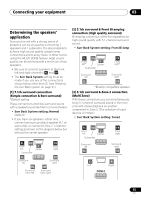
03 Connecting your equipment Connecting the speakers Each speaker connection on the receiver comprises a positive (+) and negative (-) terminal. Make sure to match these up with the terminals on the speakers themselves. CAUTION • These speaker terminals carry HAZARDOUS LIVE voltage. To prevent the risk of electric shock when connecting or disconnecting the speaker cables, disconnect the power cord before touching any uninsulated parts. • Make sure that all the bare speaker wire is twisted together and inserted fully into the speaker terminal. If any of the bare speaker wire touches the back panel it may cause the power to cut off as a safety measure. Bare wire connections 1 Twist exposed wire strands together. (fig. A) 2 Loosen terminal and insert exposed wire. (fig. B) 3 Tighten terminal. (fig. C) fig. A fig. B fig. C 10 mm (3/8 in.) Important • Please refer to the manual that came with your speakers for details on how to connect the other end of the speaker cables to your speakers. • Use an RCA cable to connect the subwoofer. It is not possible to connect using speaker cables. CAUTION • Make sure that all speakers are securely installed. This not only improves sound quality, but also reduces the risk of damage or injury resulting from speakers being knocked over or falling in the event of external shocks such as earthquakes. Banana plug connections If you want to use speaker cables terminated with banana plugs, screw the speaker terminal fully shut, then plug the banana plug into the end of the speaker terminal. 18 En
-
 1
1 -
2
-
3
-
4
-
5
-
6
-
7
-
8
-
9
-
10
-
11
-
12
-
 13
13 -
 14
14 -
 15
15 -
 16
16 -
 17
17 -
 18
18 -
 19
19 -
 20
20 -
 21
21 -
 22
22 -
 23
23 -
24
-
25
-
26
-
27
-
28
-
29
-
30
-
31
-
32
-
33
-
34
-
35
-
36
-
37
-
38
-
39
-
40
-
41
-
42
-
43
-
44
-
45
-
46
-
47
-
48
-
49
-
50
-
51
-
52
-
53
-
54
-
55
-
56
-
57
-
58
-
59
-
60
-
61
-
62
-
63
-
64
-
65
-
66
-
67
-
68
-
69
-
70
-
71
-
72
-
73
-
74
-
75
-
76
-
77
-
78
-
79
-
80
-
81
-
82
-
83
-
84
-
85
-
86
-
87
-
88
-
89
-
90
-
91
-
92
-
93
-
94
-
95
-
96
-
97
-
98
-
99
-
100
-
101
-
102
-
103
-
104
-
105
-
106
-
107
-
108
-
109
-
110
-
111
-
112
-
113
-
114
-
115
-
116
-
117
-
118
-
119
-
120
-
121
-
122
-
123
-
124
-
125
-
126
-
127
-
128
 |
 |
