Pioneer VSX 1019AH-K Owner's Manual - Page 93
The system and the other setup
 |
UPC - 012562954646
View all Pioneer VSX 1019AH-K manuals
Add to My Manuals
Save this manual to your list of manuals |
Page 93 highlights
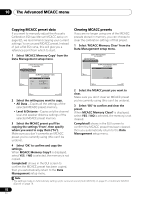
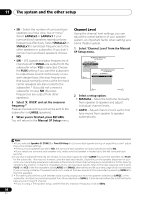
The system and the other setup 11 Chapter 11: The system and the other setup Making receiver settings from the System Setup menu The following section describes how to change the speaker-related settings manually and make various other settings (input selection, OSD language selection, etc.). 1 Switch on the receiver and your TV. Use the RECEIVER button to switch on.1 • If headphones are connected to the receiver, disconnect them. 2 Press RECEIVER , then press HOME MENU.2 A Graphical User Interface (GUI) screen appears on your TV. Use and ENTER to navigate through the screens and select menu items. Press RETURN to confirm and exit the current menu. • Press HOME MENU at any time to exit the HOME MENU. 3 Select 'System Setup' from the HOME MENU, then press ENTER. HOME MENU A/V RECEIVER 1. Advanced MCACC 2. MCACC Data Check 3. Data Management 4. System Setup 4 Select the setting you want to adjust. 4.System Setup A/V RECEIVER a.Manual SP Setup b. Input Setup c. OSD Language d. Other Setup Exit Return • Manual SP Setup - Sets the type of connection used for surround back terminals and the size, number distance and overall balance of the connected speakers (see Manual speaker setup on page 94). • Input Setup - Specifies what you've connected to the digital, HDMI and component video inputs (see The Input Setup menu on page 39). • OSD Language - The GUI screen's display language can be changed (see Changing the OSD display language (OSD Language) on page 36). • Other Setup - Makes customized settings to reflect how you are using the receiver (see The Other Setup menu on page 98). Exit Return Note 1 Make sure not to switch off the power when using the System Setup menu. 2 You can't use the HOME MENU when either the iPod/USB or SIRIUS Radio input function is selected or the headphones are connected. When you set ZONE 2 to ON (page 69), you can't use the HOME MENU. 93 En
-
 1
1 -
2
-
3
-
4
-
5
-
6
-
7
-
8
-
9
-
10
-
11
-
12
-
13
-
14
-
15
-
16
-
17
-
18
-
19
-
20
-
21
-
22
-
23
-
24
-
25
-
26
-
27
-
28
-
29
-
30
-
31
-
32
-
33
-
34
-
35
-
36
-
37
-
38
-
39
-
40
-
41
-
42
-
43
-
44
-
45
-
46
-
47
-
48
-
49
-
50
-
51
-
52
-
53
-
54
-
55
-
56
-
57
-
58
-
59
-
60
-
61
-
62
-
63
-
64
-
65
-
66
-
67
-
68
-
69
-
70
-
71
-
72
-
73
-
74
-
75
-
76
-
77
-
78
-
79
-
80
-
81
-
82
-
83
-
84
-
85
-
86
-
87
-
 88
88 -
 89
89 -
 90
90 -
 91
91 -
 92
92 -
 93
93 -
 94
94 -
 95
95 -
 96
96 -
 97
97 -
 98
98 -
99
-
100
-
101
-
102
-
103
-
104
-
105
-
106
-
107
-
108
-
109
-
110
-
111
-
112
-
113
-
114
-
115
-
116
-
117
-
118
-
119
-
120
-
121
-
122
-
123
-
124
-
125
-
126
-
127
-
128
 |
 |