Pioneer VSX 1019AH-K Owner's Manual - Page 38
Reverse Phase - amp error
 |
UPC - 012562954646
View all Pioneer VSX 1019AH-K manuals
Add to My Manuals
Save this manual to your list of manuals |
Page 38 highlights
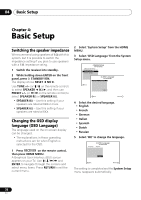
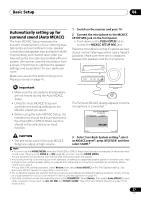
04 Basic Setup Select Normal (Surround back), Speaker B, Front Bi-Amp or ZONE 2 for the Surr Back System setting according to connections to the surround back speaker terminals. 4 Follow the instructions on-screen. Make sure the microphone is connected, and if you're using a subwoofer, make sure it is switched on and set to a comfortable volume level. 5 Wait for the test tones to finish, then confirm the speaker configuration in the GUI screen. A progress report is displayed on-screen while the receiver outputs test tones to determine the speakers present in your setup. Try to be as quiet as possible while it's doing this.1 If no operations are performed for 10 seconds while the speaker configuration check screen is being displayed, the Auto MCACC Setup will resume automatically. In this case, you don't need to select 'OK' and press ENTER in step 6. • With error messages (such as Too much ambient noise! or Check microphone.) select RETRY after checking for ambient noise (see Problems when using the Auto MCACC Setup below) and verifying the mic connection. If there doesn't seem to be a problem, you can simply select GO NEXT and continue. 1a.Full Auto MCACC A/V RECEIVER Now Analyzing... 2/10 Environment Check Ambient Noise : OK Microphone : Speaker YES/NO : 1a.Full Auto MCACC A/V RECEIVER Exit L : C : R : SR : SBR : SBL : SL : SW : 10 OK YES YES YES YES YES YES YES YES RETRY Cancel Exit Cancel The configuration shown on-screen should reflect the actual speakers you have. • If you see an ERR message (or the speaker configuration displayed isn't correct), there may be a problem with the speaker connection. If selecting RETRY doesn't work, turn off the power and check the speaker connections. If there doesn't seem to be a problem, you can simply use / to select the speaker and / to change the setting and continue. • If Reverse Phase is displayed, the speaker's wiring (+ and -) may be inverted. Check the speaker connections.2 If the connections were wrong, turn off the power, disconnect the power cable, then reconnect properly. After this, perform the Full Auto MCACC procedure again. 6 Make sure 'OK' is selected, then press ENTER. A progress report is displayed on-screen while the receiver outputs more test tones to determine the optimum receiver settings for Channel Level, Speaker Distance, Standing Wave and Acoustic Cal EQ. Again, try to be as quiet as possible while this is happening. It may take 3 to 10 minutes. Note 1 Do not adjust the volume during the test tones. This may result in incorrect speaker settings. 2 If the speaker is not pointed to the microphone (listening position) or when using speakers that affect the phase (dipole speakers, reflective speakers, etc.), Reverse Phase may be displayed even if the speakers are properly connected. If this happens, select GO NEXT and continue. 38 En
-
 1
1 -
2
-
3
-
4
-
5
-
6
-
7
-
8
-
9
-
10
-
11
-
12
-
13
-
14
-
15
-
16
-
17
-
18
-
19
-
20
-
21
-
22
-
23
-
24
-
25
-
26
-
27
-
28
-
29
-
30
-
31
-
32
-
 33
33 -
 34
34 -
 35
35 -
 36
36 -
 37
37 -
 38
38 -
 39
39 -
 40
40 -
 41
41 -
 42
42 -
 43
43 -
44
-
45
-
46
-
47
-
48
-
49
-
50
-
51
-
52
-
53
-
54
-
55
-
56
-
57
-
58
-
59
-
60
-
61
-
62
-
63
-
64
-
65
-
66
-
67
-
68
-
69
-
70
-
71
-
72
-
73
-
74
-
75
-
76
-
77
-
78
-
79
-
80
-
81
-
82
-
83
-
84
-
85
-
86
-
87
-
88
-
89
-
90
-
91
-
92
-
93
-
94
-
95
-
96
-
97
-
98
-
99
-
100
-
101
-
102
-
103
-
104
-
105
-
106
-
107
-
108
-
109
-
110
-
111
-
112
-
113
-
114
-
115
-
116
-
117
-
118
-
119
-
120
-
121
-
122
-
123
-
124
-
125
-
126
-
127
-
128
 |
 |
