Pioneer VSX 1019AH-K Owner's Manual - Page 78
The Advanced MCACC menu, Automatic MCACC Expert
 |
UPC - 012562954646
View all Pioneer VSX 1019AH-K manuals
Add to My Manuals
Save this manual to your list of manuals |
Page 78 highlights
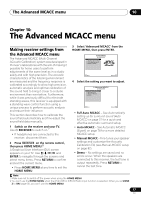
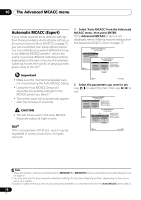
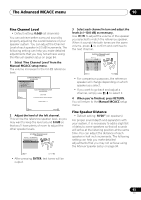
10 The Advanced MCACC menu Automatic MCACC (Expert) If your setup requires more detailed settings than those provided in Automatically setting up for surround sound (Auto MCACC) on page 37, you can customize your setup options below. You can calibrate your system differently for up to six different MCACC presets1, which are useful if you have different listening positions depending on the type of source (for example, watching movies from a sofa, or playing a video game close to the TV).2 Important • Make sure the microphone/speakers are not moved during the Auto MCACC Setup. • Using the Auto MCACC Setup will overwrite any existing settings for the MCACC preset you select.3 • The screen saver will automatically appear after five minutes of inactivity. CAUTION • The test tones used in the Auto MCACC Setup are output at high volume. THX® THX is a trademark of THX Ltd., which may be registered in some jurisdictions. All rights reserved. 1 Select 'Auto MCACC' from the Advanced MCACC menu, then press ENTER. If the Advanced MCACC screen is not displayed, refer to Making receiver settings from the Advanced MCACC menu on page 77. 1.Advanced MCACC A/V RECEIVER a. Full Auto MCACC b. Auto MCACC c. Manual MCACC d. Demo 1b.Auto MCACC A/V RECEIVER Exit ALL Speaker Setting Channel Level SYMMETRY : M1.MEMORY 1 Speaker Distance ALL CH ADJ : M2.MEMORY 2 EQ Pro & S-Wave FRONT ALIGH: M3.MEMORY 3 Return THX Speaker : NO START Exit Return 2 Select the parameters you want to set. Use / to select the item, then use / to set. 1b.Auto MCACC A/V RECEIVER ALL SYMMETRY : M1.MEMORY 1 ALL CH ADJ : M2.MEMORY 2 FRONT ALIGH : M3.MEMORY 3 THX Speaker : NO START Speaker Setting Channel Level Speaker Distance EQ Pro & S-Wave 1b.Auto MCACC A/V RECEIVER Exit ALL Speaker Setting Channel Level SYMMETRY : M1.MEMORY 1 Speaker Distance ALL CH ADJ : M2.MEMORY 2 ReEtuQrnPro & S-Wave FRONT ALIGH : M3.MEMORY 3 THX Speaker : NO START Exit Return Note 1 These are stored in memory and referred to as MEMORY1 to MEMORY6 until you rename them in Data Management on page 91. 2 You may also want to have separate calibration settings for the same listening position, depending on how you're using your system. 3 Except in cases where you are only adjusting one parameter (i.e. channel level) from the Auto MCACC menu (step 2). 78 En
-
 1
1 -
2
-
3
-
4
-
5
-
6
-
7
-
8
-
9
-
10
-
11
-
12
-
13
-
14
-
15
-
16
-
17
-
18
-
19
-
20
-
21
-
22
-
23
-
24
-
25
-
26
-
27
-
28
-
29
-
30
-
31
-
32
-
33
-
34
-
35
-
36
-
37
-
38
-
39
-
40
-
41
-
42
-
43
-
44
-
45
-
46
-
47
-
48
-
49
-
50
-
51
-
52
-
53
-
54
-
55
-
56
-
57
-
58
-
59
-
60
-
61
-
62
-
63
-
64
-
65
-
66
-
67
-
68
-
69
-
70
-
71
-
72
-
 73
73 -
 74
74 -
 75
75 -
 76
76 -
 77
77 -
 78
78 -
 79
79 -
 80
80 -
 81
81 -
 82
82 -
 83
83 -
84
-
85
-
86
-
87
-
88
-
89
-
90
-
91
-
92
-
93
-
94
-
95
-
96
-
97
-
98
-
99
-
100
-
101
-
102
-
103
-
104
-
105
-
106
-
107
-
108
-
109
-
110
-
111
-
112
-
113
-
114
-
115
-
116
-
117
-
118
-
119
-
120
-
121
-
122
-
123
-
124
-
125
-
126
-
127
-
128
 |
 |
