Pioneer VSX-47TX Owner's Manual - Page 105
Troubleshooting
 |
View all Pioneer VSX-47TX manuals
Add to My Manuals
Save this manual to your list of manuals |
Page 105 highlights
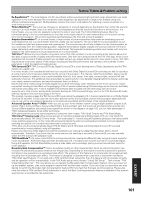
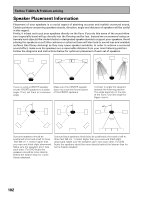
Techno Tidbits & Problem-solving Troubleshooting Incorrect operations are often mistaken for trouble and malfunctions. If you think that there is something wrong with this component, check the points below. Sometimes the trouble may lie in another component. Investigate the other components and electrical appliances being used. If the trouble cannot be rectified even after exercising the checks listed below, ask your nearest PIONEER authorized service center or your dealer to carry out repair work. Symptom Cause Remedy Power The power does not turn on. • The power plug is disconnected. • The protection circuit may have been activated. • Connect the power plug to the wall outlet. • Disconnect the power plug from the outlet, and insert again. The unit does not respond when the buttons are pressed. • Static electricity caused by dry air. • Switch the unit off, then on again. • Disconnect the power plug from the outlet, and insert again. During operation, the unit suddenly switches off. • The speaker wires are frayed or sticking • Reinsert the speaker wires, making sure out of the jack, and are touching the back of there are no stray strands of wire and that the receiver or another set of wires. they are inserted fully (see p.25) AMP ERR blinks in the display and the unit turns off. • The receiver probably has a serious problem. • You won't be able to operate the receiver for a minute. After that turn the receiver back on. If you have the same problem again call a Pioneer-accredited repair center. OVERHEAT blinks in the display and no sound is output. • The receiver has gotten too hot. • Turn the receiver off and allow it to cool down with good ventilation. It is very likely that you have a heat dispersal and ventilation problem so please follow the instructions in "Installing the Receiver" (p.8 ) carefully. Setup The setup screen doesn't appear. • The output jacks haven't been connected properly. • The MONITOR OUT jack haven't been connected. • Check all connections (see p.16-23). • Connect the MONITOR OUT jacks to the TV monitor (see p.16). Every time Auto Surround Sound Setup is attempted, there is some kind of error, or the settings seem incorrect. The LARGE and SMALL settings for speakers after the Auto Surround Sound Setup are incorrect. • The room environment is not optimal for auto setup (too much ambient noise, obstacles blocking the speakers from the microphone, etc.) • There are other frequencies in the room that are affecting the auto setup. • Make sure the room environment is in line with the guidelines displayed on the OSD during auto setup (see p.13-14, memo p.15, & 36-37). • Check for household appliances (air conditioner, fan, etc.) that may be affecting the environment and switch them off if necessary. After the proper settings have been made, there still seems to be something wrong with the sound. • The speakers have been incorrectly connected (+/- connections are reversed). • Check all connections (see p.25). No audio No sound is output when a function is selected. • Improper connections. • Sound is muted. • The volume is turned down. • The TAPE 2 MONITOR is on. • Speakers are turned off. • DIGITAL/ANALOG setting is incorrect. • MULTI CH IN mode is on. • Make sure the component is connected correctly (see p.16-26). • Press MUTING on the remote control. • Adjust MASTER VOLUME. • Turn TAPE 2 MONITOR off (see p.54). • Press SPEAKERS (A/B) to select the speakers you connected (see p.71). • Select the proper signal with the SIGNAL SELECT button (see p.45). • Turn MULTI CH IN mode off (see p.53). No sound output from the front speakers. • The U-shaped connectors that connect the POWER AMP IN terminals to the front channel pre outs are not connected. • The front speakers are connected to the B speaker system jack. • Connect the POWER AMP IN terminals to the front channel pre outs using the supplied U-shaped connectors (see p.30). • Connect the front speakers to the A speaker system jacks (see p.25). 105 EXPERT
-
 1
1 -
2
-
3
-
4
-
5
-
6
-
7
-
8
-
9
-
10
-
11
-
12
-
13
-
14
-
15
-
16
-
17
-
18
-
19
-
20
-
21
-
22
-
23
-
24
-
25
-
26
-
27
-
28
-
29
-
30
-
31
-
32
-
33
-
34
-
35
-
36
-
37
-
38
-
39
-
40
-
41
-
42
-
43
-
44
-
45
-
46
-
47
-
48
-
49
-
50
-
51
-
52
-
53
-
54
-
55
-
56
-
57
-
58
-
59
-
60
-
61
-
62
-
63
-
64
-
65
-
66
-
67
-
68
-
69
-
70
-
71
-
72
-
73
-
74
-
75
-
76
-
77
-
78
-
79
-
80
-
81
-
82
-
83
-
84
-
85
-
86
-
87
-
88
-
89
-
90
-
91
-
92
-
93
-
94
-
95
-
96
-
97
-
98
-
99
-
 100
100 -
 101
101 -
 102
102 -
 103
103 -
 104
104 -
 105
105 -
 106
106 -
 107
107 -
 108
108 -
 109
109 -
 110
110 -
111
-
112
 |
 |
