Pioneer VSX-47TX Owner's Manual - Page 38
Channel Delay
 |
View all Pioneer VSX-47TX manuals
Add to My Manuals
Save this manual to your list of manuals |
Page 38 highlights
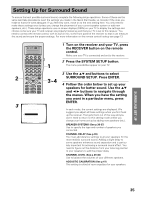
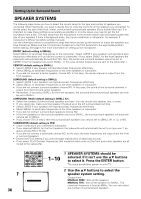
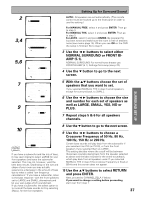
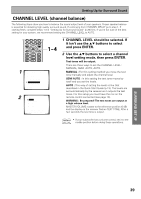
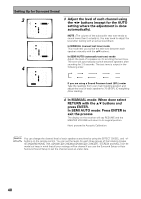
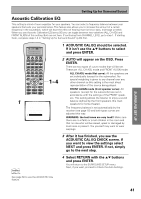
Setting Up for Surround Sound CHANNEL DELAY Adding a slight delay to some speakers is necessary to achieve proper sound depth, separation as well as an effective surround sound effect. You need to figure out the distance from your listening position to your speakers to add the proper delay. The following steps show you how to set the delay time for each channel by specifying the distances from your listening position to each speaker. Once you specify the speaker distances (or it is done automatically through the AUTO selection, or in the Quick Start Guide), the receiver calculates the correct delay times automatically. If continuing from SPEAKER SYSTEMS go to step 1. If starting fresh, complete steps 1-3 in "Setting Up for Surround Sound" (p.35) first. VIDEO SEL SIGNAL SEL 5 6 TAPE 2 EFFECT/CH SELL 7 8 TONE BASS/TREBLE 9 0 - +10 + DISC ENTER SYSTEM SETUP DIRECT ACCESS DISP MODE REMOTE SETUP MENU TUNER EDIT ENTER STATUS EXIT GUIDE RETURN MPX ¶ TUNING - 1 STATION - 4 CHANNEL- DTV ON/OFF 8 BAND 3 DTV MENU CLASS 7 EXTRA MENU TUNING + ¡ STATION + ¢ CHANNEL+ 1 2.Surround Setup [ Check ] 1~4 1 The CHANNEL DELAY should be selected. If it isn't use the 5∞ buttons to select it. Press the ENTER button. The setup possibilities appear on your TV 2 There are two ways to set the CHANNEL DELAY, MANUAL and AUTO. Select the method you'd like to use with the 5∞ buttons and press ENTER. 2 [ 1.Speaker Systems ] [ 2.Channel Delay ] [ 3.Channel Level ] [ 4.Acoustic Cal EQ] [Return] 3.2. Channel Delay [Manual] [Auto] [Return] 3 Your Speaker Systems " Normal Surround " 2.2. Channel Delay Manual Front L [10.5ft ] Center [ 9.0ft ] Front R [10.0ft ] Surround R [ 8 . 5 f t ] SurrBack R [ 7 . 0 f t ] SurrBack L [ 6 . 5 f t ] Surround L [ 8 . 0 f t ] Subwoofer [ 1 1 . 5 f t ] [Return] MANUAL : In this way of setting the distance you choose the speaker and adjust the distance yourself. AUTO : This way of setting the delay time is like that described in the Quick Start Guide (p.13-15). The levels are set automatically by the receiver as it outputs the test tones. For this setup you must have the mic on the remote control connected (see page 13). WARNING : Be prepared! The test tones are output at a high volume level. MASTER VOLUME rotates to the reference position (0 dB) and the display on the receiver flashes TEST TONE. After a few seconds the test tone is output. 3 For MANUAL, select each speaker with the 5∞ buttons. Use the 2 3 buttons to add or subtract the distance in feet that the speaker is from your normal listening position. 4 2.2. Channel Delay Manual Front L [10.0ft ] Center [ 9.0ft ] Front R [10.0ft ] Surround R [ 8 . 5 f t ] SurrBack R [ 7 . 0 f t ] SurrBack L [ 6 . 5 f t ] Surround L [ 8 . 0 f t ] Subwoofer [ 1 1 . 5 f t ] [Return] 2.2. Channel Delay Manual Front L [ 10.0ft ] Center [ 9.0ft ] Front R [ 10.0ft ] Surround R [ 8 . 5 f t ] SurrBack R [ 7 . 0 f t ] SurrBack L [ 6 . 5 f t ] Surround L [ 8 . 0 f t ] Subwoofer [ 1 1 . 5 f t ] [Return] Adjust the speaker distance in half foot increments from 0.5 to 45 feet (1 foot equals approximately 0.3 meters). The default setting is 10 ft. 4 When done select RETURN with the 5∞ buttons and press ENTER. Next, proceed to CHANNEL LEVEL below . If you want to change a setting before proceeding Start over from step 1. memo If you have two surround back speakers you can put them together, set them to the same distance and then use them get the benefit of ASA technology (see p.97, 101, 103). 38
-
 1
1 -
2
-
3
-
4
-
5
-
6
-
7
-
8
-
9
-
10
-
11
-
12
-
13
-
14
-
15
-
16
-
17
-
18
-
19
-
20
-
21
-
22
-
23
-
24
-
25
-
26
-
27
-
28
-
29
-
30
-
31
-
32
-
 33
33 -
 34
34 -
 35
35 -
 36
36 -
 37
37 -
 38
38 -
 39
39 -
 40
40 -
 41
41 -
 42
42 -
 43
43 -
44
-
45
-
46
-
47
-
48
-
49
-
50
-
51
-
52
-
53
-
54
-
55
-
56
-
57
-
58
-
59
-
60
-
61
-
62
-
63
-
64
-
65
-
66
-
67
-
68
-
69
-
70
-
71
-
72
-
73
-
74
-
75
-
76
-
77
-
78
-
79
-
80
-
81
-
82
-
83
-
84
-
85
-
86
-
87
-
88
-
89
-
90
-
91
-
92
-
93
-
94
-
95
-
96
-
97
-
98
-
99
-
100
-
101
-
102
-
103
-
104
-
105
-
106
-
107
-
108
-
109
-
110
-
111
-
112
 |
 |
