Pioneer VSX-47TX Owner's Manual - Page 35
Surround Set Up
 |
View all Pioneer VSX-47TX manuals
Add to My Manuals
Save this manual to your list of manuals |
Page 35 highlights
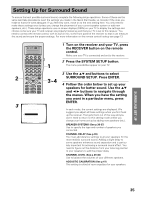
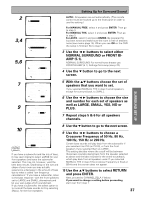
Setting Up for Surround Sound To ensure the best possible surround sound, complete the following setup operations. Some of these are the same (and take precedence over) the settings you made in the Quick Start Guide, so consider if the ones you made at that time were adequate. If you feel they were, move on to the next setting here. You only need to make these settings once (unless you change the placement of your current speaker system or add new speakers, etc.). These setup operations use on-screen displays (OSDs) on your TV to display the settings and choices so be sure your TV and receiver are properly hooked up and that your TV is set to this receiver. You need to connect the remote control, with its built in mic, to the front panel of the receiver so that it can measure the sound and ensure the proper settings. For more information on the remote control hookup see page 13. SETUP 2 S0URCE TV SYSTEM RECEIVER OFF DVD/LD TV SAT MULTI CONTROL VCR1/ DVR VCR2 VIDEO TV CONT MULTI OPERATION CD CD-R/ TAPE1 TUNER RECEIVER DIMMER INPUT ATT LOUDNESS SPEAKER A/B 1 2 3 4 VIDEO SEL SIGNAL SEL TAPE 2 EFFECT/CH SELL 5 6 7 8 TONE BASS/TREBLE 9 0 - +10 + DISC ENTER SYSTEM SETUP DIRECT ACCESS DISP MODE REMOTE SETUP MENU TUNER EDIT ENTER STATUS EXIT GUIDE RETURN MPX ¶ TUNING - 1 STATION - 4 CHANNEL - DTV ON/OFF 8 BAND 3 DTV MENU CLASS 7 EXTRA MENU TUNING + ¡ STATION + ¢ CHANNEL+ 3 System Setup [Auto Surround Setup] [1. Input Assign ] [2. Surround Setup ] [3. Expert Setup ] [4. THX Audio Setup ] [Exit] 1 3~4 1 Turn on the receiver and your TV, press the RECEIVER button on the remote control. Make sure your TV is connected and set to the receiver. 2 Press the SYSTEM SETUP button. The menu possibilities appear on your TV. 3 Use the 5∞ and buttons to select SURROUND SETUP. Press ENTER. 4 Follow the order below to set up your speakers for better sound. Use the 5∞ and 2 3 buttons to navigate through the menus. When you have the setting you want in a particular menu, press ENTER. In each mode, the current settings are displayed. We suggest you adjust all these settings when you first hook up the receiver. That gets them out of the way and you won't need to return to this setting mode unless you change your home set up by adding new speakers (etc.). SPEAKER SYSTEMS (See p.36-37) Use to specify the type and number of speakers you connected. CHANNEL DELAY (See p.38) You must add distance settings to all your speakers for the most realistic surround sound. Adding a slight delay to some speakers enhances sound separation and is particularly important for achieving a surround sound effect. You need to figure out the distance from your listening position to your speakers to add the proper delay. CHANNEL LEVEL (See p.39-40) Use to balance the volumes of your different speakers. ACOUSTIC CALIBRATION (See p.41) This setting is a kind of room equalizer for your speakers. SURROUND SET UP 35
-
 1
1 -
2
-
3
-
4
-
5
-
6
-
7
-
8
-
9
-
10
-
11
-
12
-
13
-
14
-
15
-
16
-
17
-
18
-
19
-
20
-
21
-
22
-
23
-
24
-
25
-
26
-
27
-
28
-
29
-
 30
30 -
 31
31 -
 32
32 -
 33
33 -
 34
34 -
 35
35 -
 36
36 -
 37
37 -
 38
38 -
 39
39 -
 40
40 -
41
-
42
-
43
-
44
-
45
-
46
-
47
-
48
-
49
-
50
-
51
-
52
-
53
-
54
-
55
-
56
-
57
-
58
-
59
-
60
-
61
-
62
-
63
-
64
-
65
-
66
-
67
-
68
-
69
-
70
-
71
-
72
-
73
-
74
-
75
-
76
-
77
-
78
-
79
-
80
-
81
-
82
-
83
-
84
-
85
-
86
-
87
-
88
-
89
-
90
-
91
-
92
-
93
-
94
-
95
-
96
-
97
-
98
-
99
-
100
-
101
-
102
-
103
-
104
-
105
-
106
-
107
-
108
-
109
-
110
-
111
-
112
 |
 |
