Pioneer VSX-47TX Owner's Manual - Page 28
Displays & Controls
 |
View all Pioneer VSX-47TX manuals
Add to My Manuals
Save this manual to your list of manuals |
Page 28 highlights
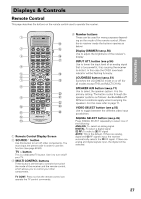
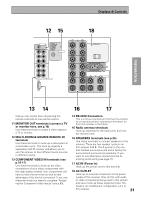
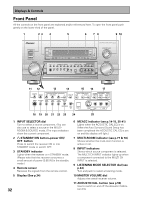
Displays & Controls TAPE 2 MONITOR button (see p.54) Selects the tape deck (or MD recorder, etc.) connected to the TAPE 2 MONITOR inputs/ outputs. Allows monitoring of a recording as it's being made. EFFECT/CH SEL. button Switches between all channels and EFFECT in ADVANCED mode. You can then use the +and - buttons to adjust the sound. TONE buttons This button has two functions. Firstly, it switches between TONE on and TONE bypass, which goes around the tone circuitry. Secondly, you need to press this button before using the BASS & TREBLE buttons. BASS/TREBLE buttons (see p.52) Use to choose the high or low frequencies to adjust. (+/-) buttons Use to adjust the high and low frequencies, effect level and channel level. 5 SYSTEM SET UP button Use for all system setups, including the speaker and sound systems. For more information see . "Setting up for Surround Sound" starting on p.35. For other components this button will give you the base or top menu. 6 5˜∞˜2˜3˜ENTER buttons These buttons can be used for a variety of operations in the SYSTEM SETUP menu. These buttons are used to control the menus for other components when in those modes (DVD, digital TV tuner, satellite tuner, cable tuner, etc.). In TUNER mode, they can select a station and/or a frequency. 7 STATUS button see p.56) Use to display the present mode the receiver is in and another settings. For a digital TV tuner this button will call up the GUIDE menu. 8 Command button for other components (see p.66-67) Use these buttons to control other components you selected with the MULTI CONTROL buttons. You must input the preset code in order use this function (see page 62-63). 9 TV CONTROL buttons The following buttons are used to control the TV only and can be used once they are preset to control your TV. TV INPUT: Press to select the input source for the TV. TV CH +/- : Use these buttons to change the channel of the TV. TV VOL +/- : Press to control the volume of the TV. 0 LISTENING MODE buttons (see p.43-44) STEREO/DIRECT: Switches the receiver into STEREO mode if it was in a different listening mode or toggles between DIRECT and STEREO mode (see p.46). THX: Press to put the receiver into Home THX listening mode (see p.47). STANDARD: Press to put the receiver into STANDARD listening mode (see p.46). ADVANCED CINEMA: Press to put the receiver into ADVANCED CINEMA listening mode (see p.48). ADVANCED CONCERT: Press to put the receiver into ADVANCED CONCERT listening mode (see p.49). - ACOUSTIC CAL. button (see p.41, 50) Press to switch on/off and select the type of acoustic calibration EQ. = MULTI CH INPUT button (see p.53, 94) Use this button to select the component (for example, a DVD-Audio player) you have hooked up to the MULTI CH INPUT terminals. ~ LISTENING CH SELECT. (see p.44) Use this button to select a listening channel (5.1, 7.1, AUTO). ! SYSTEM OFF button (see p.81) This button turns off components in two ways. First, when pressed it will turn off all PIONEER components. Secondly, any component that has programmed into the SYSTEM OFF settings will be turned off. For example : If you programmed power off in the SYSTEM OFF settings for your TV and VCR, pressing the SYSTEM OFF button will turn off these components even if they are not PIONEER products. @ RECEIVER (standby/power on) button Press to turn power of the receiver on or to standby (off). 28
-
 1
1 -
2
-
3
-
4
-
5
-
6
-
7
-
8
-
9
-
10
-
11
-
12
-
13
-
14
-
15
-
16
-
17
-
18
-
19
-
20
-
21
-
22
-
 23
23 -
 24
24 -
 25
25 -
 26
26 -
 27
27 -
 28
28 -
 29
29 -
 30
30 -
 31
31 -
 32
32 -
 33
33 -
34
-
35
-
36
-
37
-
38
-
39
-
40
-
41
-
42
-
43
-
44
-
45
-
46
-
47
-
48
-
49
-
50
-
51
-
52
-
53
-
54
-
55
-
56
-
57
-
58
-
59
-
60
-
61
-
62
-
63
-
64
-
65
-
66
-
67
-
68
-
69
-
70
-
71
-
72
-
73
-
74
-
75
-
76
-
77
-
78
-
79
-
80
-
81
-
82
-
83
-
84
-
85
-
86
-
87
-
88
-
89
-
90
-
91
-
92
-
93
-
94
-
95
-
96
-
97
-
98
-
99
-
100
-
101
-
102
-
103
-
104
-
105
-
106
-
107
-
108
-
109
-
110
-
111
-
112
 |
 |
