Pioneer VSX-47TX Owner's Manual - Page 19
Connecting Satellite TV SAT Components
 |
View all Pioneer VSX-47TX manuals
Add to My Manuals
Save this manual to your list of manuals |
Page 19 highlights
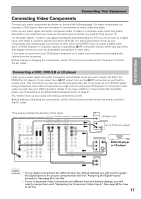
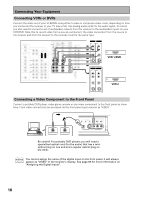
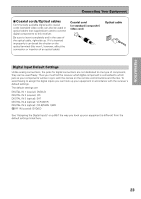
PREPARATION PREPARATION Connecting Your Equipment Connecting Satellite TV (SAT) Components Hook up the video signal with either component video, S video, or composite video cords, depending on how you connected the receiver to your TV (see p.16). For the audio signal, in order to use digital soundtracks broadcast you must hook up a digital input. Use either a coaxial or optical cable, it doesn't matter which (see p.22-23). We recommend hooking up your audio with analog cables as well (see below). Before making or changing the connections, switch off the power and disconnect the power cord from the AC outlet. *The arrows indicate the direction of the TV signal. DIGITAL PCM/2DIGITAL/DTS 2 OUT 1 PHONO OUT IN R AUDIO L CD DIGITAL IN PCM/2DIGITAL/DTS 5 (CD-R/ TAPE1 IN /MD) R L 4 OUT (VCR1 /DVR) REC IN CD-R/ TAPE1 3 /MD (SAT) IN IN PLAY OUT IN 2 (CD) REC TAPE2 MONITOR IN 1 (DVD /LD) IN PLAY FRONT R R 1 (Single) R R SUB W. CONTROL OUT AUDIO POWER AMP IN L FRONT L CENTER SUB W. PRE OUT 2 SURROUND L SURROUND BACK L (Single) CENTER R AUDIO L IN MULTIROOM & SOURCE DVD /LD IN TV IN SAT IN OUT VCR1 /DVR IN MONITOR OUT OUT IN IN IN OUT IN OUT OUT VCR2 IN IN VIDEO DVD /LD IN 1Y PB REMOTE IN MULTIROOM & SOURCE Y MONITOR OUT PB PR (TV) IN 2 Y PR (SAT) IN 3 Y PB PB PR PR COMPONENT VIDEO ASSIGNABLE S VIDEO 2RF IN (DVD /LD) (For LD) ASSIGNABLE R SURROUND R L LR MULTI CH INPUT SURROUND BACK L (Single) VIDEO COMPONENT VIDEO OUT Y PB S-VIDEO PR ANALOG STEREO L DIGITAL DIGITAL R Satellite tuner VIDEO COMPONENT VIDEO OUT Y PB S-VIDEO PR ANALOG STEREO L R TV tuner memo • If your component video connections are different from the default settings, you will need to assign them with "Assigning the Component Video Inputs". See page 89 for how to do this. • If your digital connections are different than the default settings you will need to assign the digital jacks to the proper component(s) with the "Assigning the Digital Inputs" procedure. See page 88 to do this. 19
-
 1
1 -
2
-
3
-
4
-
5
-
6
-
7
-
8
-
9
-
10
-
11
-
12
-
13
-
 14
14 -
 15
15 -
 16
16 -
 17
17 -
 18
18 -
 19
19 -
 20
20 -
 21
21 -
 22
22 -
 23
23 -
 24
24 -
25
-
26
-
27
-
28
-
29
-
30
-
31
-
32
-
33
-
34
-
35
-
36
-
37
-
38
-
39
-
40
-
41
-
42
-
43
-
44
-
45
-
46
-
47
-
48
-
49
-
50
-
51
-
52
-
53
-
54
-
55
-
56
-
57
-
58
-
59
-
60
-
61
-
62
-
63
-
64
-
65
-
66
-
67
-
68
-
69
-
70
-
71
-
72
-
73
-
74
-
75
-
76
-
77
-
78
-
79
-
80
-
81
-
82
-
83
-
84
-
85
-
86
-
87
-
88
-
89
-
90
-
91
-
92
-
93
-
94
-
95
-
96
-
97
-
98
-
99
-
100
-
101
-
102
-
103
-
104
-
105
-
106
-
107
-
108
-
109
-
110
-
111
-
112
 |
 |
