Pioneer VSX-47TX Owner's Manual - Page 56
Status Display, Adjusting the Brightness of the Display
 |
View all Pioneer VSX-47TX manuals
Add to My Manuals
Save this manual to your list of manuals |
Page 56 highlights
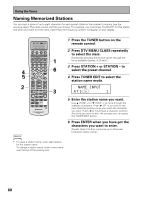
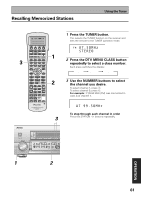
Basic Operation Adjusting the Brightness of the Display Use the display DIMMER button to adjust the brightness of the fluorescent display. 1 Press RECEIVER. SETUP 2 S0URCE TV SYSTEM RECEIVER OFF DVD/LD TV SAT MULTI CONTROL VCR1/ DVR VCR2 VIDEO TV CONT MULTI OPERATION CD CD-R/ TAPE1 TUNER RECEIVER DIMMER INPUT ATT LOUDNESS SPEAKER A/B 1 2 3 4 VIDEO SEL SIGNAL SEL 5 6 TAPE 2 EFFECT/CH SELL 7 8 TONE BASS/TREBLE 9 0 - +10 + DISC ENTER SYSTEM SETUP DIRECT ACCESS DISP MODE REMOTE SETUP MENU TUNER EDIT ENTER STATUS EXIT GUIDE RETURN MPX DTV ON/OFF 1 Status Display 2 Use the display DIMMER button on the remote control to alternate between the different levels of brightness for the display. Four levels of brightness ranging from very dim to very bright can be selected. Each press changes the brightness of the display. When cycling through the options, the default brightness can also be selected. memo • Please note: It is a feature of this unit that the fluorescent display will be brighter for a few seconds after you choose a function (like DVD/LD, CD, etc.) and then get softer. This will still happen when you adjust the brightness but the new setting will be the one the display softens to. The Status display lets you see what the status is for most of the settings in this section. SETUP 2 S0URCE TV SYSTEM RECEIVER OFF DVD/LD TV SAT MULTI CONTROL VCR1/ DVR VCR2 VIDEO TV CONT MULTI OPERATION CD CD-R/ TAPE1 TUNER RECEIVER DIMMER INPUT ATT LOUDNESS SPEAKER A/B 1 2 3 4 VIDEO SEL SIGNAL SEL 5 6 TAPE 2 EFFECT/CH SELL 7 8 TONE BASS/TREBLE 9 0 - +10 + DISC ENTER SYSTEM SETUP DIRECT ACCESS DISP MODE REMOTE SETUP MENU TUNER EDIT ENTER STATUS EXIT GUIDE RETURN MPX ¶ TUN NG - DTV ON/OFF 8 BAND EXTRA MENU TUN NG + 1 LISTEN'CH SEL : 7.1ch ACOUS. CAL EQ : ALL ADJ DIGITAL NR : OFF MIDNIGHT : OFF LOUDNESS : OFF TONE CONTROL : OFF INPUT ATT : OFF TAPE2 MONITOR : OFF VIDEO SELECT : DVD/LD 56 1 Press RECEIVER. 2 Press the STATUS button. The status of the settings will appear on both the OSD and the display on the receiver. For the latter the settings will appear in the following order for two seconds each. • Listening Channel Select LISTEN'CH:7.1 • Acoustic Calibration A-EQ:ALL CH ADJ • Digital Noise Reduction DIGITAL NR:OFF • Midnight Mode/ Loudness/ Tone Control MID LOUD TN:OFF • Input Attenuator INPUT ATT:OFF • Tape 2 Monitor TAPE2:OFF • Video Select VSEL: DVD/LD
-
 1
1 -
2
-
3
-
4
-
5
-
6
-
7
-
8
-
9
-
10
-
11
-
12
-
13
-
14
-
15
-
16
-
17
-
18
-
19
-
20
-
21
-
22
-
23
-
24
-
25
-
26
-
27
-
28
-
29
-
30
-
31
-
32
-
33
-
34
-
35
-
36
-
37
-
38
-
39
-
40
-
41
-
42
-
43
-
44
-
45
-
46
-
47
-
48
-
49
-
50
-
 51
51 -
 52
52 -
 53
53 -
 54
54 -
 55
55 -
 56
56 -
 57
57 -
 58
58 -
 59
59 -
 60
60 -
 61
61 -
62
-
63
-
64
-
65
-
66
-
67
-
68
-
69
-
70
-
71
-
72
-
73
-
74
-
75
-
76
-
77
-
78
-
79
-
80
-
81
-
82
-
83
-
84
-
85
-
86
-
87
-
88
-
89
-
90
-
91
-
92
-
93
-
94
-
95
-
96
-
97
-
98
-
99
-
100
-
101
-
102
-
103
-
104
-
105
-
106
-
107
-
108
-
109
-
110
-
111
-
112
 |
 |
