RCA 25255RE2 User Guide - Page 11
Installing the Phone
 |
UPC - 845679000018
View all RCA 25255RE2 manuals
Add to My Manuals
Save this manual to your list of manuals |
Page 11 highlights
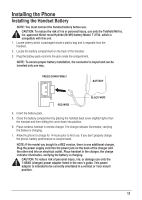
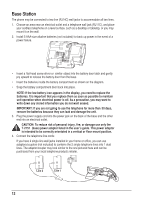
Installing the Phone Installing the Handset Battery NOTE: You must connect the handset battery before use. CAUTION: To reduce the risk of fire or personal injury, use only the Telefield NA Inc. Inc. approved Nickel-metal Hydride (Ni-MH) battery Model T-2734, which is compatible with this unit. 1. Locate battery which is packaged inside a plastic bag and is separate from the handset . 2. Locate the battery compartment on the back of the handset. 3. Plug the battery pack cord into the jack inside the compartment. NOTE: To ensure proper battery installation, the connector is keyed and can be inserted only one way. PRESS DOWN FIRMLY BATTERY RED WIRE BLACK WIRE 4. Insert the battery pack. 5. Close the battery compartment by placing the handset back cover slightly higher than the handset and then sliding the cover down into position. 6. Place cordless handset in remote charger. The charge indicator illuminates, verifying the battery is charging. 7. Allow the phone to charge for 14 hours prior to first use. If you don't properly charge the phone, battery performance is compromised. NOTE: If the model you bought is a RE2 version, there is one additional charger. Plug the power supply cord into the power jack on the back of the charger and the other end into an electrical outlet. Place handset in the charger, the charge indicator illuminates, verifying the battery is charging. CAUTION: To reduce risk of personal injury, fire, or damage use only the T-8BXD (charger) power adaptor listed in the user's guide. This power adaptor is intended to be correctly orientated in a vertical or floor mount position. 11
-
 1
1 -
2
-
3
-
4
-
5
-
 6
6 -
 7
7 -
 8
8 -
 9
9 -
 10
10 -
 11
11 -
 12
12 -
 13
13 -
 14
14 -
 15
15 -
 16
16 -
17
-
18
-
19
-
20
-
21
-
22
-
23
-
24
-
25
-
26
-
27
-
28
-
29
-
30
-
31
-
32
-
33
-
34
-
35
-
36
-
37
-
38
-
39
-
40
-
41
-
42
-
43
-
44
-
45
-
46
-
47
-
48
-
49
-
50
-
51
-
52
 |
 |
