Ricoh Aficio GX3000 User Guide - Page 161
If the dialog box type is Multi-tab, click [Glossy Paper] in the [Paper type:] list on the [Setup]
 |
View all Ricoh Aficio GX3000 manuals
Add to My Manuals
Save this manual to your list of manuals |
Page 161 highlights
Printing 6. Push tray 1 gently in until it stops. 7. Lower the output tray. 8. Slide the envelope selector to the forward position . 9. Open the printer properties dialog box from the application. 10. On the [Print Settings] tab, click [Glossy Paper] in the [Paper type:] list. If the dialog box type is Multi-tab, click [Glossy Paper] in the [Paper type:] list on the [Setup] tab. 11. Make the necessary settings, and then click [OK]. The printer properties dialog box closes. 12. Make print settings, and then click [OK]. The output tray can hold up to 20 sheets of glossy paper at a time. z To print photographs or other high-resolution images, set [Print Quality] to [Quality priority]. z p.151 "Two Types of Printer Properties Dialog Box" 161
-
 1
1 -
2
-
3
-
4
-
5
-
6
-
7
-
8
-
9
-
10
-
11
-
12
-
13
-
14
-
15
-
16
-
17
-
18
-
19
-
20
-
21
-
22
-
23
-
24
-
25
-
26
-
27
-
28
-
29
-
30
-
31
-
32
-
33
-
34
-
35
-
36
-
37
-
38
-
39
-
40
-
41
-
42
-
43
-
44
-
45
-
46
-
47
-
48
-
49
-
50
-
51
-
52
-
53
-
54
-
55
-
56
-
57
-
58
-
59
-
60
-
61
-
62
-
63
-
64
-
65
-
66
-
67
-
68
-
69
-
70
-
71
-
72
-
73
-
74
-
75
-
76
-
77
-
78
-
79
-
80
-
81
-
82
-
83
-
84
-
85
-
86
-
87
-
88
-
89
-
90
-
91
-
92
-
93
-
94
-
95
-
96
-
97
-
98
-
99
-
100
-
101
-
102
-
103
-
104
-
105
-
106
-
107
-
108
-
109
-
110
-
111
-
112
-
113
-
114
-
115
-
116
-
117
-
118
-
119
-
120
-
121
-
122
-
123
-
124
-
125
-
126
-
127
-
128
-
129
-
130
-
131
-
132
-
133
-
134
-
135
-
136
-
137
-
138
-
139
-
140
-
141
-
142
-
143
-
144
-
145
-
146
-
147
-
148
-
149
-
150
-
151
-
152
-
153
-
154
-
155
-
 156
156 -
 157
157 -
 158
158 -
 159
159 -
 160
160 -
 161
161 -
 162
162 -
 163
163 -
 164
164 -
 165
165 -
 166
166 -
167
-
168
-
169
-
170
-
171
-
172
-
173
-
174
-
175
-
176
-
177
-
178
-
179
-
180
-
181
-
182
-
183
-
184
-
185
-
186
-
187
-
188
-
189
-
190
-
191
-
192
-
193
-
194
-
195
-
196
-
197
-
198
-
199
-
200
-
201
-
202
-
203
-
204
-
205
-
206
-
207
-
208
-
209
-
210
-
211
-
212
-
213
-
214
-
215
-
216
-
217
-
218
-
219
-
220
-
221
-
222
-
223
-
224
-
225
-
226
-
227
-
228
-
229
-
230
-
231
-
232
-
233
-
234
-
235
-
236
-
237
-
238
-
239
-
240
-
241
-
242
-
243
-
244
-
245
-
246
-
247
-
248
-
249
 |
 |

161
Printing
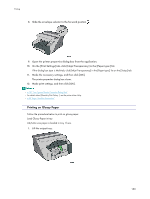
6.
Push tray 1 gently in until it stops.
7.
Lower the output tray.
8.
Slide the envelope selector to the forward position
9.
Open the printer properties dialog box from the application.
10.
On the [Print Settings] tab, click [Glossy Paper] in the [Paper type:] list.
If the dialog box type is Multi-tab, click [Glossy Paper] in the [Paper type:] list on the [Setup] tab.
11.
Make the necessary settings, and then click [OK].
The printer properties dialog box closes.
12.
Make print settings, and then click [OK].
The output tray can hold up to 20 sheets of glossy paper at a time.
To print photographs or other high-resolution images, set [Print Quality] to [Quality priority].
p.151 "
Two Types of Printer Properties Dialog Box
"