Ricoh Aficio GX3000 User Guide - Page 168
Adjusting Print Quality
 |
View all Ricoh Aficio GX3000 manuals
Add to My Manuals
Save this manual to your list of manuals |
Page 168 highlights
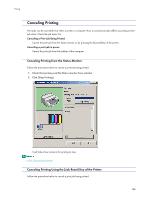
Printing Adjusting Print Quality Print quality and colour tone can be adjusted to suit the print data. Printing Using Preset Print Quality Settings With preset print quality settings, you do not have to make print quality settings every time you print. Follow the procedure below to print using a preset print quality setting. 1. Open the file you want to print from the application, and then open the printer properties dialog box. 2. On the [Print Settings] tab, select a print quality setting in the [Print Quality] area. If the dialog box type is Multi-tab, select a print quality setting in the [Print Quality] area on the [Setup] tab. 3. Make the necessary settings, and then click [OK]. The printer properties dialog box closes. 4. Make print settings, and then click [OK]. z p.151 "Two Types of Printer Properties Dialog Box" z For details about [Print Quality], see the printer driver Help. Printing in Black and White Follow the procedure below to print using only black. Since black and white printing is faster than colour printing, it is efficient for printing colour documents that do not need to be printed in colour. Also, the black produced by black and white printing is a more distinct black than that produced by colour printing. Be sure to select black and white printing if you specified black and white printing in an application. 1. Open the file you want to print from the application, and then open the printer properties dialog box. 2. On the [Print Settings] tab, click [Black and White] in the [Color/Black and White] area. If the dialog box type is Multi-tab, click [Black and White] in the [Color/Black and White] area on the [Setup] tab. 3. Make the necessary settings, and then click [OK]. The printer properties dialog box closes. 4. Make print settings, and then click [OK]. z Depending on the paper type, colour ink is also consumed. z p.151 "Two Types of Printer Properties Dialog Box" 168
-
 1
1 -
2
-
3
-
4
-
5
-
6
-
7
-
8
-
9
-
10
-
11
-
12
-
13
-
14
-
15
-
16
-
17
-
18
-
19
-
20
-
21
-
22
-
23
-
24
-
25
-
26
-
27
-
28
-
29
-
30
-
31
-
32
-
33
-
34
-
35
-
36
-
37
-
38
-
39
-
40
-
41
-
42
-
43
-
44
-
45
-
46
-
47
-
48
-
49
-
50
-
51
-
52
-
53
-
54
-
55
-
56
-
57
-
58
-
59
-
60
-
61
-
62
-
63
-
64
-
65
-
66
-
67
-
68
-
69
-
70
-
71
-
72
-
73
-
74
-
75
-
76
-
77
-
78
-
79
-
80
-
81
-
82
-
83
-
84
-
85
-
86
-
87
-
88
-
89
-
90
-
91
-
92
-
93
-
94
-
95
-
96
-
97
-
98
-
99
-
100
-
101
-
102
-
103
-
104
-
105
-
106
-
107
-
108
-
109
-
110
-
111
-
112
-
113
-
114
-
115
-
116
-
117
-
118
-
119
-
120
-
121
-
122
-
123
-
124
-
125
-
126
-
127
-
128
-
129
-
130
-
131
-
132
-
133
-
134
-
135
-
136
-
137
-
138
-
139
-
140
-
141
-
142
-
143
-
144
-
145
-
146
-
147
-
148
-
149
-
150
-
151
-
152
-
153
-
154
-
155
-
156
-
157
-
158
-
159
-
160
-
161
-
162
-
 163
163 -
 164
164 -
 165
165 -
 166
166 -
 167
167 -
 168
168 -
 169
169 -
 170
170 -
 171
171 -
 172
172 -
 173
173 -
174
-
175
-
176
-
177
-
178
-
179
-
180
-
181
-
182
-
183
-
184
-
185
-
186
-
187
-
188
-
189
-
190
-
191
-
192
-
193
-
194
-
195
-
196
-
197
-
198
-
199
-
200
-
201
-
202
-
203
-
204
-
205
-
206
-
207
-
208
-
209
-
210
-
211
-
212
-
213
-
214
-
215
-
216
-
217
-
218
-
219
-
220
-
221
-
222
-
223
-
224
-
225
-
226
-
227
-
228
-
229
-
230
-
231
-
232
-
233
-
234
-
235
-
236
-
237
-
238
-
239
-
240
-
241
-
242
-
243
-
244
-
245
-
246
-
247
-
248
-
249
 |
 |
