Ricoh Aficio GX3000 User Guide - Page 170
Correcting the Hue of Digital Photos, Printing Low Resolution Images Smoothly
 |
View all Ricoh Aficio GX3000 manuals
Add to My Manuals
Save this manual to your list of manuals |
Page 170 highlights
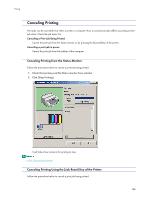
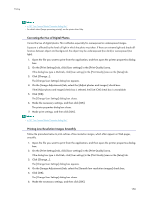
Printing z p.151 "Two Types of Printer Properties Dialog Box" z For details about [Image processing priority], see the printer driver Help. Correcting the Hue of Digital Photos Correct the hue of digital photos. This is effective especially for overexposed or underexposed images. Exposure is affected by the levels of light in which the photo was taken. If there are extreme light and shade differences between object and background, the object may be underexposed (too dark) or overexposed (too light). 1. Open the file you want to print from the application, and then open the printer properties dialog box. 2. On the [Print Settings] tab, click [User settings] in the [Print Quality] area. If the dialog box type is Multi-tab, click [User settings] in the [Print Quality] area on the [Setup] tab. 3. Click [Change...]. The [Change User Settings] dialog box appears. 4. On the [Image Adjustments] tab, select the [Adjust photos and images] check box. If the [Adjust photos and images] check box is selected, the [Use ICM] check box is unavailable. 5. Click [OK]. The [Change User Settings] dialog box closes. 6. Make the necessary settings, and then click [OK]. The printer properties dialog box closes. 7. Make print settings, and then click [OK]. z p.151 "Two Types of Printer Properties Dialog Box" Printing Low Resolution Images Smoothly Follow the procedure below to print outlines of low resolution images, which often appear on Web pages, smoothly. 1. Open the file you want to print from the application, and then open the printer properties dialog box. 2. On the [Print Settings] tab, click [User settings] in the [Print Quality] area. If the dialog box type is Multi-tab, click [User settings] in the [Print Quality] area on the [Setup] tab. 3. Click [Change...]. The [Change User Settings] dialog box appears. 4. On the [Image Adjustments] tab, select the [Smooth low resolution images] check box. 5. Click [OK]. The [Change User Settings] dialog box closes. 6. Make the necessary settings, and then click [OK]. 170
-
 1
1 -
2
-
3
-
4
-
5
-
6
-
7
-
8
-
9
-
10
-
11
-
12
-
13
-
14
-
15
-
16
-
17
-
18
-
19
-
20
-
21
-
22
-
23
-
24
-
25
-
26
-
27
-
28
-
29
-
30
-
31
-
32
-
33
-
34
-
35
-
36
-
37
-
38
-
39
-
40
-
41
-
42
-
43
-
44
-
45
-
46
-
47
-
48
-
49
-
50
-
51
-
52
-
53
-
54
-
55
-
56
-
57
-
58
-
59
-
60
-
61
-
62
-
63
-
64
-
65
-
66
-
67
-
68
-
69
-
70
-
71
-
72
-
73
-
74
-
75
-
76
-
77
-
78
-
79
-
80
-
81
-
82
-
83
-
84
-
85
-
86
-
87
-
88
-
89
-
90
-
91
-
92
-
93
-
94
-
95
-
96
-
97
-
98
-
99
-
100
-
101
-
102
-
103
-
104
-
105
-
106
-
107
-
108
-
109
-
110
-
111
-
112
-
113
-
114
-
115
-
116
-
117
-
118
-
119
-
120
-
121
-
122
-
123
-
124
-
125
-
126
-
127
-
128
-
129
-
130
-
131
-
132
-
133
-
134
-
135
-
136
-
137
-
138
-
139
-
140
-
141
-
142
-
143
-
144
-
145
-
146
-
147
-
148
-
149
-
150
-
151
-
152
-
153
-
154
-
155
-
156
-
157
-
158
-
159
-
160
-
161
-
162
-
163
-
164
-
 165
165 -
 166
166 -
 167
167 -
 168
168 -
 169
169 -
 170
170 -
 171
171 -
 172
172 -
 173
173 -
 174
174 -
 175
175 -
176
-
177
-
178
-
179
-
180
-
181
-
182
-
183
-
184
-
185
-
186
-
187
-
188
-
189
-
190
-
191
-
192
-
193
-
194
-
195
-
196
-
197
-
198
-
199
-
200
-
201
-
202
-
203
-
204
-
205
-
206
-
207
-
208
-
209
-
210
-
211
-
212
-
213
-
214
-
215
-
216
-
217
-
218
-
219
-
220
-
221
-
222
-
223
-
224
-
225
-
226
-
227
-
228
-
229
-
230
-
231
-
232
-
233
-
234
-
235
-
236
-
237
-
238
-
239
-
240
-
241
-
242
-
243
-
244
-
245
-
246
-
247
-
248
-
249
 |
 |
