Ricoh Aficio GX3000 User Guide - Page 169
Saving Colour Ink When Printing, Printing with Print Quality Settings You Want
 |
View all Ricoh Aficio GX3000 manuals
Add to My Manuals
Save this manual to your list of manuals |
Page 169 highlights
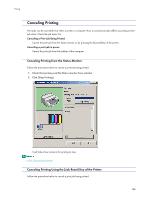
Printing Saving Colour Ink When Printing Follow the procedure below to save colour ink by printing graphics and images with less than the usual amount of ink. Text is printed as usual so that it can remain clear and easy to read. 1. Open the file you want to print from the application, and then open the printer properties dialog box. 2. On the [Print Settings] tab, click [Color] in the [Color/Black and White] area. If the dialog box type is Multi-tab, click [Color] in the [Color/Black and White] area on the [Setup] tab. 3. Select the [Level Color] check box. 4. Make the necessary settings, and then click [OK]. The printer properties dialog box closes. 5. Make print settings, and then click [OK]. z Overall colour, except for text, will be lighter. z The colour of text may be printed lighter depending on the application used. z p.151 "Two Types of Printer Properties Dialog Box" Printing with Print Quality Settings You Want You can make print quality settings more in details. Changing Image Printing Method When printing images, the higher the resolution of images, the longer the time required for printing. Follow the procedure below to print with priority on print quality or print speed. 1. Open the file you want to print from the application, and then open the printer properties dialog box. 2. On the [Print Settings] tab, click [User settings] in the [Print Quality] area. If the dialog box type is Multi-tab, click [User settings] in the [Print Quality] area on the [Setup] tab. 3. Click [Change...]. The [Change User Settings] dialog box appears. 4. On the [Image Adjustments] tab, select an image printing method in the [Image processing prior- ity] list. 5. Click [OK]. The [Change User Settings] dialog box closes. 6. Make the necessary settings, and then click [OK]. The printer properties dialog box closes. 7. Make print settings, and then click [OK]. 169
-
 1
1 -
2
-
3
-
4
-
5
-
6
-
7
-
8
-
9
-
10
-
11
-
12
-
13
-
14
-
15
-
16
-
17
-
18
-
19
-
20
-
21
-
22
-
23
-
24
-
25
-
26
-
27
-
28
-
29
-
30
-
31
-
32
-
33
-
34
-
35
-
36
-
37
-
38
-
39
-
40
-
41
-
42
-
43
-
44
-
45
-
46
-
47
-
48
-
49
-
50
-
51
-
52
-
53
-
54
-
55
-
56
-
57
-
58
-
59
-
60
-
61
-
62
-
63
-
64
-
65
-
66
-
67
-
68
-
69
-
70
-
71
-
72
-
73
-
74
-
75
-
76
-
77
-
78
-
79
-
80
-
81
-
82
-
83
-
84
-
85
-
86
-
87
-
88
-
89
-
90
-
91
-
92
-
93
-
94
-
95
-
96
-
97
-
98
-
99
-
100
-
101
-
102
-
103
-
104
-
105
-
106
-
107
-
108
-
109
-
110
-
111
-
112
-
113
-
114
-
115
-
116
-
117
-
118
-
119
-
120
-
121
-
122
-
123
-
124
-
125
-
126
-
127
-
128
-
129
-
130
-
131
-
132
-
133
-
134
-
135
-
136
-
137
-
138
-
139
-
140
-
141
-
142
-
143
-
144
-
145
-
146
-
147
-
148
-
149
-
150
-
151
-
152
-
153
-
154
-
155
-
156
-
157
-
158
-
159
-
160
-
161
-
162
-
163
-
 164
164 -
 165
165 -
 166
166 -
 167
167 -
 168
168 -
 169
169 -
 170
170 -
 171
171 -
 172
172 -
 173
173 -
 174
174 -
175
-
176
-
177
-
178
-
179
-
180
-
181
-
182
-
183
-
184
-
185
-
186
-
187
-
188
-
189
-
190
-
191
-
192
-
193
-
194
-
195
-
196
-
197
-
198
-
199
-
200
-
201
-
202
-
203
-
204
-
205
-
206
-
207
-
208
-
209
-
210
-
211
-
212
-
213
-
214
-
215
-
216
-
217
-
218
-
219
-
220
-
221
-
222
-
223
-
224
-
225
-
226
-
227
-
228
-
229
-
230
-
231
-
232
-
233
-
234
-
235
-
236
-
237
-
238
-
239
-
240
-
241
-
242
-
243
-
244
-
245
-
246
-
247
-
248
-
249
 |
 |
