Ricoh CL3500N Operating Instructions - Page 165
Displaying Web Image Monitor Help
 |
UPC - 026649024344
View all Ricoh CL3500N manuals
Add to My Manuals
Save this manual to your list of manuals |
Page 165 highlights
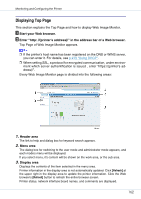
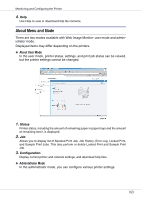
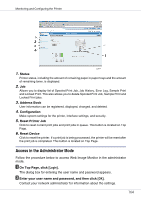
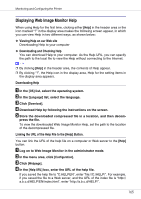
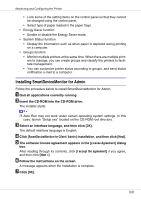
Monitoring and Configuring the Printer Displaying Web Image Monitor Help When using Help for the first time, clicking either [Help] in the header area or the icon marked "?" in the display area makes the following screen appear, in which you can view Help in two different ways, as shown below: ❖ Viewing Help on our Web site Downloading Help to your computer ❖ Downloading and Checking Help You can download Help to your computer. As the Help URL, you can specify the path to the local file to view the Help without connecting to the Internet. ❒ By clicking [Help] in the header area, the contents of Help appear. ❒ By clicking "?", the Help icon in the display area, Help for the setting items in the display area appears. Downloading Help A In the [OS] list, select the operating system. B In the [Language] list, select the language. C Click [Download]. D Download Help by following the instructions on the screen. E Store the downloaded compressed file in a location, and then decom- press the file. To view the downloaded Web Image Monitor Help, set the path to the location of the decompressed file. Linking the URL of the Help File to the [Help] Button. You can link the URL of the help file on a computer or Web server to the [Help] button. A Log on to Web Image Monitor in the administrator mode. B In the menu area, click [Configuration]. C Click [Webpage]. D In the [Help URL] box, enter the URL of the help file. If you saved the help file to "C:HELPEN", enter "file://C:/HELP/". For example, if you saved the file to a Web server, and the URL of the index file is "http:// a.b.c.d/HELP/EN/index.html", enter "http://a.b.c.d/HELP/". 165
-
 1
1 -
2
-
3
-
4
-
5
-
6
-
7
-
8
-
9
-
10
-
11
-
12
-
13
-
14
-
15
-
16
-
17
-
18
-
19
-
20
-
21
-
22
-
23
-
24
-
25
-
26
-
27
-
28
-
29
-
30
-
31
-
32
-
33
-
34
-
35
-
36
-
37
-
38
-
39
-
40
-
41
-
42
-
43
-
44
-
45
-
46
-
47
-
48
-
49
-
50
-
51
-
52
-
53
-
54
-
55
-
56
-
57
-
58
-
59
-
60
-
61
-
62
-
63
-
64
-
65
-
66
-
67
-
68
-
69
-
70
-
71
-
72
-
73
-
74
-
75
-
76
-
77
-
78
-
79
-
80
-
81
-
82
-
83
-
84
-
85
-
86
-
87
-
88
-
89
-
90
-
91
-
92
-
93
-
94
-
95
-
96
-
97
-
98
-
99
-
100
-
101
-
102
-
103
-
104
-
105
-
106
-
107
-
108
-
109
-
110
-
111
-
112
-
113
-
114
-
115
-
116
-
117
-
118
-
119
-
120
-
121
-
122
-
123
-
124
-
125
-
126
-
127
-
128
-
129
-
130
-
131
-
132
-
133
-
134
-
135
-
136
-
137
-
138
-
139
-
140
-
141
-
142
-
143
-
144
-
145
-
146
-
147
-
148
-
149
-
150
-
151
-
152
-
153
-
154
-
155
-
156
-
157
-
158
-
159
-
 160
160 -
 161
161 -
 162
162 -
 163
163 -
 164
164 -
 165
165 -
 166
166 -
 167
167 -
 168
168 -
 169
169 -
 170
170 -
171
-
172
-
173
-
174
-
175
-
176
-
177
-
178
-
179
-
180
-
181
-
182
-
183
-
184
-
185
-
186
-
187
-
188
-
189
-
190
-
191
-
192
-
193
-
194
-
195
-
196
-
197
-
198
-
199
-
200
-
201
-
202
-
203
-
204
-
205
-
206
-
207
-
208
-
209
-
210
-
211
-
212
-
213
-
214
-
215
-
216
-
217
-
218
-
219
-
220
-
221
-
222
-
223
-
224
-
225
-
226
-
227
-
228
-
229
-
230
-
231
-
232
-
233
-
234
-
235
-
236
-
237
-
238
-
239
-
240
-
241
-
242
-
243
-
244
-
245
-
246
-
247
-
248
-
249
-
250
-
251
-
252
-
253
-
254
-
255
-
256
-
257
-
258
-
259
-
260
-
261
-
262
-
263
-
264
-
265
-
266
-
267
-
268
-
269
-
270
-
271
-
272
-
273
-
274
-
275
-
276
-
277
-
278
-
279
-
280
-
281
-
282
-
283
-
284
-
285
-
286
-
287
-
288
-
289
-
290
-
291
-
292
-
293
-
294
-
295
-
296
-
297
-
298
-
299
-
300
-
301
 |
 |