Ricoh CL3500N Operating Instructions - Page 242
Remote Printer No.N
 |
UPC - 026649024344
View all Ricoh CL3500N manuals
Add to My Manuals
Save this manual to your list of manuals |
Page 242 highlights
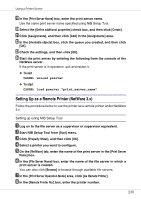
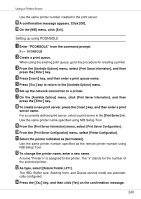
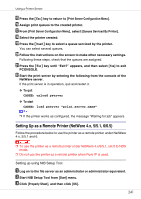
Using a Printer Server D Select a printer you want to configure. E Click [NetWare]. F In the [Logon Mode] area, click [File Server Mode] or [NDS mode]. If [File Server Mode] is selected, the network connection is established based on the string you entered. If [NDS mode] is selected, the network connection is established based on the string you entered. G In the [Print Server Name(P):] box, enter the name of the print server. Use the same print server name in NWadmin. Enter up to 47 alphanumeric characters. H In the [File Server Name(F):] box, enter the name of the file server in which a print server is created. You can also click [Browse...] to browse through available file servers. Enter up to 47 alphanumeric characters. I In the [NDS Tree(T):] box, enter the NDS tree name and create the file serv- er. You can also click [Browse...] to browse through available NDS trees and NDS contexts. Enter up to 32 alphanumeric characters. Hyphens and underscores can also be used. J In the [NDS Context(C):] box, enter a context in which the print server is created. Enter up to 127 alphanumeric characters. For context, object names from Root are entered from the lowest object, with each object separated by a period. For example, to create a print server in the NETWORK object under the organization object DS of Root, enter "NETWORK.DS". K In the [Print Server Option Mode] area, click [As Remote Printer(R)]. L In the [Remote Printer No.(N)] box, enter the printer number. Use the same printer number created. M Click [OK] to close [NIB Setup Tool]. Setting up using NWadmin A From Windows, start NWadmin. For details about NWadmin, see the NetWare manuals. 242
-
 1
1 -
2
-
3
-
4
-
5
-
6
-
7
-
8
-
9
-
10
-
11
-
12
-
13
-
14
-
15
-
16
-
17
-
18
-
19
-
20
-
21
-
22
-
23
-
24
-
25
-
26
-
27
-
28
-
29
-
30
-
31
-
32
-
33
-
34
-
35
-
36
-
37
-
38
-
39
-
40
-
41
-
42
-
43
-
44
-
45
-
46
-
47
-
48
-
49
-
50
-
51
-
52
-
53
-
54
-
55
-
56
-
57
-
58
-
59
-
60
-
61
-
62
-
63
-
64
-
65
-
66
-
67
-
68
-
69
-
70
-
71
-
72
-
73
-
74
-
75
-
76
-
77
-
78
-
79
-
80
-
81
-
82
-
83
-
84
-
85
-
86
-
87
-
88
-
89
-
90
-
91
-
92
-
93
-
94
-
95
-
96
-
97
-
98
-
99
-
100
-
101
-
102
-
103
-
104
-
105
-
106
-
107
-
108
-
109
-
110
-
111
-
112
-
113
-
114
-
115
-
116
-
117
-
118
-
119
-
120
-
121
-
122
-
123
-
124
-
125
-
126
-
127
-
128
-
129
-
130
-
131
-
132
-
133
-
134
-
135
-
136
-
137
-
138
-
139
-
140
-
141
-
142
-
143
-
144
-
145
-
146
-
147
-
148
-
149
-
150
-
151
-
152
-
153
-
154
-
155
-
156
-
157
-
158
-
159
-
160
-
161
-
162
-
163
-
164
-
165
-
166
-
167
-
168
-
169
-
170
-
171
-
172
-
173
-
174
-
175
-
176
-
177
-
178
-
179
-
180
-
181
-
182
-
183
-
184
-
185
-
186
-
187
-
188
-
189
-
190
-
191
-
192
-
193
-
194
-
195
-
196
-
197
-
198
-
199
-
200
-
201
-
202
-
203
-
204
-
205
-
206
-
207
-
208
-
209
-
210
-
211
-
212
-
213
-
214
-
215
-
216
-
217
-
218
-
219
-
220
-
221
-
222
-
223
-
224
-
225
-
226
-
227
-
228
-
229
-
230
-
231
-
232
-
233
-
234
-
235
-
236
-
 237
237 -
 238
238 -
 239
239 -
 240
240 -
 241
241 -
 242
242 -
 243
243 -
 244
244 -
 245
245 -
 246
246 -
 247
247 -
248
-
249
-
250
-
251
-
252
-
253
-
254
-
255
-
256
-
257
-
258
-
259
-
260
-
261
-
262
-
263
-
264
-
265
-
266
-
267
-
268
-
269
-
270
-
271
-
272
-
273
-
274
-
275
-
276
-
277
-
278
-
279
-
280
-
281
-
282
-
283
-
284
-
285
-
286
-
287
-
288
-
289
-
290
-
291
-
292
-
293
-
294
-
295
-
296
-
297
-
298
-
299
-
300
-
301
 |
 |