Samsung CLP 300N User Manual (ENGLISH) - Page 20
Turning the Printer On, Printing a Demo Altitude adjustment - setup
 |
UPC - 635753722093
View all Samsung CLP 300N manuals
Add to My Manuals
Save this manual to your list of manuals |
Page 20 highlights
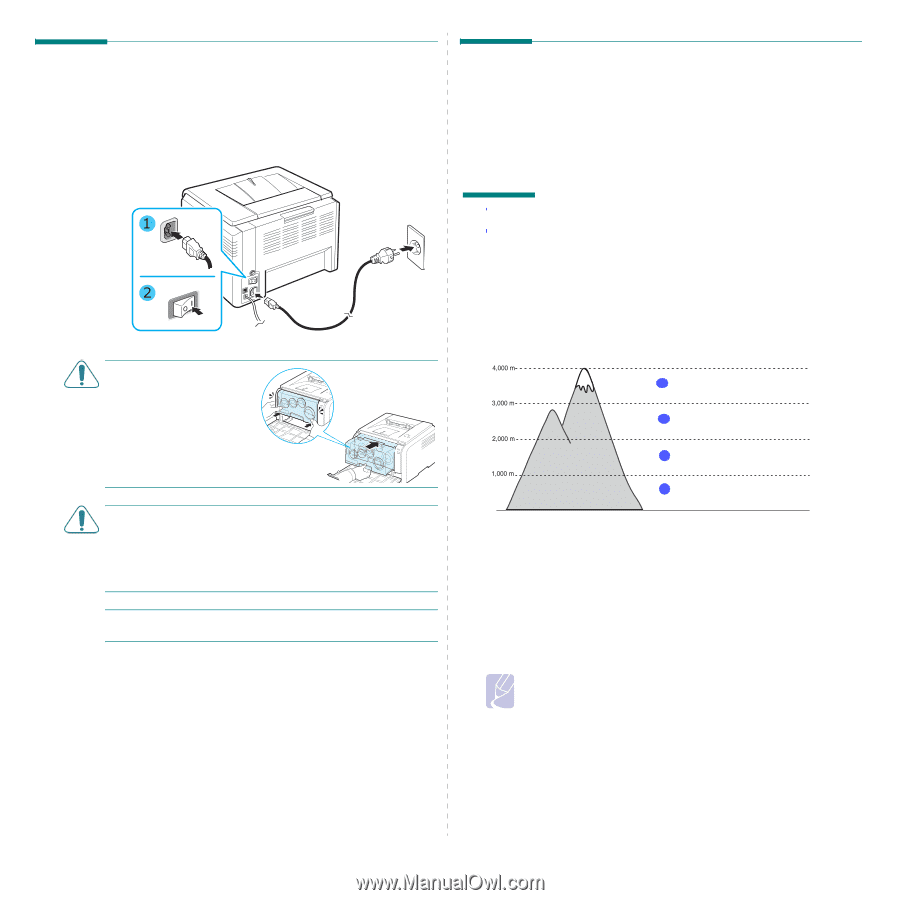
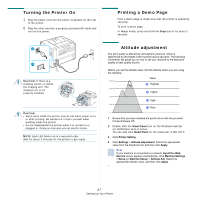
Turning the Printer On 1 Plug the power cord into the power receptacle on the rear of the printer. 2 Plug the other end into a properly grounded AC outlet and turn on the power. CAUTION: If there is a cracking sound, re-install the imaging unit. The imaging unit is not properly installed. CAUTION: • Some parts inside the printer may be hot when power is on, or after printing. Be careful not to burn yourself when working inside the printer. • Do not disassemble the printer when it is turned on or plugged in. Doing so may give you an electric shock. NOTE: Each LED blinks red in a repeated order. Wait for about 3 minutes for the printer to get ready. Printing a Demo Page Print a demo page to make sure that the printer is operating correctly. To print a demo page: In Ready mode, press and hold the Stop button for about 2 seconds. Altitude adjustment The print quality is affected by atmospheric pressure, which is determined by the height of the machine above sea level. The following information will guide you on how to set your machine to the best print quality or best quality of print. Before you set the altitude value, find the altitude where you are using the machine. Value 1 Highest 2 Higher 3 High 4 Plain 0 1 Ensure that you have installed the printer driver with the provided Printer Software CD. 2 Double-click the Smart Panel icon on the Windows task bar (or Notification Area in Linux). You can also click Smart Panel on the status bar in Mac OS X. 3 Click Printer Setting. 4 Click Settings > Altitude Adjustment. Select the appropriate value from the dropdown list, and then click Apply. Note If your machine is connected to a network, SyncThru Web Service screen appears automatically. Click Machine Settings > Setup (or Machine Setup) > Altitude Adj. Select the appropriate altitude value, and then click Apply. • 2.7 Setting Up Your Printer
-
 1
1 -
2
-
3
-
4
-
5
-
6
-
7
-
8
-
9
-
10
-
11
-
12
-
13
-
14
-
 15
15 -
 16
16 -
 17
17 -
 18
18 -
 19
19 -
 20
20 -
 21
21 -
 22
22 -
 23
23 -
 24
24 -
 25
25 -
26
-
27
-
28
-
29
-
30
-
31
-
32
-
33
-
34
-
35
-
36
-
37
-
38
-
39
-
40
-
41
-
42
-
43
-
44
-
45
-
46
-
47
-
48
-
49
-
50
-
51
-
52
-
53
-
54
-
55
-
56
-
57
-
58
-
59
-
60
-
61
-
62
-
63
-
64
-
65
-
66
-
67
-
68
-
69
-
70
-
71
-
72
-
73
-
74
-
75
-
76
-
77
-
78
-
79
-
80
-
81
-
82
-
83
-
84
-
85
-
86
-
87
-
88
-
89
-
90
-
91
 |
 |