Samsung CLP 300N User Manual (ENGLISH) - Page 76
Using a Overlay, Extras, Overlay, Load Overlay, Overlay List, Confirm Overlay When, Printing
 |
UPC - 635753722093
View all Samsung CLP 300N manuals
Add to My Manuals
Save this manual to your list of manuals |
Page 76 highlights
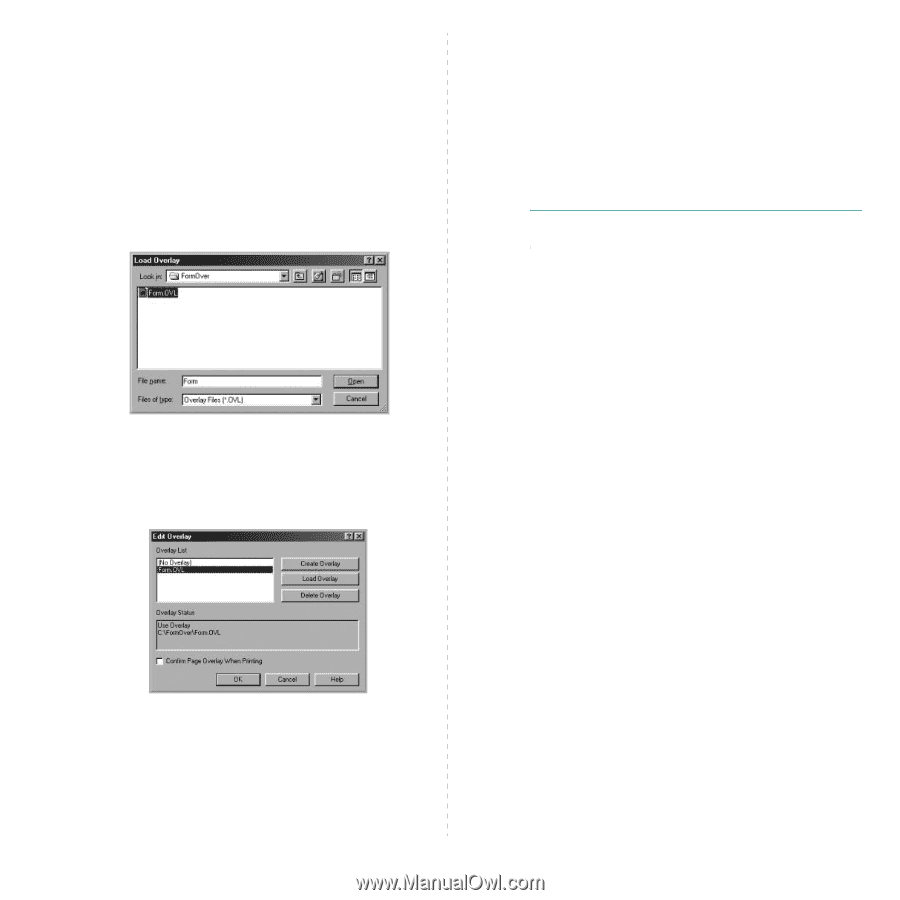
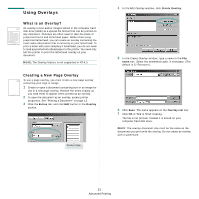
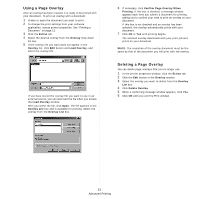
Using a Page Overlay After an overlay has been created, it is ready to be printed with your document. To print an overlay with a document: 1 Create or open the document you want to print. 2 To change the print settings from your software application, access printer properties. See "Printing a Document" on page 12. 3 Click the Extras tab. 4 Select the desired overlay from the Overlay drop-down list box. 5 If the overlay file you want does not appear in the Overlay list, click Edit button and Load Overlay, and select the overlay file. If you have stored the overlay file you want to use in an external source, you can also load the file when you access the Load Overlay window. After you select the file, click Open. The file appears in the Overlay List box and is available for printing. Select the overlay from the Overlay List box. 6 If necessary, click Confirm Page Overlay When Printing. If this box is checked, a message window appears each time you submit a document for printing, asking you to confirm your wish to print an overlay on your document. If this box is not checked and an overlay has been selected, the overlay automatically prints with your document. 7 Click OK or Yes until printing begins. The selected overlay downloads with your print job and prints on your document. NOTE: The resolution of the overlay document must be the same as that of the document you will print with the overlay. Deleting a Page Overlay You can delete page overlays that you no longer use. 1 In the printer properties window, click the Extras tab. 2 Click the Edit button in the Overlay section. 3 Select the overlay you want to delete from the Overlay List box. 4 Click Delete Overlay. 5 When a confirming message window appears, click Yes. 6 Click OK until you exit the Print window. 23 Advanced Printing
-
 1
1 -
2
-
3
-
4
-
5
-
6
-
7
-
8
-
9
-
10
-
11
-
12
-
13
-
14
-
15
-
16
-
17
-
18
-
19
-
20
-
21
-
22
-
23
-
24
-
25
-
26
-
27
-
28
-
29
-
30
-
31
-
32
-
33
-
34
-
35
-
36
-
37
-
38
-
39
-
40
-
41
-
42
-
43
-
44
-
45
-
46
-
47
-
48
-
49
-
50
-
51
-
52
-
53
-
54
-
55
-
56
-
57
-
58
-
59
-
60
-
61
-
62
-
63
-
64
-
65
-
66
-
67
-
68
-
69
-
70
-
 71
71 -
 72
72 -
 73
73 -
 74
74 -
 75
75 -
 76
76 -
 77
77 -
 78
78 -
 79
79 -
 80
80 -
 81
81 -
82
-
83
-
84
-
85
-
86
-
87
-
88
-
89
-
90
-
91
 |
 |