Samsung CLP 300N User Manual (ENGLISH) - Page 41
AaBbCc, Color or Black - cleaning
 |
UPC - 635753722093
View all Samsung CLP 300N manuals
Add to My Manuals
Save this manual to your list of manuals |
Page 41 highlights
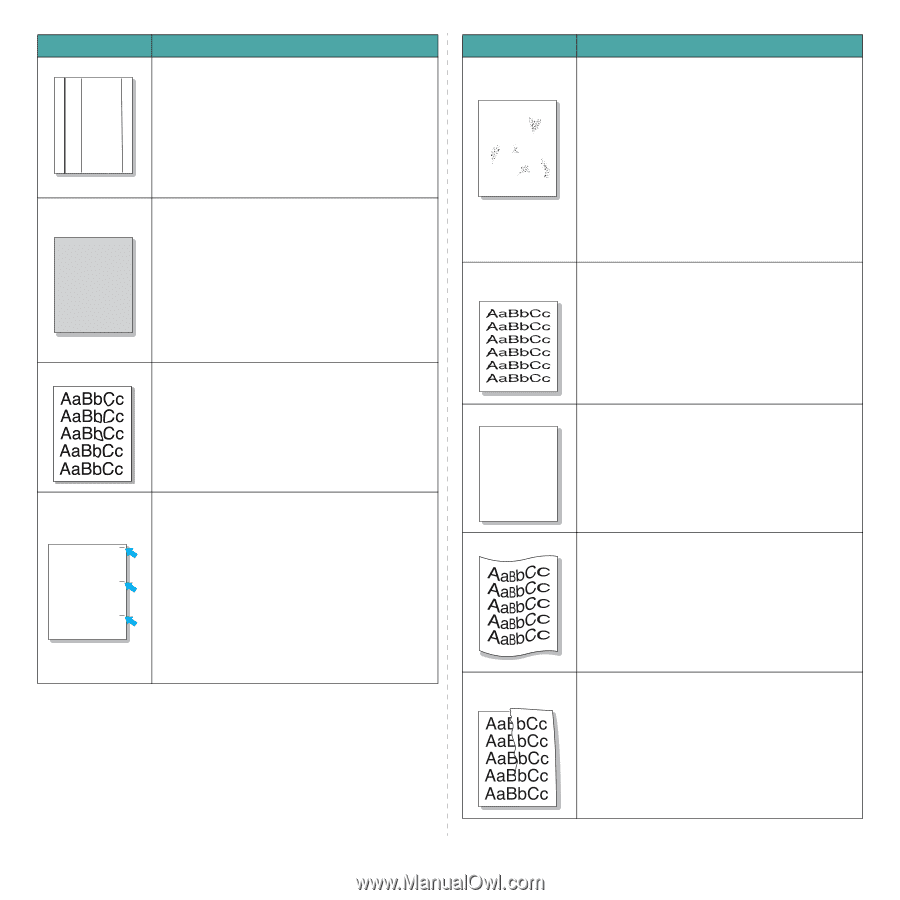
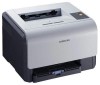
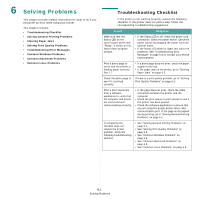
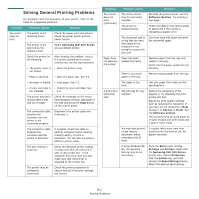
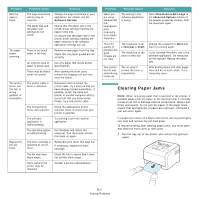
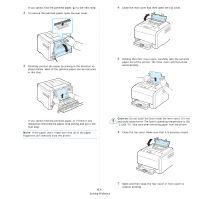
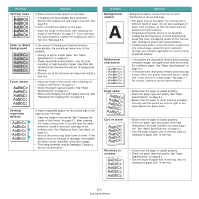
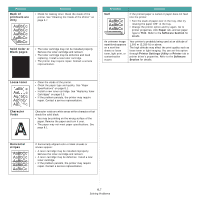
Problem Vertical lines AaBbCc AaBbCc AaBbCc AaBbCc AaBbCc Color or Black background AaBbCc AaBbCc AaBbCc AaBbCc AaBbCc Toner smear Solution If black vertical streaks appear on the page: • A imaging unit has probably been scratched. Remove the imaging unit and install a new one. See page 5.3. If white vertical lines appear on the page: • Clean the inside of the printer. See "Cleaning the Inside of the Printer" on page 5.7. If you still have the same problems, replace the imaging unit with a new one. See page 5.3. If the amount of background shading becomes unacceptable, the procedures below may fix the problem. • Change to lighter weight paper. See "Paper Specifications" on page 8.1. • Check the printer's environment; very dry (low humidity) or high humidity (higher than 80% RH) conditions can increase the amount of background shading. • Remove one of the old toner cartridges and install a new one. • Clean the inside of the printer. See "Cleaning the Inside of the Printer" on page 5.7 • Check the paper type and quality. See "Paper Specifications" on page 8.1. • Remove the imaging unit and install a new one. See "Replacing the Imaging Unit" on page 5.4. Vertical repetitive defects AaBbCc AaBbCc AaBbCc AaBbCc AaBbCc If marks repeatedly appear on the printed side of the page at even intervals: • Clean the inside of the printer. See "Cleaning the Inside of the Printer" on page 5.7. After cleaning the inside of the printer, if you still have the same problems, install a new toner cartridge of the problem color. See "Replacing Toner Cartridges" on page 5.3. • Parts of the printer may have toner on them. If the defects occur on the back of the page, the problem will likely correct itself after a few more pages. • The fusing assembly may be damaged. Contact a service representative. Problem Background scatter A Misformed characters Solution Background scatter results from bits of toner distributed on the printed page. • The paper may be too damp. Try printing with a different batch of paper. Do not open packages of paper until necessary so that the paper does not absorb too much moisture. • If background scatter occurs on an envelope, change the printing layout to avoid printing over areas that have overlapping seams on the reverse side. Printing on seams can cause problems. • If background scatter covers the entire surface area of a printed page, adjust the print resolution through your software application or via the printer properties window. • If characters are improperly formed and producing hollowed images, the paper stock may be too slick. Try a different paper. See "Paper Specifications" on page 8.1. • If characters are improperly formed and producing a wavy effect, the printer may need service. Verify that it also occurs on a demo page. See page 2.7. For service, contact a service representative. Page skew AAAAaAaaaBaBBBbBbbbCbCCCCccccc Curl or wave • Ensure that the paper is loaded properly. • Check the paper type and quality. See "Paper Specifications" on page 8.1. • Ensure that the paper or other material is loaded correctly and the guides are not too tight or too loose against the paper stack. • Ensure that the paper is loaded properly. • Check the paper type and quality. Both high temperature and high humidity can cause paper curl. See "Paper Specifications" on page 8.1. • Turn the stack of paper over in the tray. Also try rotating the paper 180° in the tray. Wrinkles or creases • Ensure that the paper is loaded properly. • Check the paper type and quality. See "Paper Specifications" on page 8.1. • Turn the stack of paper over in the tray. Also try rotating the paper 180° in the tray. 6.6 Solving Problems
-
 1
1 -
2
-
3
-
4
-
5
-
6
-
7
-
8
-
9
-
10
-
11
-
12
-
13
-
14
-
15
-
16
-
17
-
18
-
19
-
20
-
21
-
22
-
23
-
24
-
25
-
26
-
27
-
28
-
29
-
30
-
31
-
32
-
33
-
34
-
35
-
 36
36 -
 37
37 -
 38
38 -
 39
39 -
 40
40 -
 41
41 -
 42
42 -
 43
43 -
 44
44 -
 45
45 -
 46
46 -
47
-
48
-
49
-
50
-
51
-
52
-
53
-
54
-
55
-
56
-
57
-
58
-
59
-
60
-
61
-
62
-
63
-
64
-
65
-
66
-
67
-
68
-
69
-
70
-
71
-
72
-
73
-
74
-
75
-
76
-
77
-
78
-
79
-
80
-
81
-
82
-
83
-
84
-
85
-
86
-
87
-
88
-
89
-
90
-
91
 |
 |