Samsung NE58K9850WG/AA User Manual - Page 56
Samsung NE58K9850WG/AA Manual
 |
View all Samsung NE58K9850WG/AA manuals
Add to My Manuals
Save this manual to your list of manuals |
Page 56 highlights
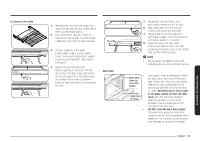
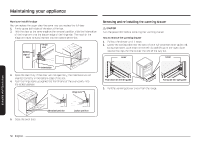
Maintaining your appliance How to re-install the door You can replace the upper door the same way you replace the full door. 1. Firmly grasp both sides of the door at the top. 2. With the door at the same angle as the removal position, slide the indentation of the hinge arm into the bottom edge of the hinge slot. The notch in the hinge arm must be fully inserted into the bottom of the slot. Hinge arm Bottom edge of slot Removing and re-installing the warming drawer CAUTION Turn the power OFF before removing the warming drawer. How to remove the warming drawer 1. Pull out the drawer until it stops. 2. Locate the locking clips near the back of each full-extension roller guide rail. Using two hands, push down on the left clip and lift up on the right clip to release the clips. Pull the drawer the rest of the way out. Lever Lever Indentation 3. Open the door fully. If the door will not open fully, the indentation is not inserted correctly in the bottom edge of the slot. 4. Push the hinge locks up against the front frame of the oven cavity into the locked position. Hinge lock Maintaining your appliance Push down on the left guide Pull up on the right guide 3. Pull the warming drawer away from the range. Unlocked position Locked position 5. Close the oven door. 56 English
-
 1
1 -
2
-
3
-
4
-
5
-
6
-
7
-
8
-
9
-
10
-
11
-
12
-
13
-
14
-
15
-
16
-
17
-
18
-
19
-
20
-
21
-
22
-
23
-
24
-
25
-
26
-
27
-
28
-
29
-
30
-
31
-
32
-
33
-
34
-
35
-
36
-
37
-
38
-
39
-
40
-
41
-
42
-
43
-
44
-
45
-
46
-
47
-
48
-
49
-
50
-
 51
51 -
 52
52 -
 53
53 -
 54
54 -
 55
55 -
 56
56 -
 57
57 -
 58
58 -
 59
59 -
 60
60 -
 61
61 -
62
-
63
-
64
-
65
-
66
-
67
-
68
-
69
-
70
-
71
-
72
-
73
-
74
-
75
-
76
-
77
-
78
-
79
-
80
-
81
-
82
-
83
-
84
-
85
-
86
-
87
-
88
-
89
-
90
-
91
-
92
-
93
-
94
-
95
-
96
-
97
-
98
-
99
-
100
-
101
-
102
-
103
-
104
-
105
-
106
-
107
-
108
-
109
-
110
-
111
-
112
-
113
-
114
-
115
-
116
-
117
-
118
-
119
-
120
-
121
-
122
-
123
-
124
-
125
-
126
-
127
-
128
-
129
-
130
-
131
-
132
-
133
-
134
-
135
-
136
-
137
-
138
-
139
-
140
-
141
-
142
-
143
-
144
-
145
-
146
-
147
-
148
-
149
-
150
-
151
-
152
-
153
-
154
-
155
-
156
-
157
-
158
-
159
-
160
-
161
-
162
-
163
-
164
-
165
-
166
-
167
-
168
-
169
-
170
-
171
-
172
-
173
-
174
-
175
-
176
-
177
-
178
-
179
-
180
-
181
-
182
-
183
-
184
-
185
-
186
-
187
-
188
-
189
-
190
-
191
-
192
-
193
-
194
-
195
-
196
-
197
-
198
-
199
-
200
-
201
-
202
-
203
-
204
 |
 |
