Samsung SC-D372 User Manual (ENGLISH) - Page 16
Using the Lithium Ion Battery Pack, Utilisation de la batterie lithium-ion
 |
UPC - 036725301689
View all Samsung SC-D372 manuals
Add to My Manuals
Save this manual to your list of manuals |
Page 16 highlights
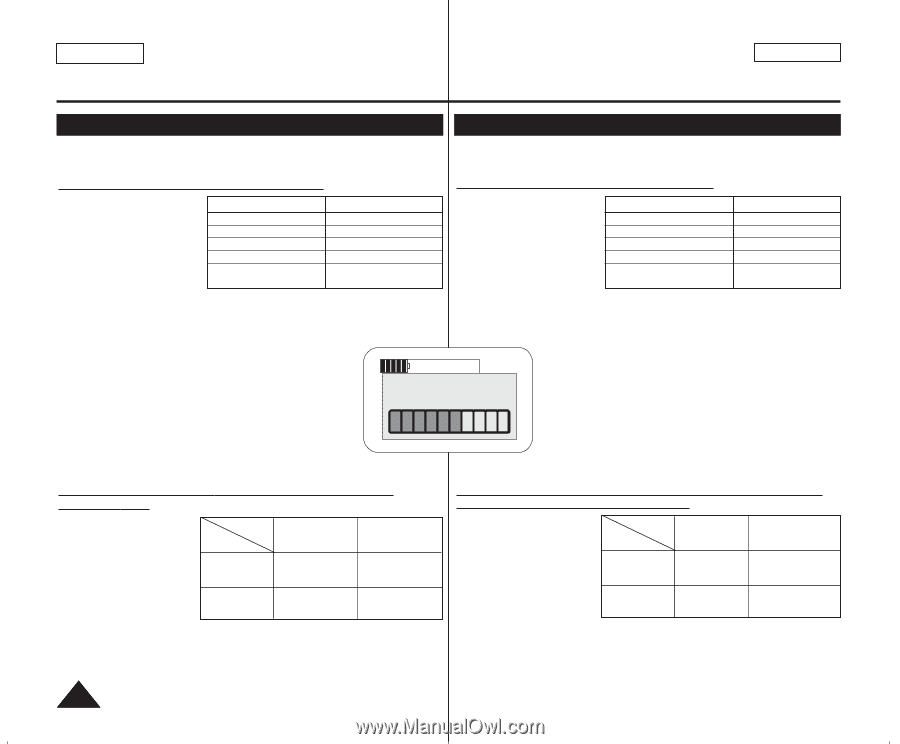
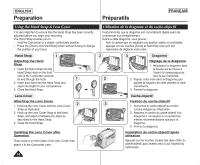
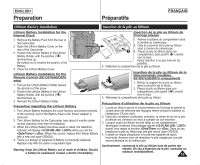
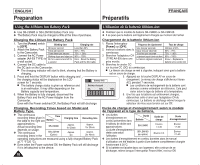
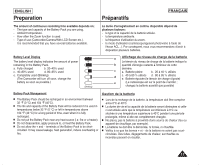
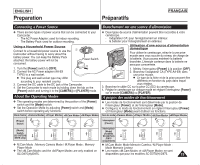
ENGLISH Preparation Préparatifs FRANÇAIS Using the Lithium Ion Battery Pack Utilisation de la batterie lithium-ion ✤ Use SB-LSM80 or SB-LSM160 Battery Pack only. ✤ The Battery Pack may be charged a little at the time of purchase. ✤ N'utilisez que le modèle de batterie SB-LSM80 ou SB-LSM160. ✤ Il se peut que la batterie soit légèrement chargée au moment de l'achat. Charging the Lithium Ion Battery Pack Chargement de la batterie lithium-ion 1. Turn the [Power] switch Blinking time Charging rate to [OFF]. 2. Attach the Battery Pack to the Camcorder. Once per second Twice per second Three times per second Less than 50% 50% ~ 75% 75% ~ 90% 3. Connect the AC Power Blinking stops and stays on 90% ~ 100% adapter (AA-E9 TYPE) to On for a second and off for Error - Reset the Battery 1. Placez l'interrupteur [Power] sur [OFF]. 2. Insérez la batterie dans le caméscope. 3. Branchez l'adaptateur CA (TYPE AA-E9) dans une Fréquence de clignotement Une fois par seconde Deux fois par seconde Trois fois par seconde Le clignotement cesse et le témoin reste allumé Le témoin clignote lentement Taux de charge Inférieur à 50% 50% ~ 75% 75% ~ 90% 90% ~ 100% Erreur - Replacez la a wall socket. a second Pack and the DC Cable prise murale. batterie et le cordon CC 4. Connect the DC cable to 4. Branchez le cordon CC the DC jack on the Camcorder. sur la prise CC (DC) du caméscope. I The charging indicator will start to blink, showing that the Battery is I Le témoin de charge se met à clignoter, indiquant ainsi que la batterie charging. est en cours de charge. 5. Press and hold the DISPLAY button while charging and 5. Appuyez sur la touche DISPLAY en cours de the charging status will be displayed on the LCD screen for 7 seconds. Battery Info chargement. Le niveau de charge s'affiche sur l'écran ACL pendant 7 secondes. I The battery charge status is given as reference and Battery charged I Les conditions de rechargement de la batterie sont is an estimation. It may differ depending on the 0% 50% 100% données comme estimation de référence. Cela peut Battery capacity and temperature. varier selon le type de batterie et la température. 6. When the Battery is fully charged, disconnect the 6. Une fois que la batterie est entièrement chargée, Battery Pack and the AC Power Adapter from the débranchez celle-ci ainsi que l'adaptateur CA du Camcorder. caméscope. La batterie se décharge même lorsque le Even with the Power switched Off, the Battery Pack will still discharge. sélecteur de mise sous tension est sur Off. Charging, Recording Times based on Model and Battery Type. ✤ The continuous recording times given in Time the table to the right are Battery Charging time Recording time approximations. Actual recording time depends on usage. ✤ The continuous recording times in the SB-LSM80 SB-LSM160 (Option) Approx. 1hr 20min Approx. 3hr Approx. 1hr 20min Approx. 2hr 40min operating instructions are measured using a fully charged Battery Pack at 77 °F (25 °C). ✤ Even when the Power switched Off, the Battery Pack will still discharge if it is left attached to the device. 16 Durée de charge et d'enregistrement selon le modèle de l'appareil et le type de batterie, ✤ Les durées d'enregistrement en continu présentées dans Durée Batterie Durée de charge Durée d'enregistrement le tableau de droite sont approximatives. SB-LSM80 Environ 1 h 20 Environ 1 h 20 La durée d'enregistrement réelle varie selon l'utilisation. SB-LSM160 (en option) Environ 3 h Environ 2 h 40 ✤ Les durées d'enregistrement en continu données dans le manuel d'utilisation ont été établies à partir d'une batterie complètement chargée fonctionnant à 25°C. ✤ Si la batterie est laissée dans son logement, elle continue de se décharger, même lorsque l'interrupteur Power (Alim.) est sur Off.
-
 1
1 -
2
-
3
-
4
-
5
-
6
-
7
-
8
-
9
-
10
-
 11
11 -
 12
12 -
 13
13 -
 14
14 -
 15
15 -
 16
16 -
 17
17 -
 18
18 -
 19
19 -
 20
20 -
 21
21 -
22
-
23
-
24
-
25
-
26
-
27
-
28
-
29
-
30
-
31
-
32
-
33
-
34
-
35
-
36
-
37
-
38
-
39
-
40
-
41
-
42
-
43
-
44
-
45
-
46
-
47
-
48
-
49
-
50
-
51
-
52
-
53
-
54
-
55
-
56
-
57
-
58
-
59
-
60
-
61
-
62
-
63
-
64
-
65
-
66
-
67
-
68
-
69
-
70
-
71
-
72
-
73
-
74
-
75
-
76
-
77
-
78
-
79
-
80
-
81
-
82
-
83
-
84
-
85
-
86
-
87
-
88
-
89
-
90
-
91
-
92
-
93
-
94
-
95
-
96
-
97
-
98
-
99
-
100
-
101
-
102
-
103
-
104
-
105
-
106
-
107
-
108
-
109
-
110
 |
 |