Samsung SCX 6322DN User Manual (ENGLISH) - Page 34
Notes, with the side to be printed on facing down, Software, - printer driver
 |
UPC - 635753620658
View all Samsung SCX 6322DN manuals
Add to My Manuals
Save this manual to your list of manuals |
Page 34 highlights
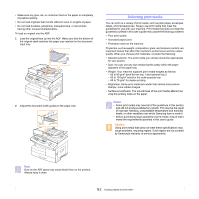
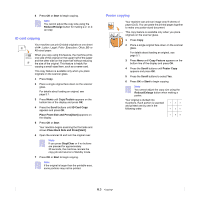
1 Open the multi-purpose tray and unfold the multi-purpose tray extension, as shown. 2 If you are using paper, flex or fan the edge of the paper stack to separate the pages before loading. Notes Depending on the media type you are using, keep the following loading guidelines: • Envelopes: Flap side down and with the stamp area on the top left side. • Transparencies: Print side up and the top with the adhesive strip entering the machine first. • Labels: Print side up and top short edge entering the machine first. • Preprinted paper: Design side up with the top edge toward the machine. • Card stock: Print side up and the short edge entering the machine first. • Previously printed paper: Previously printed side down with an uncurled edge toward the machine. 4 Squeeze the multi-purpose tray paper width guides and adjust them to the width of the paper. Do not force too much, or the paper will be bent, which will result in a paper jam or skew. For transparencies, hold them by the edges and avoid touching the print side. Oils from your fingers can cause print quality problems. 3 Load the paper with the side to be printed on facing down. 5 After loading paper, set the paper type and size for the multipurpose tray. See page 5.8 for copying and faxing or the Software Section for PC-printing. Note The settings made from the printer driver override the settings on the control panel. 6 After printing, fold the multi-purpose tray extension and close the multi-purpose tray. 5.7
-
 1
1 -
2
-
3
-
4
-
5
-
6
-
7
-
8
-
9
-
10
-
11
-
12
-
13
-
14
-
15
-
16
-
17
-
18
-
19
-
20
-
21
-
22
-
23
-
24
-
25
-
26
-
27
-
28
-
 29
29 -
 30
30 -
 31
31 -
 32
32 -
 33
33 -
 34
34 -
 35
35 -
 36
36 -
 37
37 -
 38
38 -
 39
39 -
40
-
41
-
42
-
43
-
44
-
45
-
46
-
47
-
48
-
49
-
50
-
51
-
52
-
53
-
54
-
55
-
56
-
57
-
58
-
59
-
60
-
61
-
62
-
63
-
64
-
65
-
66
-
67
-
68
-
69
-
70
-
71
-
72
-
73
-
74
-
75
-
76
-
77
-
78
-
79
-
80
-
81
-
82
-
83
-
84
-
85
-
86
-
87
-
88
-
89
-
90
-
91
-
92
-
93
-
94
-
95
-
96
-
97
-
98
-
99
-
100
-
101
-
102
-
103
-
104
-
105
-
106
-
107
-
108
-
109
-
110
-
111
-
112
-
113
-
114
-
115
-
116
-
117
-
118
-
119
-
120
-
121
-
122
-
123
-
124
-
125
-
126
-
127
-
128
-
129
-
130
-
131
-
132
-
133
-
134
-
135
-
136
-
137
-
138
-
139
-
140
-
141
-
142
-
143
-
144
-
145
-
146
-
147
-
148
 |
 |
