Samsung SCX 6322DN User Manual (ENGLISH) - Page 69
Cleaning your machine, Cleaning the outside, Cleaning the scan unit
 |
UPC - 635753620658
View all Samsung SCX 6322DN manuals
Add to My Manuals
Save this manual to your list of manuals |
Page 69 highlights
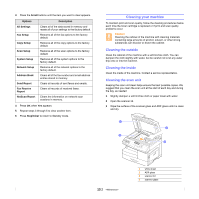
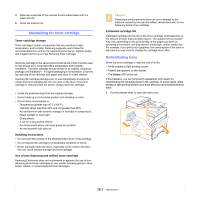
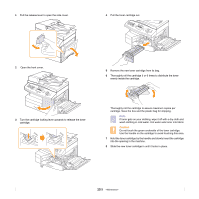
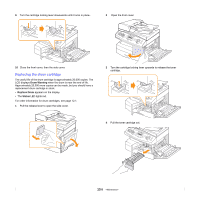
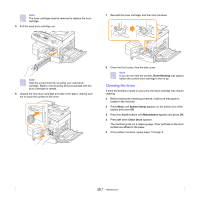
3 Press the Scroll buttons until the item you want to clear appears. Options All Settings Fax Setup Copy Setup Scan Setup System Setup Network Setup Address Book Send Report Fax Receive Report NetScan Report Description Clears all of the data stored in memory and resets all of your settings to the factory default. Restores all of the fax options to the factory default. Restores all of the copy options to the factory default. Restores all of the scan options to the factory default. Restores all of the system options to the factory default. Restores all of the network options to the factory default. Clears all of the fax number and email address entries stored in memory. Clears all records of sent faxes and emails. Clears all records of received faxes. Clears the information on network scan sessions in memory. 4 Press OK when Yes appears. 5 Repeat steps 3 through 5 to clear another item. 6 Press Stop/Clear to return to Standby mode. Cleaning your machine To maintain print and scan quality, follow the cleaning procedures below each time the toner cartridge is replaced or if print and scan quality problems occur. Caution Cleaning the cabinet of the machine with cleaning materials containing large amounts of alcohol, solvent, or other strong substances can discolor or distort the cabinet. Cleaning the outside Clean the cabinet of the machine with a soft lint-free cloth. You can dampen the cloth slightly with water, but be careful not to let any water drip onto or into the machine. Cleaning the inside Clean the inside of the machine. Contact a service representative. Cleaning the scan unit Keeping the scan unit clean helps ensure the best possible copies. We suggest that you clean the scan unit at the start of each day and during the day, as needed. 1 Slightly dampen a soft lint-free cloth or paper towel with water. 2 Open the scanner lid. 3 Wipe the surface of the scanner glass and ADF glass until it is clean and dry. 1 3 2 4 13.2 1 white sheet 2 ADF glass 3 scanner lid 4 scanner glass
-
 1
1 -
2
-
3
-
4
-
5
-
6
-
7
-
8
-
9
-
10
-
11
-
12
-
13
-
14
-
15
-
16
-
17
-
18
-
19
-
20
-
21
-
22
-
23
-
24
-
25
-
26
-
27
-
28
-
29
-
30
-
31
-
32
-
33
-
34
-
35
-
36
-
37
-
38
-
39
-
40
-
41
-
42
-
43
-
44
-
45
-
46
-
47
-
48
-
49
-
50
-
51
-
52
-
53
-
54
-
55
-
56
-
57
-
58
-
59
-
60
-
61
-
62
-
63
-
 64
64 -
 65
65 -
 66
66 -
 67
67 -
 68
68 -
 69
69 -
 70
70 -
 71
71 -
 72
72 -
 73
73 -
 74
74 -
75
-
76
-
77
-
78
-
79
-
80
-
81
-
82
-
83
-
84
-
85
-
86
-
87
-
88
-
89
-
90
-
91
-
92
-
93
-
94
-
95
-
96
-
97
-
98
-
99
-
100
-
101
-
102
-
103
-
104
-
105
-
106
-
107
-
108
-
109
-
110
-
111
-
112
-
113
-
114
-
115
-
116
-
117
-
118
-
119
-
120
-
121
-
122
-
123
-
124
-
125
-
126
-
127
-
128
-
129
-
130
-
131
-
132
-
133
-
134
-
135
-
136
-
137
-
138
-
139
-
140
-
141
-
142
-
143
-
144
-
145
-
146
-
147
-
148
 |
 |
