Samsung SCX 6322DN User Manual (ENGLISH) - Page 74
Cleaning the drum, Drum Warning, System Setup, Scroll, Maintenance, Clean Drum - brochure
 |
UPC - 635753620658
View all Samsung SCX 6322DN manuals
Add to My Manuals
Save this manual to your list of manuals |
Page 74 highlights
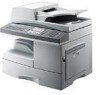
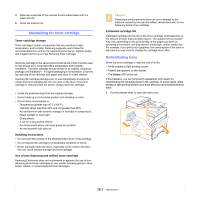
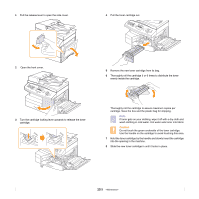
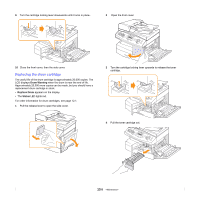
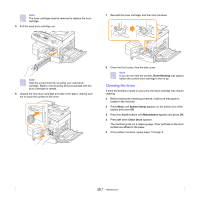
Note The toner cartridge must be removed to replace the drum cartridge. 5 Pull the used drum cartridge out. 7 Reinstall the toner cartridge, and then lock the lever. Note Help the environment by recycling your used drum cartridge. Refer to the recycling brochure packed with the drum cartridge for details. 6 Unpack the new drum cartridge and slide it into place, making sure not to touch the surface of the drum. 8 Close the front cover, then the side cover. Note If you do not reset the counter, Drum Warning may appear before the current drum cartridge's time is up. Cleaning the drum If there are streaks or spots on your print, the drum cartridge may require cleaning. 1 Before starting the cleaning procedure, make sure that paper is loaded in the machine. 2 Press Menu until System Setup appears on the bottom line of the display and press OK. 3 Press the Scroll buttons until Maintenance appears and press OK. 4 Press OK when Clean Drum appears. The machine prints out a cleaning page. Toner particles on the drum surface are affixed to the paper. 5 If the problem remains, repeat steps 1 through 4. 13.7
-
 1
1 -
2
-
3
-
4
-
5
-
6
-
7
-
8
-
9
-
10
-
11
-
12
-
13
-
14
-
15
-
16
-
17
-
18
-
19
-
20
-
21
-
22
-
23
-
24
-
25
-
26
-
27
-
28
-
29
-
30
-
31
-
32
-
33
-
34
-
35
-
36
-
37
-
38
-
39
-
40
-
41
-
42
-
43
-
44
-
45
-
46
-
47
-
48
-
49
-
50
-
51
-
52
-
53
-
54
-
55
-
56
-
57
-
58
-
59
-
60
-
61
-
62
-
63
-
64
-
65
-
66
-
67
-
68
-
 69
69 -
 70
70 -
 71
71 -
 72
72 -
 73
73 -
 74
74 -
 75
75 -
 76
76 -
 77
77 -
 78
78 -
 79
79 -
80
-
81
-
82
-
83
-
84
-
85
-
86
-
87
-
88
-
89
-
90
-
91
-
92
-
93
-
94
-
95
-
96
-
97
-
98
-
99
-
100
-
101
-
102
-
103
-
104
-
105
-
106
-
107
-
108
-
109
-
110
-
111
-
112
-
113
-
114
-
115
-
116
-
117
-
118
-
119
-
120
-
121
-
122
-
123
-
124
-
125
-
126
-
127
-
128
-
129
-
130
-
131
-
132
-
133
-
134
-
135
-
136
-
137
-
138
-
139
-
140
-
141
-
142
-
143
-
144
-
145
-
146
-
147
-
148
 |
 |
