Samsung SL-M2875DW User Guide - Page 154
IPv4 configuration using SetIP Linux, Network Connected PrinterWired or Wireless
 |
View all Samsung SL-M2875DW manuals
Add to My Manuals
Save this manual to your list of manuals |
Page 154 highlights
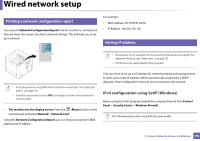
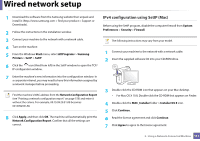
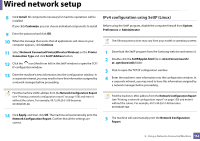
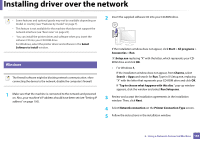
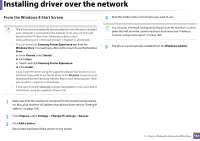
Wired network setup 8 Click Install. All components necessary for machine operations will be installed. If you click Customize, you can choose individual components to install. 9 Enter the password and click OK. 10 When the message that warns that all applications will close on your computer appears, click Continue. 11 Select Network Connected Printer(Wired or Wireless) on the Printer Connection Type and click Set IP Address button. 12 Click the icon (third from left) in the SetIP window to open the TCP/ IP configuration window. 13 Enter the machine's new information into the configuration window. In a corporate intranet, you may need to have this information assigned by a network manager before proceeding. IPv4 configuration using SetIP (Linux) Before using the SetIP program, disable the computer firewall from System Preferences or Administrator. The following instructions may vary from your model or operating systems. 1 Download the SetIP program from the Samsung web site and extract it. 2 Double-click the SetIPApplet.html file in cdroot/Linux/noarch/ at_opt/share/utils folder. 3 Click to open the TCP/IP configuration window. 4 Enter the machine's new information into the configuration window. In a corporate intranet, you may need to have this information assigned by a network manager before proceeding. Find the machine's MAC address from the Network Configuration Report (see "Printing a network configuration report" on page 150) and enter it without the colons. For example, 00:15:99:29:51:A8 becomes 0015992951A8. Find the machine's MAC address from the Network Configuration Report (see "Printing a network configuration report" on page 150) and enter it without the colons. For example, 00:15:99:29:51:A8 becomes 0015992951A8. 14 Click Apply, and then click OK. The machine will automatically print the Network Configuration Report. Confirm that all the settings are correct. 5 The machine will automatically print the Network Configuration Report. 2. Using a Network-Connected Machine 152
-
 1
1 -
2
-
3
-
4
-
5
-
6
-
7
-
8
-
9
-
10
-
11
-
12
-
13
-
14
-
15
-
16
-
17
-
18
-
19
-
20
-
21
-
22
-
23
-
24
-
25
-
26
-
27
-
28
-
29
-
30
-
31
-
32
-
33
-
34
-
35
-
36
-
37
-
38
-
39
-
40
-
41
-
42
-
43
-
44
-
45
-
46
-
47
-
48
-
49
-
50
-
51
-
52
-
53
-
54
-
55
-
56
-
57
-
58
-
59
-
60
-
61
-
62
-
63
-
64
-
65
-
66
-
67
-
68
-
69
-
70
-
71
-
72
-
73
-
74
-
75
-
76
-
77
-
78
-
79
-
80
-
81
-
82
-
83
-
84
-
85
-
86
-
87
-
88
-
89
-
90
-
91
-
92
-
93
-
94
-
95
-
96
-
97
-
98
-
99
-
100
-
101
-
102
-
103
-
104
-
105
-
106
-
107
-
108
-
109
-
110
-
111
-
112
-
113
-
114
-
115
-
116
-
117
-
118
-
119
-
120
-
121
-
122
-
123
-
124
-
125
-
126
-
127
-
128
-
129
-
130
-
131
-
132
-
133
-
134
-
135
-
136
-
137
-
138
-
139
-
140
-
141
-
142
-
143
-
144
-
145
-
146
-
147
-
148
-
 149
149 -
 150
150 -
 151
151 -
 152
152 -
 153
153 -
 154
154 -
 155
155 -
 156
156 -
 157
157 -
 158
158 -
 159
159 -
160
-
161
-
162
-
163
-
164
-
165
-
166
-
167
-
168
-
169
-
170
-
171
-
172
-
173
-
174
-
175
-
176
-
177
-
178
-
179
-
180
-
181
-
182
-
183
-
184
-
185
-
186
-
187
-
188
-
189
-
190
-
191
-
192
-
193
-
194
-
195
-
196
-
197
-
198
-
199
-
200
-
201
-
202
-
203
-
204
-
205
-
206
-
207
-
208
-
209
-
210
-
211
-
212
-
213
-
214
-
215
-
216
-
217
-
218
-
219
-
220
-
221
-
222
-
223
-
224
-
225
-
226
-
227
-
228
-
229
-
230
-
231
-
232
-
233
-
234
-
235
-
236
-
237
-
238
-
239
-
240
-
241
-
242
-
243
-
244
-
245
-
246
-
247
-
248
-
249
-
250
-
251
-
252
-
253
-
254
-
255
-
256
-
257
-
258
-
259
-
260
-
261
-
262
-
263
-
264
-
265
-
266
-
267
-
268
-
269
-
270
-
271
-
272
-
273
-
274
-
275
-
276
-
277
-
278
-
279
-
280
-
281
-
282
-
283
-
284
-
285
-
286
-
287
-
288
-
289
-
290
-
291
-
292
-
293
-
294
-
295
-
296
-
297
-
298
-
299
-
300
-
301
-
302
-
303
-
304
-
305
-
306
-
307
-
308
-
309
-
310
-
311
-
312
-
313
-
314
-
315
-
316
-
317
-
318
-
319
-
320
-
321
-
322
-
323
-
324
-
325
-
326
-
327
-
328
 |
 |