Samsung SL-M2875DW User Guide - Page 176
Access point without a USB cable recommended, Items to prepare, Creating the infrastructure network
 |
View all Samsung SL-M2875DW manuals
Add to My Manuals
Save this manual to your list of manuals |
Page 176 highlights
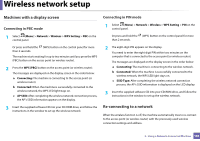
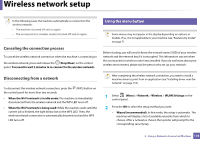
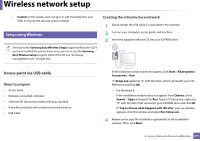
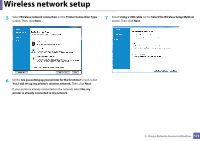
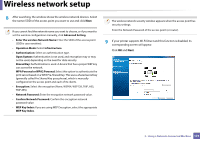
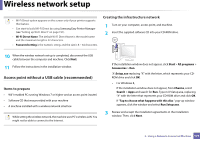
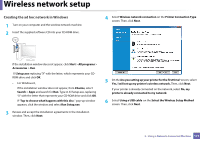
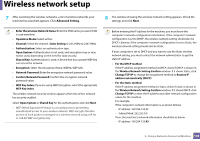
Wireless network setup • Wi-Fi Direct option appears on the screen only if your printer supports this feature. • Can start to build Wi-Fi Direct by using Samsung Easy Printer Manager (see "Setting up Wi-Fi Direct" on page 191). • Wi-Fi Direct Name: The default Wi-Fi Direct Name is the model name and the maximum length is 22 characters. • Password setting is the numeric string, and the size is 8 ~ 64 characters. Creating the infrastructure network 1 Turn on your computer, access point, and machine. 2 Insert the supplied software CD into your CD-ROM drive. 10 When the wireless network set up is completed, disconnect the USB cable between the computer and machine. Click Next. 11 Follow the instructions in the installation window. Access point without a USB cable (recommended) Items to prepare • WiFi-enabled PC running Windows 7 or higher and an access point (router) • Software CD that was provided with your machine • A machine installed with a wireless network interface While setting the wireless network, the machine uses PC's wireless LAN. You might not be able to connect to the Internet. If the installation window does not appear, click Start > All programs > Accessories > Run. X:\Setup.exe replacing "X" with the letter, which represents your CDROM drive and click OK. • For Windows 8, If the installation window does not appear, from Charms, select Search > Apps and search for Run. Type in X:\Setup.exe, replacing "X" with the letter that represents your CD-ROM drive and click OK. If "Tap to choose what happens with this disc." pop-up window appears, click the window and select Run Setup.exe. 3 Review and accept the installation agreements in the installation window. Then, click Next. 2. Using a Network-Connected Machine 174
-
 1
1 -
2
-
3
-
4
-
5
-
6
-
7
-
8
-
9
-
10
-
11
-
12
-
13
-
14
-
15
-
16
-
17
-
18
-
19
-
20
-
21
-
22
-
23
-
24
-
25
-
26
-
27
-
28
-
29
-
30
-
31
-
32
-
33
-
34
-
35
-
36
-
37
-
38
-
39
-
40
-
41
-
42
-
43
-
44
-
45
-
46
-
47
-
48
-
49
-
50
-
51
-
52
-
53
-
54
-
55
-
56
-
57
-
58
-
59
-
60
-
61
-
62
-
63
-
64
-
65
-
66
-
67
-
68
-
69
-
70
-
71
-
72
-
73
-
74
-
75
-
76
-
77
-
78
-
79
-
80
-
81
-
82
-
83
-
84
-
85
-
86
-
87
-
88
-
89
-
90
-
91
-
92
-
93
-
94
-
95
-
96
-
97
-
98
-
99
-
100
-
101
-
102
-
103
-
104
-
105
-
106
-
107
-
108
-
109
-
110
-
111
-
112
-
113
-
114
-
115
-
116
-
117
-
118
-
119
-
120
-
121
-
122
-
123
-
124
-
125
-
126
-
127
-
128
-
129
-
130
-
131
-
132
-
133
-
134
-
135
-
136
-
137
-
138
-
139
-
140
-
141
-
142
-
143
-
144
-
145
-
146
-
147
-
148
-
149
-
150
-
151
-
152
-
153
-
154
-
155
-
156
-
157
-
158
-
159
-
160
-
161
-
162
-
163
-
164
-
165
-
166
-
167
-
168
-
169
-
170
-
 171
171 -
 172
172 -
 173
173 -
 174
174 -
 175
175 -
 176
176 -
 177
177 -
 178
178 -
 179
179 -
 180
180 -
 181
181 -
182
-
183
-
184
-
185
-
186
-
187
-
188
-
189
-
190
-
191
-
192
-
193
-
194
-
195
-
196
-
197
-
198
-
199
-
200
-
201
-
202
-
203
-
204
-
205
-
206
-
207
-
208
-
209
-
210
-
211
-
212
-
213
-
214
-
215
-
216
-
217
-
218
-
219
-
220
-
221
-
222
-
223
-
224
-
225
-
226
-
227
-
228
-
229
-
230
-
231
-
232
-
233
-
234
-
235
-
236
-
237
-
238
-
239
-
240
-
241
-
242
-
243
-
244
-
245
-
246
-
247
-
248
-
249
-
250
-
251
-
252
-
253
-
254
-
255
-
256
-
257
-
258
-
259
-
260
-
261
-
262
-
263
-
264
-
265
-
266
-
267
-
268
-
269
-
270
-
271
-
272
-
273
-
274
-
275
-
276
-
277
-
278
-
279
-
280
-
281
-
282
-
283
-
284
-
285
-
286
-
287
-
288
-
289
-
290
-
291
-
292
-
293
-
294
-
295
-
296
-
297
-
298
-
299
-
300
-
301
-
302
-
303
-
304
-
305
-
306
-
307
-
308
-
309
-
310
-
311
-
312
-
313
-
314
-
315
-
316
-
317
-
318
-
319
-
320
-
321
-
322
-
323
-
324
-
325
-
326
-
327
-
328
 |
 |