Samsung SL-M2875DW User Guide - Page 62
Darkness, Original, Changing the settings for each copy
 |
View all Samsung SL-M2875DW manuals
Add to My Manuals
Save this manual to your list of manuals |
Page 62 highlights
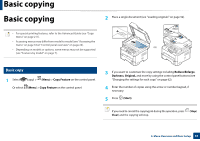
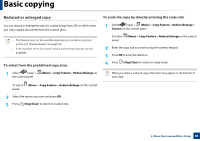
Basic copying 17 Changing the settings for each copy Your machine provides default settings for copying so that you can quickly and easily make a copy. However, if you want to change the options for each copy, use the copy function buttons on the control panel. • If you press (Stop/Clear) while setting the copy options, all of the options you have set for the current copy job will be canceled and returned to their default status. Or, they will automatically return to their default status after the machine completes the copy in progress. • Accessing menus may differ from model to model (see "Accessing the menu" on page 33). • It may be necessary to press OK to navigate to lower-level menus for some models. Darkness If you have an original containing faint marking and dark images, you can adjust the brightness to make a copy that is easier to read. 1 Select (copy) > (Menu) > Copy Feature > Darkness on the control panel. Or select Darkness button on the control panel. 2 Select the option you want and press OK. For example, the Light+5 being the lightest, and the Dark+5 being the darkest. 3 Press (Stop/Clear) to return to ready mode. Original The original setting is used to improve the copy quality by selecting the document for the current copy job. 1 Select (copy) > (Menu) > Copy Feature > Original Type on the control panel. Or select (Menu) > Copy Feature > Original Type on the control panel. 2 Select the option you want and press OK. • Text: Use for originals containing mostly text. • Text/Photo: Use for originals with mixed text and photographs. If texts in the printout is blurry, select Text to get the clear texts. • Photo: Use when the originals are photographs. 3 Press (Stop/Clear) to return to ready mode. 2. Menu Overview and Basic Setup 62
-
 1
1 -
2
-
3
-
4
-
5
-
6
-
7
-
8
-
9
-
10
-
11
-
12
-
13
-
14
-
15
-
16
-
17
-
18
-
19
-
20
-
21
-
22
-
23
-
24
-
25
-
26
-
27
-
28
-
29
-
30
-
31
-
32
-
33
-
34
-
35
-
36
-
37
-
38
-
39
-
40
-
41
-
42
-
43
-
44
-
45
-
46
-
47
-
48
-
49
-
50
-
51
-
52
-
53
-
54
-
55
-
56
-
 57
57 -
 58
58 -
 59
59 -
 60
60 -
 61
61 -
 62
62 -
 63
63 -
 64
64 -
 65
65 -
 66
66 -
 67
67 -
68
-
69
-
70
-
71
-
72
-
73
-
74
-
75
-
76
-
77
-
78
-
79
-
80
-
81
-
82
-
83
-
84
-
85
-
86
-
87
-
88
-
89
-
90
-
91
-
92
-
93
-
94
-
95
-
96
-
97
-
98
-
99
-
100
-
101
-
102
-
103
-
104
-
105
-
106
-
107
-
108
-
109
-
110
-
111
-
112
-
113
-
114
-
115
-
116
-
117
-
118
-
119
-
120
-
121
-
122
-
123
-
124
-
125
-
126
-
127
-
128
-
129
-
130
-
131
-
132
-
133
-
134
-
135
-
136
-
137
-
138
-
139
-
140
-
141
-
142
-
143
-
144
-
145
-
146
-
147
-
148
-
149
-
150
-
151
-
152
-
153
-
154
-
155
-
156
-
157
-
158
-
159
-
160
-
161
-
162
-
163
-
164
-
165
-
166
-
167
-
168
-
169
-
170
-
171
-
172
-
173
-
174
-
175
-
176
-
177
-
178
-
179
-
180
-
181
-
182
-
183
-
184
-
185
-
186
-
187
-
188
-
189
-
190
-
191
-
192
-
193
-
194
-
195
-
196
-
197
-
198
-
199
-
200
-
201
-
202
-
203
-
204
-
205
-
206
-
207
-
208
-
209
-
210
-
211
-
212
-
213
-
214
-
215
-
216
-
217
-
218
-
219
-
220
-
221
-
222
-
223
-
224
-
225
-
226
-
227
-
228
-
229
-
230
-
231
-
232
-
233
-
234
-
235
-
236
-
237
-
238
-
239
-
240
-
241
-
242
-
243
-
244
-
245
-
246
-
247
-
248
-
249
-
250
-
251
-
252
-
253
-
254
-
255
-
256
-
257
-
258
-
259
-
260
-
261
-
262
-
263
-
264
-
265
-
266
-
267
-
268
-
269
-
270
-
271
-
272
-
273
-
274
-
275
-
276
-
277
-
278
-
279
-
280
-
281
-
282
-
283
-
284
-
285
-
286
-
287
-
288
-
289
-
290
-
291
-
292
-
293
-
294
-
295
-
296
-
297
-
298
-
299
-
300
-
301
-
302
-
303
-
304
-
305
-
306
-
307
-
308
-
309
-
310
-
311
-
312
-
313
-
314
-
315
-
316
-
317
-
318
-
319
-
320
-
321
-
322
-
323
-
324
-
325
-
326
-
327
-
328
 |
 |