Samsung SM-G360R6 User Manual - Page 41
Camera Settings, The Volume key
 |
View all Samsung SM-G360R6 manuals
Add to My Manuals
Save this manual to your list of manuals |
Page 41 highlights
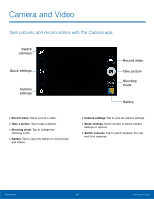
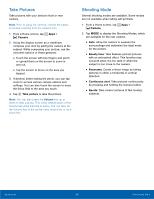
Camera Settings Configure camera settings. 1. From a Home screen, tap Apps > > Settings. Camera 2. Quick settings are listed across one side of the camera view finder. Available options vary depending on the camera or recording mode used. Default settings include: • Picture size: Select a resolution. Use higher resolution for higher quality. Higher resolution pictures take up more memory. • Effect: Add special graphical effects. • Timer: Take time-delayed pictures or videos. • Flash: Activate or deactivate the flash. (Available only on the Rear camera.) • Save as horizontally flipped: Save the self‑portrait or self‑recording as a reversed (or 'mirrored') image. (Available only on the Front camera.) 3. Tap More options to configure settings for Camera. Available options vary depending on the camera or recording mode used. Both cameras • Exposure value: Change the exposure value. This determines how much light the camera's sensor receives. For low light situations, use a higher exposure. • Tap to take pics: Tap the image on the preview screen to take photos. • Video size: Select a resolution. Use higher resolution for higher quality. Higher resolution videos take up more memory. • Recording mode: Select a recording mode. • Location tags: Attach a GPS location tag to the photo. • Storage location: Select the memory location for storage. • Grid lines: Display viewfinder guides to help composition when selecting subjects. • Shutter sound: Play a tone when the camera button is tapped. • The Volume key: Use the Volume key as the camera key, the record key, or as a zoom key. • Reset settings: Reset the camera settings. Rear camera only • ISO: Select an ISO value. This controls camera light sensitivity. It is measured in film-camera equivalents. Low values are for stationary or brightly-lit objects. Higher values are for fast‑moving or poorly-lit objects. • White balance: Select an appropriate white balance, so images have a true-to-life color range. The settings are designed for specific lighting situations. These settings are similar to the heat range for white-balance exposure in professional cameras. • Metering modes: Select a metering method. This determines how light values are calculated. Center-weighted measures background light in the center of the scene. Spot measures the light value at a specific location. Matrix averages the entire scene. Front camera only • Palm selfie: When enabled, show your palm to the camera to automatically take a picture after 2 seconds. • Beauty face: Take a photo with lightened faces for gentler images. Applications 36 Camera and Video
-
 1
1 -
2
-
3
-
4
-
5
-
6
-
7
-
8
-
9
-
10
-
11
-
12
-
13
-
14
-
15
-
16
-
17
-
18
-
19
-
20
-
21
-
22
-
23
-
24
-
25
-
26
-
27
-
28
-
29
-
30
-
31
-
32
-
33
-
34
-
35
-
 36
36 -
 37
37 -
 38
38 -
 39
39 -
 40
40 -
 41
41 -
 42
42 -
 43
43 -
 44
44 -
 45
45 -
 46
46 -
47
-
48
-
49
-
50
-
51
-
52
-
53
-
54
-
55
-
56
-
57
-
58
-
59
-
60
-
61
-
62
-
63
-
64
-
65
-
66
-
67
-
68
-
69
-
70
-
71
-
72
-
73
-
74
-
75
-
76
-
77
-
78
-
79
-
80
-
81
-
82
-
83
-
84
-
85
-
86
-
87
-
88
-
89
-
90
-
91
-
92
-
93
-
94
-
95
-
96
-
97
-
98
-
99
-
100
-
101
 |
 |
