Samsung SPH-A800 User Manual (user Manual) (ver.f3) (English) - Page 211
In Camcorder Folder Options, Options, Upload, Upload Selection, Upload All, Assign, Copy/Move
 |
View all Samsung SPH-A800 manuals
Add to My Manuals
Save this manual to your list of manuals |
Page 211 highlights
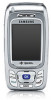
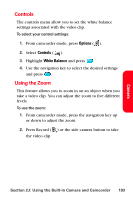
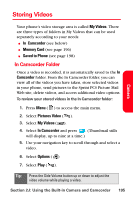
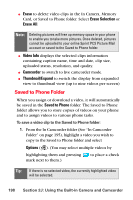
In Camcorder Folder Options When you are viewing the images in the In Camcorder or Memory Card folder, press Options ( ) to display the following options: ⅷ Play to play the highlighted video clip. ⅷ Upload to upload video clips from the In camcorder folder to the Sprint PCS Picture Mail Web site (www.sprint.com/picturemail). Depending on your settings, you may be prompted to accept a Sprint PCS Vision connection. Choose from the following options: Ⅲ Upload Selection to upload the currently highlighted video clip. Ⅲ Upload All to upload all video clips in the In Camcorder or Memory Card folder. Camera Note: If this is the first time you have accessed the Sprint PCS Picture Mail account, you will be prompted to create your Sprint PCS Picture Mail Password. See "Creating Your Sprint PCS Picture Mail Password" on page 173. ⅷ Assign to set a movie ID, screen saver, or incoming call. ⅷ Copy/Move to save the selected pictures into one of the other available folders (In Camcorder (based on viewing location), Memory Card (based on viewing location), or Saved to Phone folder). Note: Video Clips that have been stored in your Saved to Phone folder or uploaded to your online account will remain available in the In Camera or Memory Card folder until you erase them. ⅷ Edit allows you to rename the video clip file and set the video lock on or off. Section 2J: Using the Built-in Camera and Camcorder 197
-
 1
1 -
2
-
3
-
4
-
5
-
6
-
7
-
8
-
9
-
10
-
11
-
12
-
13
-
14
-
15
-
16
-
17
-
18
-
19
-
20
-
21
-
22
-
23
-
24
-
25
-
26
-
27
-
28
-
29
-
30
-
31
-
32
-
33
-
34
-
35
-
36
-
37
-
38
-
39
-
40
-
41
-
42
-
43
-
44
-
45
-
46
-
47
-
48
-
49
-
50
-
51
-
52
-
53
-
54
-
55
-
56
-
57
-
58
-
59
-
60
-
61
-
62
-
63
-
64
-
65
-
66
-
67
-
68
-
69
-
70
-
71
-
72
-
73
-
74
-
75
-
76
-
77
-
78
-
79
-
80
-
81
-
82
-
83
-
84
-
85
-
86
-
87
-
88
-
89
-
90
-
91
-
92
-
93
-
94
-
95
-
96
-
97
-
98
-
99
-
100
-
101
-
102
-
103
-
104
-
105
-
106
-
107
-
108
-
109
-
110
-
111
-
112
-
113
-
114
-
115
-
116
-
117
-
118
-
119
-
120
-
121
-
122
-
123
-
124
-
125
-
126
-
127
-
128
-
129
-
130
-
131
-
132
-
133
-
134
-
135
-
136
-
137
-
138
-
139
-
140
-
141
-
142
-
143
-
144
-
145
-
146
-
147
-
148
-
149
-
150
-
151
-
152
-
153
-
154
-
155
-
156
-
157
-
158
-
159
-
160
-
161
-
162
-
163
-
164
-
165
-
166
-
167
-
168
-
169
-
170
-
171
-
172
-
173
-
174
-
175
-
176
-
177
-
178
-
179
-
180
-
181
-
182
-
183
-
184
-
185
-
186
-
187
-
188
-
189
-
190
-
191
-
192
-
193
-
194
-
195
-
196
-
197
-
198
-
199
-
200
-
201
-
202
-
203
-
204
-
205
-
 206
206 -
 207
207 -
 208
208 -
 209
209 -
 210
210 -
 211
211 -
 212
212 -
 213
213 -
 214
214 -
 215
215 -
 216
216 -
217
-
218
-
219
-
220
-
221
-
222
-
223
-
224
-
225
-
226
-
227
-
228
-
229
-
230
-
231
-
232
-
233
-
234
-
235
-
236
-
237
-
238
-
239
-
240
-
241
-
242
-
243
-
244
-
245
-
246
-
247
-
248
-
249
-
250
-
251
-
252
-
253
-
254
-
255
-
256
-
257
-
258
-
259
-
260
-
261
-
262
-
263
-
264
-
265
-
266
-
267
-
268
-
269
-
270
-
271
-
272
-
273
-
274
-
275
-
276
-
277
-
278
-
279
-
280
-
281
-
282
-
283
-
284
-
285
-
286
-
287
-
288
-
289
-
290
-
291
-
292
-
293
-
294
-
295
-
296
-
297
-
298
-
299
-
300
-
301
-
302
-
303
-
304
-
305
-
306
-
307
-
308
-
309
-
310
-
311
-
312
-
313
-
314
-
315
-
316
-
317
-
318
 |
 |