Samsung SPH-M260 User Manual (user Manual) (ver.f6) (English) - Page 69
Adjusting the White Balance, Adjusting Color Tones, Adjusting the Quality
 |
View all Samsung SPH-M260 manuals
Add to My Manuals
Save this manual to your list of manuals |
Page 69 highlights
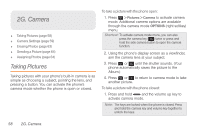
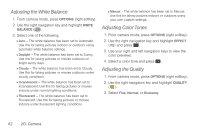
Adjusting the White Balance 1. From camera mode, press OPTIONS (right softkey). 2. Use the right navigation key and highlight WHITE BALANCE ( ). 3. Select one of the following: Ⅲ Auto - The white balance has been set to Automatic. Use this for taking pictures indoors or outdoors using automatic white balance settings. Ⅲ Daylight - The white balance has been set to Sunny. Use this for taking pictures or movies outdoors on bright sunny days. Ⅲ Cloudy - The white balance has been set to Cloudy. Use this for taking pictures or movies outdoors under cloudy conditions. Ⅲ Incandescent - The white balance has been set to Incandescent. Use this for taking pictures or movies indoors under normal lighting conditions. Ⅲ Fluorescent - The white balance has been set to Fluorescent. Use this for taking pictures or movies indoors under fluorescent lighting conditions. Ⅲ Manual - The white balance has been set to Manual. Use this for taking pictures indoors or outdoors using your own custom settings. Adjusting Color Tones 1. From camera mode, press OPTIONS (right softkey). 2. Use the right navigation key and highlight EFFECT ( ) and press . 3. Use your right and left navigation keys to view the color previews. 4. Select a color tone and press . Adjusting the Quality 1. From camera mode, press OPTIONS (right softkey). 2. Use the right navigation key and highlight QUALITY ( F ). 3. Select Fine, Normal, or Economy. 62 2G. Camera
-
 1
1 -
2
-
3
-
4
-
5
-
6
-
7
-
8
-
9
-
10
-
11
-
12
-
13
-
14
-
15
-
16
-
17
-
18
-
19
-
20
-
21
-
22
-
23
-
24
-
25
-
26
-
27
-
28
-
29
-
30
-
31
-
32
-
33
-
34
-
35
-
36
-
37
-
38
-
39
-
40
-
41
-
42
-
43
-
44
-
45
-
46
-
47
-
48
-
49
-
50
-
51
-
52
-
53
-
54
-
55
-
56
-
57
-
58
-
59
-
60
-
61
-
62
-
63
-
 64
64 -
 65
65 -
 66
66 -
 67
67 -
 68
68 -
 69
69 -
 70
70 -
 71
71 -
 72
72 -
 73
73 -
 74
74 -
75
-
76
-
77
-
78
-
79
-
80
-
81
-
82
-
83
-
84
-
85
-
86
-
87
-
88
-
89
-
90
-
91
-
92
-
93
-
94
-
95
-
96
-
97
-
98
-
99
-
100
-
101
-
102
-
103
-
104
-
105
-
106
-
107
-
108
-
109
-
110
-
111
-
112
-
113
 |
 |