Sanyo Katana Blue User Guide - Page 147
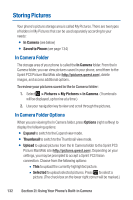
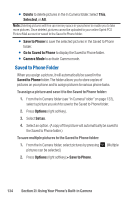
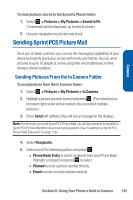
I: Using Your Phone's Built-in Camera, Camera
 |
View all Sanyo Katana Blue manuals
Add to My Manuals
Save this manual to your list of manuals |
Page 147 highlights
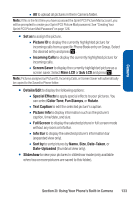
Camera Ⅲ All to upload all pictures in the In Camera folder. Note: If this is the first time you have accessed the Sprint PCS Picture Mail account, you will be prompted to create your Sprint PCS Picture Mail password. See "Creating Your Sprint PCS Picture Mail Password"on page 126. ⅷ Set as to assign the picture. Ⅲ Picture ID to display the currently highlighted picture for incoming calls from a specific Phone Book entry or Group. Select the desired entry and press . Ⅲ Incoming Calls to display the currently highlighted picture for incoming calls. Ⅲ Screen Saver to display the currently highlighted picture as a screen saver. Select Main LCD or Sub LCD and press . Note: Pictures assigned as Picture ID, Incoming Calls, or Screen Saver will automatically be copied to the Saved to Phone folder. ⅷ Details/Edit to display the following options: Ⅲ Special Effects to apply special effects to your pictures.You can select Color Tone, Fun Stamps, or Rotate. Ⅲ Text Caption to edit the selected picture's caption. Ⅲ Picture Info to display information such as the picture's caption, time/date, and size. Ⅲ Full Screen to display the selected picture in full screen mode without any icons or Info Bar. Ⅲ Info Bar to display the selected picture's information bar (expanded view only). Ⅲ Sort by to sort pictures by Name, Size, Date-Taken, or Date-Uploaded (thumbnail view only). ⅷ Slideshow to view your pictures in slideshow mode (only available when two or more pictures are saved to this folder). Section 2I: Using Your Phone's Built-in Camera 133
-
 1
1 -
2
-
3
-
4
-
5
-
6
-
7
-
8
-
9
-
10
-
11
-
12
-
13
-
14
-
15
-
16
-
17
-
18
-
19
-
20
-
21
-
22
-
23
-
24
-
25
-
26
-
27
-
28
-
29
-
30
-
31
-
32
-
33
-
34
-
35
-
36
-
37
-
38
-
39
-
40
-
41
-
42
-
43
-
44
-
45
-
46
-
47
-
48
-
49
-
50
-
51
-
52
-
53
-
54
-
55
-
56
-
57
-
58
-
59
-
60
-
61
-
62
-
63
-
64
-
65
-
66
-
67
-
68
-
69
-
70
-
71
-
72
-
73
-
74
-
75
-
76
-
77
-
78
-
79
-
80
-
81
-
82
-
83
-
84
-
85
-
86
-
87
-
88
-
89
-
90
-
91
-
92
-
93
-
94
-
95
-
96
-
97
-
98
-
99
-
100
-
101
-
102
-
103
-
104
-
105
-
106
-
107
-
108
-
109
-
110
-
111
-
112
-
113
-
114
-
115
-
116
-
117
-
118
-
119
-
120
-
121
-
122
-
123
-
124
-
125
-
126
-
127
-
128
-
129
-
130
-
131
-
132
-
133
-
134
-
135
-
136
-
137
-
138
-
139
-
140
-
141
-
 142
142 -
 143
143 -
 144
144 -
 145
145 -
 146
146 -
 147
147 -
 148
148 -
 149
149 -
 150
150 -
 151
151 -
 152
152 -
153
-
154
-
155
-
156
-
157
-
158
-
159
-
160
-
161
-
162
-
163
-
164
-
165
-
166
-
167
-
168
-
169
-
170
-
171
-
172
-
173
-
174
-
175
-
176
-
177
-
178
-
179
-
180
-
181
-
182
-
183
-
184
-
185
-
186
-
187
-
188
-
189
-
190
-
191
-
192
-
193
-
194
-
195
-
196
-
197
-
198
-
199
-
200
-
201
-
202
-
203
-
204
-
205
-
206
-
207
-
208
-
209
-
210
-
211
-
212
-
213
-
214
-
215
-
216
-
217
 |
 |