Sharp LD-26SH1U LD-26SH1U Operation Manual - Page 11
Product description - remote
 |
UPC - 074000046467
View all Sharp LD-26SH1U manuals
Add to My Manuals
Save this manual to your list of manuals |
Page 11 highlights
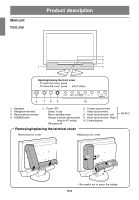
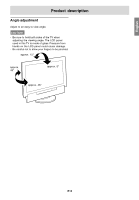
Main unit Front view Product description 2 3 4 1 5 Opening/closing the front cover To open the cover, press . To close the cover, press until it clicks. INPUT MENU ENTER/BMROIDGEHT CH 6 789 10 VOL/ BRIGHT 1. Speakers 2. Headphone terminal 3. Remote sensor window 4. POWER button 5. Power LED Green: in use Red: in standby mode Orange: in power-saving mode (only for PC mode) Off: power off 6. S-video input terminal 7. Video input terminal 8. Audio input terminal - Left 9. Audio input terminal - Right 10. Control buttons Removing/replacing the terminal cover Removing the cover Replacing the cover AV-IN 3 1 2 1 2 - Be careful not to pinch the cables. E10
-
 1
1 -
2
-
3
-
4
-
5
-
 6
6 -
 7
7 -
 8
8 -
 9
9 -
 10
10 -
 11
11 -
 12
12 -
 13
13 -
 14
14 -
 15
15 -
 16
16 -
17
-
18
-
19
-
20
-
21
-
22
-
23
-
24
-
25
-
26
-
27
-
28
-
29
-
30
-
31
-
32
-
33
-
34
-
35
-
36
-
37
-
38
-
39
-
40
-
41
-
42
-
43
-
44
-
45
-
46
-
47
-
48
-
49
-
50
-
51
-
52
-
53
-
54
-
55
-
56
-
57
-
58
-
59
-
60
-
61
-
62
-
63
-
64
-
65
-
66
-
67
-
68
-
69
-
70
-
71
-
72
 |
 |

E10
Product description
Front view
VOL/
BRIGHT
CH
BRIGHT
MODE
MENU
INPUT
ENTER/
1
2
5
3
4
6
7
8
9
10
Opening/closing the front cover
To open the cover, press
.
To close the cover, press
until it clicks.
Main unit
Removing/replacing the terminal cover
Removing the cover
Replacing the cover
1
1
2
2
-
Be careful not to pinch the cables.
1.
Speakers
2.
Headphone terminal
3.
Remote sensor window
4.
POWER button
5.
Power LED
Green: in use
Red: in standby mode
Orange: in power-saving mode
(only for PC mode)
Off: power off
6.
S-video input terminal
7.
Video input terminal
8.
Audio input terminal - Left
9.
Audio input terminal - Right
10.
Control buttons
AV-IN 3