Sharp LD-26SH1U LD-26SH1U Operation Manual - Page 13
Cable clamp, Using headphones, commercially available, Remote control - power supply
 |
UPC - 074000046467
View all Sharp LD-26SH1U manuals
Add to My Manuals
Save this manual to your list of manuals |
Page 13 highlights
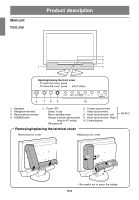
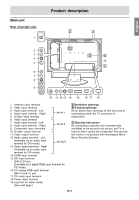
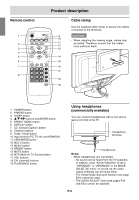
Product description Remote control POWER 1 Virtual 9 PC TV AV HDMI/DVI 10 FREEZE MULTI VIEW MODE 11 2 SLEEP MENU 12 3 13 4 ENTER BRIGHT MODE BRIGHT 5 14 6 15 DISPLAY CC MTS MUTE 7 16 VOL 17 8 CH 18 FLASHBACK 19 Cable clamp Use the supplied cable clamp to secure the cables connected to the terminals. CAUTION! - When adjusting the viewing angle, cables may be pulled. Therefore, ensure that the cables have sufficient slack. 1. POWER button 2. FREEZE button 3. SLEEP button 4. buttons and ENTER button 5. BRIGHT MODE button 6. DISPLAY button 7. CC (Closed Caption) button 8. Channel buttons 9. Dolby Virtual button 10. Input buttons (PC, TV, AV, and HDMI/DVI) 11. VIEW MODE button 12. MULTI button 13. MENU button 14. BRIGHT button 15. MUTE button 16. MTS (Multi ch TV Sound) button 17. VOL buttons 18. CH (channel) buttons 19. FLASHBACK button Using headphones (commercially available) You can connect headphones with a mini stereo jack ( 3.5 mm) to the TV. Headphone terminal Headphones Notes: - When headphones are connected: - No sound can be heard from the TV speakers. In addition, when "AV-OUT(AUDIO)" is set to "VARIABLE1" or "VARIABLE2" in the MODE SELECT(2) menu, no sound via the audio output terminals can be heard either. - The Virtual Dolby Surround function (see page E34) cannot be used. - The AUDIO ADJUST menu (see pages E46 and E55) cannot be adjusted. E12
-
 1
1 -
2
-
3
-
4
-
5
-
6
-
7
-
 8
8 -
 9
9 -
 10
10 -
 11
11 -
 12
12 -
 13
13 -
 14
14 -
 15
15 -
 16
16 -
 17
17 -
 18
18 -
19
-
20
-
21
-
22
-
23
-
24
-
25
-
26
-
27
-
28
-
29
-
30
-
31
-
32
-
33
-
34
-
35
-
36
-
37
-
38
-
39
-
40
-
41
-
42
-
43
-
44
-
45
-
46
-
47
-
48
-
49
-
50
-
51
-
52
-
53
-
54
-
55
-
56
-
57
-
58
-
59
-
60
-
61
-
62
-
63
-
64
-
65
-
66
-
67
-
68
-
69
-
70
-
71
-
72
 |
 |
