Sharp LD-26SH1U LD-26SH1U Operation Manual - Page 24
Notes, Rear of the TV, Output terminals of, AV equipment
 |
UPC - 074000046467
View all Sharp LD-26SH1U manuals
Add to My Manuals
Save this manual to your list of manuals |
Page 24 highlights
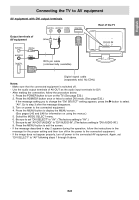
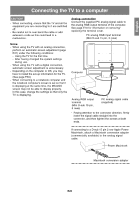
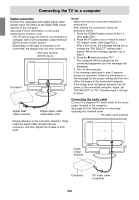
English Français Deutsch Connecting the TV to AV equipment AV equipment with DVI output terminals AUDIO-L AUDIO-R HDMI DIGITAL Rear of the TV Output terminals of AV equipment AUDIO-L (White) AUDIO-R (Red) DIGITAL (White) (Red) RCA pin cable (commercially available) DVI-D IN Digital signal cable (separately sold, NL-C04J) Notes: - Make sure that the connected equipment is switched off. - Use the audio output terminals of AV-OUT as the audio input terminals for DVI. - After making the connection, follow the procedure below. 1. Press the POWER button to turn on the TV. (See page E32.) 2. Press the HDMI/DVI button once or twice to select DVI mode. (See page E32.) If the message asking you to change the "DVI SELECT" setting appears, press the button to select "AV". Go to step 3 after the message disappears. 3. Turn on power to the connected equipment. 4. Press the MENU button to display the MENU screen. (See pages E45 and E48 for information on using the menus.) 5. Select the MODE SELECT menu. 6. Be sure to set "DVI SELECT" to "AV". (The factory setting is "AV".) 7. Be sure to set "AV-OUT(AUDIO)" to "DVI AUDIO-IN". (The factory setting is "DVI AUDIO-IN".) 8. Press the MENU button to exit the screen. - If the message described in step 2 appears during the operation, follow the instructions in the message for the proper setting and then turn off/on the power to the connected equipment. - If the image does not appear properly, turn off power to the connected AV equipment. Again, set "DVI SELECT" to "AV" following steps 1 through 8 above. Italiano Español English E23
-
 1
1 -
2
-
3
-
4
-
5
-
6
-
7
-
8
-
9
-
10
-
11
-
12
-
13
-
14
-
15
-
16
-
17
-
18
-
 19
19 -
 20
20 -
 21
21 -
 22
22 -
 23
23 -
 24
24 -
 25
25 -
 26
26 -
 27
27 -
 28
28 -
 29
29 -
30
-
31
-
32
-
33
-
34
-
35
-
36
-
37
-
38
-
39
-
40
-
41
-
42
-
43
-
44
-
45
-
46
-
47
-
48
-
49
-
50
-
51
-
52
-
53
-
54
-
55
-
56
-
57
-
58
-
59
-
60
-
61
-
62
-
63
-
64
-
65
-
66
-
67
-
68
-
69
-
70
-
71
-
72
 |
 |
