Sony CAV-M1000ES Installation Manual Integrated A/V System - Page 7
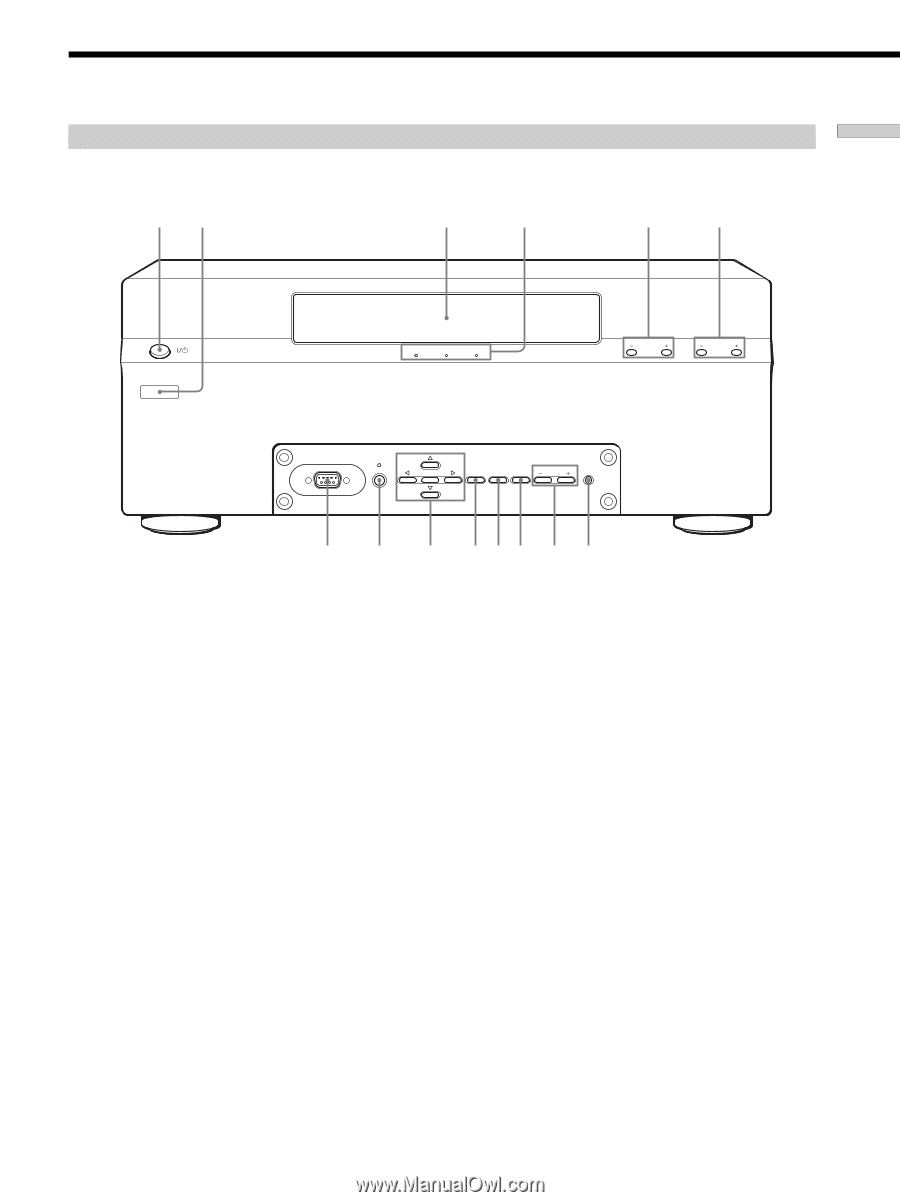
Parts and Controls, POWER switch, Learning IR window, Display window, Mode indicators, SOURCE SELECT
 |
View all Sony CAV-M1000ES manuals
Add to My Manuals
Save this manual to your list of manuals |
Page 7 highlights
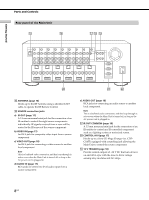
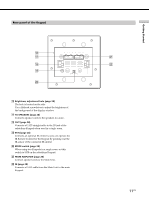
Getting Started Parts and Controls Front panel of the Main Unit 12 3 4 5 6 CHECK LEARN SETUP ZONE SOURCE SELECT RS232C PROGRAM ENTER MODE BACK CANCEL ZONE VOLUME ALL ZONE MUTING 7 8 9 q; qa qs qd qf 1 ?/1 (POWER) switch Press to turn the power on or off. 2 Learning IR window Used to input remote codes into the Main Unit. 3 Display window Displays various information. 4 Mode indicators Display the current mode. These indicators turn off in the NORMAL mode. 5 ZONE +/- Press to select the zone in the NORMAL mode. 6 SOURCE SELECT +/- Press to select the source component in the NORMAL mode. 7 RS232C connector Used to update the firmware of the Main Unit and to upload/download setup data from a computer using an RS232C cross cable. 8 PROGRAM Press to initiate a firmware update. 9 Cursor/ENTER Press to select a menu. 0 MODE Press repeatedly to select the mode. qa BACK Press to return to the previous layer of the menu. qs CANCEL Press to cancel the present operation and return to the NORMAL mode. qd ZONE VOLUME +/- Press to adjust the volume of the selected zone. qf ALL ZONE MUTING Press to set muting on or off in all zones. 7US
-
 1
1 -
 2
2 -
 3
3 -
 4
4 -
 5
5 -
 6
6 -
 7
7 -
 8
8 -
 9
9 -
 10
10 -
 11
11 -
 12
12 -
13
-
14
-
15
-
16
-
17
-
18
-
19
-
20
-
21
-
22
-
23
-
24
-
25
-
26
-
27
-
28
-
29
-
30
-
31
-
32
-
33
-
34
-
35
-
36
-
37
-
38
-
39
-
40
-
41
-
42
-
43
-
44
 |
 |