Sony CAV-M1000ES Installation Manual Integrated A/V System - Page 9
AC IN RS232C
 |
View all Sony CAV-M1000ES manuals
Add to My Manuals
Save this manual to your list of manuals |
Page 9 highlights
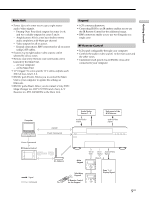
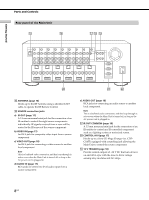
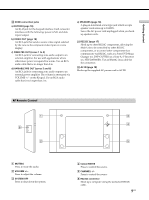
Getting Started w; ZONE connection jacks a) KEYPAD (page 18) An RJ-45 jack for the Keypad interface. Each connector interfaces with the following: power, GND, and data input/output. b) VIDEO OUT (page 18) An RCA jack that sends a source video signal selected by the zone to the composite video input on a zone display. c) FIXED PRE OUT (zones 1 to 4) An RCA jack for connecting zone audio output to an external amplifier. For use with applications where either more power is required for a zone. Use an RCA audio cable that is no longer than 2 m. d) VARIABLE PRE OUT (zones 5 and 6) An RCA jack for connecting zone audio output to an external power amplifier. The volume is attenuated via VOLUME +/- on the Keypad. Use an RCA audio cable that is no longer than 2 m. e) SPEAKERS (page 18) A plug-in 4-terminal screw-type jack which accepts speaker cords sizes up to 12AWG. Leave the AC power cord unplugged when you hook up speaker cords. wa RS232C (page 17) Hook up to other RS232C components, allowing the Main Unit to be controlled by other RS232C components, or to control other components that communicate via RS232C, such as a Sony DVD Mega Changer (ex. DVP-CX777ES) or a Sony A/V Receiver (ex. STR-DA5000ES). Use an RS232C cross cable for the connection. ws AC IN (page 18) Hooks up the supplied AC power cord to AC IN. RF Remote Control 1 6 2 MUTING VOLUME SYSTEM OFF 3 4 CHANNEL 5 1 MUTING Press to mute the audio. 2 VOLUME +/- Press to adjust the volume. 3 SYSTEM OFF Press to shut down the system. 4 Cursor/ENTER Press to control the source. 5 CHANNEL +/- Press to control the source. 6 RS232C connector Hook up a computer using the dedicated RS232C cable. 9US
-
 1
1 -
2
-
3
-
 4
4 -
 5
5 -
 6
6 -
 7
7 -
 8
8 -
 9
9 -
 10
10 -
 11
11 -
 12
12 -
 13
13 -
 14
14 -
15
-
16
-
17
-
18
-
19
-
20
-
21
-
22
-
23
-
24
-
25
-
26
-
27
-
28
-
29
-
30
-
31
-
32
-
33
-
34
-
35
-
36
-
37
-
38
-
39
-
40
-
41
-
42
-
43
-
44
 |
 |
