Sony DCR-HC30 Camera Operations Guide - Page 139
Quick Reference, To connect an accessory
 |
UPC - 027242644588
View all Sony DCR-HC30 manuals
Add to My Manuals
Save this manual to your list of manuals |
Page 139 highlights
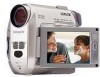
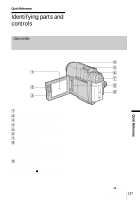
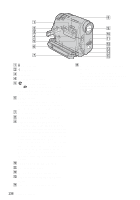
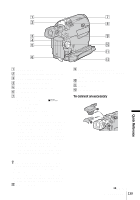
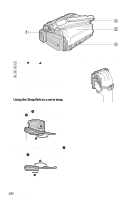
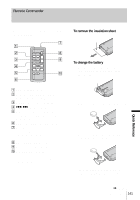
1 7 2 8 Quick Reference 3 4 5 6 A PHOTO button (p. 31) B Viewfinder lens adjustment lever (p. 21) C BATT (battery) release button (p. 16) D CHG (charge) lamp (p. 16) E REC START/STOP (p. 26, 50) F DC IN jack (p. 16) G For DCR-HC40: Intelligent accessory shoe / shoe cover (p. 104) For DCR-HC30: Accessory shoe/shoe cover • Remove the shoe cover when you use an accessory. • Extend the viewfinder when you attach or remove the shoe cover or the accessory. • The Intelligent accessory shoe for DCR- HC40 and the accessory shoe for DCR- HC30 have a safety device for fixing the installed accessory securely. To connect an accessory, press down and push it to the end, and then tighten the screw. To remove an accessory, loosen the screw, and then press down and pull out the accessory. z Tips on the Intelligent accessory shoe • The Intelligent accessory shoe supplies power to optional accessories such as a video light, a flash or microphone. • The accessory can be turned on or off as you operate the POWER switch on your camcorder. Refer to the operating instructions of the accessory for details. H Power zoom lever 9 q; qa qs I CAMERA-TAPE, CAMERAMEMORY, PLAY/EDIT mode lamps (p. 19) J POWER switch (p. 19) K Speaker L DC IN jack cover To connect an accessory ,continued Quick Reference 139
-
 1
1 -
2
-
3
-
4
-
5
-
6
-
7
-
8
-
9
-
10
-
11
-
12
-
13
-
14
-
15
-
16
-
17
-
18
-
19
-
20
-
21
-
22
-
23
-
24
-
25
-
26
-
27
-
28
-
29
-
30
-
31
-
32
-
33
-
34
-
35
-
36
-
37
-
38
-
39
-
40
-
41
-
42
-
43
-
44
-
45
-
46
-
47
-
48
-
49
-
50
-
51
-
52
-
53
-
54
-
55
-
56
-
57
-
58
-
59
-
60
-
61
-
62
-
63
-
64
-
65
-
66
-
67
-
68
-
69
-
70
-
71
-
72
-
73
-
74
-
75
-
76
-
77
-
78
-
79
-
80
-
81
-
82
-
83
-
84
-
85
-
86
-
87
-
88
-
89
-
90
-
91
-
92
-
93
-
94
-
95
-
96
-
97
-
98
-
99
-
100
-
101
-
102
-
103
-
104
-
105
-
106
-
107
-
108
-
109
-
110
-
111
-
112
-
113
-
114
-
115
-
116
-
117
-
118
-
119
-
120
-
121
-
122
-
123
-
124
-
125
-
126
-
127
-
128
-
129
-
130
-
131
-
132
-
133
-
 134
134 -
 135
135 -
 136
136 -
 137
137 -
 138
138 -
 139
139 -
 140
140 -
 141
141 -
 142
142 -
 143
143 -
 144
144 -
145
-
146
-
147
-
148
 |
 |
