Sony DCR-HC30 Camera Operations Guide - Page 83
Using the, STANDARD SET
 |
UPC - 027242644588
View all Sony DCR-HC30 manuals
Add to My Manuals
Save this manual to your list of manuals |
Page 83 highlights
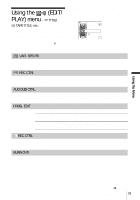
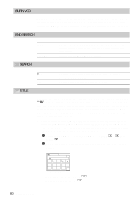
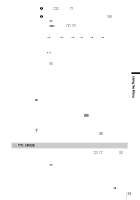
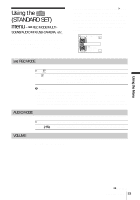
Using the (STANDARD SET) menu - REC MODE/MULTI- SOUND/AUDIO MIX/USB-CAMERA, etc. You can select the items listed below on the STANDARD SET menu. To select these items, see "Selecting menu items" (p. 62). The default settings are marked with G. The indicators in parentheses appear when the setting is selected. The settings you can adjust vary depending on the power mode of your camcorder. The screen shows the items you can currently operate. Unavailable items will be grayed out. 60min STBY 0:00:00 STANDARD SET REC MODE AUD IO MODE LCD/VF SET OK REC MODE GSP ( SP ) LP ( LP ) Select to record in the SP (Standard Play) mode on a cassette. Select to increase the recording time to 1.5 times the SP mode (Long Play). The use of Sony Excellence/Master mini DV cassette is recommended to get the most out of your camcorder. b Notes • You cannot add sound on the tape recorded in the LP mode. • If you record in the LP mode, a mosaic-like noise may appear or sound may be interrupted when you play back the tape on other camcorders or VCRs. • When you mix recordings in the SP mode and in the LP mode on one tape, the playback picture may be distorted or the time code may not be written properly between the scenes. AUDIO MODE VOLUME G12BIT 16BIT ( Select to record in the 12-bit mode (2 stereo sounds). ) Select to record in the 16-bit mode (1 stereo sound with high quality). See page 49, 52 for details. Using the Menu ,continued Using the Menu 83
-
 1
1 -
2
-
3
-
4
-
5
-
6
-
7
-
8
-
9
-
10
-
11
-
12
-
13
-
14
-
15
-
16
-
17
-
18
-
19
-
20
-
21
-
22
-
23
-
24
-
25
-
26
-
27
-
28
-
29
-
30
-
31
-
32
-
33
-
34
-
35
-
36
-
37
-
38
-
39
-
40
-
41
-
42
-
43
-
44
-
45
-
46
-
47
-
48
-
49
-
50
-
51
-
52
-
53
-
54
-
55
-
56
-
57
-
58
-
59
-
60
-
61
-
62
-
63
-
64
-
65
-
66
-
67
-
68
-
69
-
70
-
71
-
72
-
73
-
74
-
75
-
76
-
77
-
 78
78 -
 79
79 -
 80
80 -
 81
81 -
 82
82 -
 83
83 -
 84
84 -
 85
85 -
 86
86 -
 87
87 -
 88
88 -
89
-
90
-
91
-
92
-
93
-
94
-
95
-
96
-
97
-
98
-
99
-
100
-
101
-
102
-
103
-
104
-
105
-
106
-
107
-
108
-
109
-
110
-
111
-
112
-
113
-
114
-
115
-
116
-
117
-
118
-
119
-
120
-
121
-
122
-
123
-
124
-
125
-
126
-
127
-
128
-
129
-
130
-
131
-
132
-
133
-
134
-
135
-
136
-
137
-
138
-
139
-
140
-
141
-
142
-
143
-
144
-
145
-
146
-
147
-
148
 |
 |
