Sony DCR-HC62 Operating Guide - Page 51
Lcd/vf Set, Tv Type, Usb Camera, Disp Guide, Guideframe, Data Code, Using The Menu, Lcd Bright - usb streaming
 |
UPC - 027242727397
View all Sony DCR-HC62 manuals
Add to My Manuals
Save this manual to your list of manuals |
Page 51 highlights
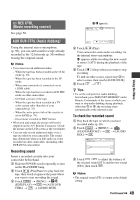
LCD/VF SET The recorded picture will not be affected by this operation. x LCD BRIGHT You can adjust the brightness of the LCD screen. 1 Adjust the brightness with 2 Touch . /. x LCD BL LEVEL You can adjust the brightness of the LCD screen's backlight. B NORMAL Standard brightness. BRIGHT Brightens the LCD screen. b Notes • When you connect your camcorder to outside power sources, [BRIGHT] is automatically selected for the setting. • When you select [BRIGHT], battery life is slightly reduced during recording. x LCD COLOR You can adjust the color on the LCD screen with / . Low intensity High intensity x VF B.LIGHT You can adjust the brightness of the viewfinder. B NORMAL Standard brightness. BRIGHT Brightens the viewfinder screen. b Notes • When you connect your camcorder to outside power sources, [BRIGHT] is automatically selected for the setting. • When you select [BRIGHT], battery life is slightly reduced during recording. TV TYPE See page 33. USB CAMERA When you set [ STREAM] and connect your camcorder to your computer via the USB cable, you can view the picture your camcorder is currently seeing on your computer like a live camera. You can also import the picture to your computer. Refer to the "First Step Guide" on the supplied CD-ROM for details (p. 67). DISP GUIDE See page 96. GUIDEFRAME You can display the frame and check that the subject is horizontal or vertical by setting [GUIDEFRAME] to [ON]. The frame is not recorded. Press DISP/ BATT INFO to make the frame disappear. z Tips • Placing the subject at the cross point of the guide frame makes a balanced composition. DATA CODE During playback, displays information (data code) recorded automatically at the time of recording. B OFF Data code is not displayed. DATE/TIME Displays the date and time. Continued , 51 Using the Menu
-
 1
1 -
2
-
3
-
4
-
5
-
6
-
7
-
8
-
9
-
10
-
11
-
12
-
13
-
14
-
15
-
16
-
17
-
18
-
19
-
20
-
21
-
22
-
23
-
24
-
25
-
26
-
27
-
28
-
29
-
30
-
31
-
32
-
33
-
34
-
35
-
36
-
37
-
38
-
39
-
40
-
41
-
42
-
43
-
44
-
45
-
 46
46 -
 47
47 -
 48
48 -
 49
49 -
 50
50 -
 51
51 -
 52
52 -
 53
53 -
 54
54 -
 55
55 -
 56
56 -
57
-
58
-
59
-
60
-
61
-
62
-
63
-
64
-
65
-
66
-
67
-
68
-
69
-
70
-
71
-
72
-
73
-
74
-
75
-
76
-
77
-
78
-
79
-
80
-
81
-
82
-
83
-
84
-
85
-
86
-
87
-
88
-
89
-
90
-
91
-
92
-
93
-
94
-
95
-
96
-
97
-
98
-
99
-
100
-
101
-
102
-
103
-
104
-
105
-
106
-
107
-
108
-
109
-
110
-
111
-
112
-
113
-
114
-
115
-
116
 |
 |