Sony DCR-TRV260 Computer Applications Guide - Page 25
Managing pictures on a Windows computer, To play the Video CD, For SEL/PUSH EXEC dial models - burn to dvd
 |
View all Sony DCR-TRV260 manuals
Add to My Manuals
Save this manual to your list of manuals |
Page 25 highlights
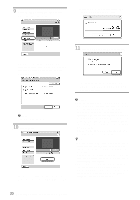
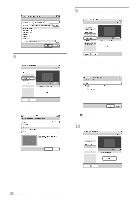
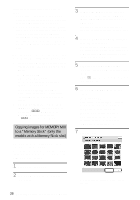
6 For touch panel models, select [BURN VCD] on or of your camcorder. For SEL/PUSH EXEC dial models, press BURN DVD/VCD of your camcorder, then select [VCD] on the [SELECT DISC]. [Picture Package VCD Maker] starts up. The procedure of the menu settings varies depending on the model. 7 Place a new CD-R in the disc drive of the computer. b Note • CD-RWs cannot be used. 8 For touch panel models, select [EXEC] of your camcorder. For SEL/PUSH EXEC dial models, press the dial of your camcorder. . 0:00:00:00 BURN VCD START CREATE VCD? For touch panel models Select [ END] or [NO] of your camcorder. For SEL/PUSH EXEC dial models Press BURN DVD/VCD of your camcorder. The disc tray comes out automatically. . 0:00:00:00 BURN VCD COMPLETED Create another copy? Disctray opens. YES NO To create another Video CD with the same content, follow the on-screen instructions, place a new CD-R in the disc drive, then repeat steps 8 and 9. b Note • The screen varies depending on the model. z Tip • You can also operate steps 8 and 9 from your computer. Managing pictures on a Windows computer EXEC CANCEL The status of the operation on your computer is displayed on the LCD screen of your camcorder. CAPTURING: The picture recorded on the tape is being copied to the computer. CONVERTING: The picture is being converted to the MPEG1 format. WRITING: The picture is being written onto the CD-R. b Notes • The screen varies depending on the model. • You cannot cancel the operation after [Finalizing VCD.] is displayed on the LCD screen of your camcorder. 9 Follow the steps below to finish creating a Video CD. b Notes • The importing of the picture stops automatically, when there is a blank portion of 10 seconds or longer on the tape. • Select a hard disk that has enough space (more than about 6 GB) for the [Temporary folder] on the [Options] screen. • Once you have created a Video CD, you cannot add images to the same CD-R. • There may be a few second-break about every 10 minutes on the created Video CD. This is due to the AVI format used to create the Video CD, which divides a picture every 10 minutes (about 4 GB) to write it on a CD-R. • The picture being written onto the CD-R does not appear on the computer screen. z Tip • The importing of the picture stops automatically when the tape is played to the end. To play the Video CD You can play back the Video CD in one of the following devices. Refer to the operating ,continued Managing pictures on a Windows computer 25
-
 1
1 -
2
-
3
-
4
-
5
-
6
-
7
-
8
-
9
-
10
-
11
-
12
-
13
-
14
-
15
-
16
-
17
-
18
-
19
-
 20
20 -
 21
21 -
 22
22 -
 23
23 -
 24
24 -
 25
25 -
 26
26 -
 27
27 -
 28
28 -
 29
29 -
 30
30 -
31
-
32
-
33
-
34
-
35
-
36
-
37
-
38
-
39
-
40
-
41
-
42
-
43
-
44
 |
 |
