Sony DCR-TRV260 Computer Applications Guide - Page 4

Table of Contents - software

Page 4 highlights

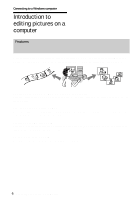
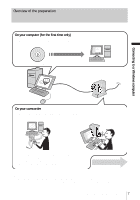
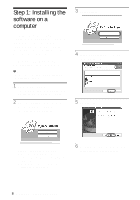
Table of Contents Read this first 2 Connecting to a Windows computer Introduction to editing pictures on a computer 6 Features ...6 Overview of the preparation 7 Step 1: Installing the software on a computer 8 Step 2: Connecting your camcorder to a computer 10 Using the USB cable (supplied) when viewing pictures on a tape 11 Using the USB cable (supplied) when copying pictures on a "Memory Stick 13 Using the i.LINK cable (optional 15 Managing pictures on a Windows computer Copying, viewing and creating pictures 17 Viewing video and pictures on your computer - Picture Package Viewer 17 Creating an original video - Picture Package Auto Video 18 Creating an original slide show - Picture Package Auto Slide 21 Saving the images on CD-R - Picture Package CD Backup 23 Creating a Video CD (Direct Access to Video CD Burn) - Picture Package VCD Maker 24 Copying images for MEMORY MIX to a "Memory Stick" (only the models with a Memory Stick slot 26 Connecting to a Macintosh computer Connecting your camcorder to a computer 28 Copying pictures recorded on a "Memory Stick" (only the models with a Memory Stick slot 29 Installing software on a computer 29 Other functions Creating a DVD (Direct Access to "Click to DVD 30 Connecting an analog VCR to the computer via your camcorder - Digital convert function 33 4

  • 1
  • 2
  • 3
  • 4
  • 5
  • 6
  • 7
  • 8
  • 9
  • 10
  • 11
  • 12
  • 13
  • 14
  • 15
  • 16
  • 17
  • 18
  • 19
  • 20
  • 21
  • 22
  • 23
  • 24
  • 25
  • 26
  • 27
  • 28
  • 29
  • 30
  • 31
  • 32
  • 33
  • 34
  • 35
  • 36
  • 37
  • 38
  • 39
  • 40
  • 41
  • 42
  • 43
  • 44

4
Read this first
.............................................................................................
2
Connecting to a Windows computer
Introduction to editing pictures on a computer
...........................................
6
Features
......................................................................................................................
6
Overview of the preparation
........................................................................................
7
Step 1: Installing the software on a computer
............................................
8
Step 2: Connecting your camcorder to a computer
..................................
10
Using the USB cable (supplied) when viewing pictures on a tape
............................
11
Using the USB cable (supplied) when copying pictures on a “Memory Stick”
...........
13
Using the i.LINK cable (optional)
...............................................................................
15
Managing pictures on a Windows computer
Copying, viewing and creating pictures
....................................................
17
Viewing video and pictures on your computer
– Picture Package Viewer
...................................................................................
17
Creating an original video
– Picture Package Auto Video
............................................................................
18
Creating an original slide show
– Picture Package Auto Slide
..............................................................................
21
Saving the images on CD-R
– Picture Package CD Backup
............................................................................
23
Creating a Video CD (Direct Access to Video CD Burn)
– Picture Package VCD Maker
...........................................................................
24
Copying images for MEMORY MIX to a “Memory Stick” (only the models
with a Memory Stick slot)
....................................................................................
26
Connecting to a Macintosh computer
Connecting your camcorder to a computer
..............................................
28
Copying pictures recorded on a “Memory Stick”
(only the models with a Memory Stick slot)
.........................................
29
Installing software on a computer
............................................................
29
Other functions
Creating a DVD (Direct Access to “Click to DVD”)
...................................
30
Connecting an analog VCR to the computer via your camcorder
Digital convert function
...................................................................
33
Table of Contents