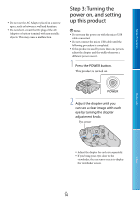
Sony DEV-50 Digital Recording Binoculars Handbook - Page 16
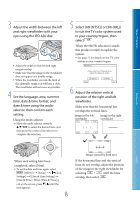
Select [Run]., Adjust the 3D lens., Type of subjects that should
 |
View all Sony DEV-50 manuals
Add to My Manuals
Save this manual to your list of manuals |
Page 16 highlights
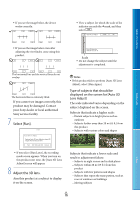
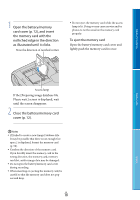
Table of Contents If you see the image below, the device works correctly. View a subject for which the scale of the indicator exceeds the mark, and then select . If you see the image below even after adjusting the viewfinder, cease using this product. The horizontal line and the vertical lines do not overlap. The horizontal line is extremely tilted. If you cannot see images correctly, this product may be damaged. Contact your Sony dealer or local authorized Sony service facility. 7 Select [Run]. Scale Do not change the subject until the adjustment is completed. Notes If this product fails to perform [Auto 3D Lens Adjust], select [Run Again]. Type of subjects that should be displayed on the screen for [Auto 3D Lens Adjust] The scale indicated varies depending on the subject displayed on the screen. Subjects that indicate a higher scale: Distant subjects in bright places such as outdoors Subjects farther away than 20 m (65 ft.) from this product Subjects with various colors and shapes Menu Lists Index If you select [Run Later], the recording mode screen appears. When you turn on this product next time, the [Auto 3D Lens Adjust] screen will appear. 8 Adjust the 3D lens. Aim this product at a subject to display it on the screen. Subjects that indicate a lower scale and result in adjustment failure: Subjects in night scenes and in dark places Subjects within 20 m (65 ft.) from this product Subjects with few patterns and shapes Subjects that repeat the same pattern, such as rows of windows on buildings Moving subjects GB 16
-
 1
1 -
2
-
3
-
4
-
5
-
6
-
7
-
8
-
9
-
10
-
 11
11 -
 12
12 -
 13
13 -
 14
14 -
 15
15 -
 16
16 -
 17
17 -
 18
18 -
 19
19 -
 20
20 -
 21
21 -
22
-
23
-
24
-
25
-
26
-
27
-
28
-
29
-
30
-
31
-
32
-
33
-
34
-
35
-
36
-
37
-
38
-
39
-
40
-
41
-
42
-
43
-
44
-
45
-
46
-
47
-
48
-
49
-
50
-
51
-
52
-
53
-
54
-
55
-
56
-
57
-
58
-
59
-
60
-
61
-
62
-
63
-
64
-
65
-
66
-
67
-
68
-
69
-
70
-
71
-
72
-
73
-
74
-
75
-
76
-
77
-
78
-
79
-
80
-
81
-
82
-
83
-
84
-
85
-
86
-
87
-
88
-
89
-
90
 |
 |
